Don’t you just hate it when you snap an awesome photo with your iPhone only to discover that there’s something in it making it not so awesome?
In this tutorial, we will help you remove unwanted objects from your photos using the new Apple Intelligence Clean Up feature or a free third-party app.

Maybe it’s a memorable family photo at the beach where a passerby decided to photobomb you. Or, it could be a dilapidated building messing up a gorgeous skyline picture. Sure, you can open the photo on your computer when you have time and use software like Photoshop to fix the image. But there are quicker ways.
Using Apple’s Photos app
Apple has added a Clean Up tool right into the Photos app with the latest iOS 18, iPadOS 18, and macOS Sequoia update. This new feature uses AI to identify the objects in your photo, and then you can simply highlight items one by one to remove them. The area from where you removed the unwanted object is intelligently filled with generated content based on the surrounding background.
You can use the Clean Up tool on iPhone 15 Pro and 15 Pro Max running iOS 18.1 beta 3 (22B5034e) or newer and an iPad or Mac with Apple silicon chip (M1, M2, M3, M4) that’s running iPadOS 18.1 beta 3 (22B5034e) or later or macOS Sequoia 15.1 beta 3 (24B5035e) or later.
Before you get to the steps, make sure you have enabled Apple Intelligence on your supported device from Settings > Apple Intelligence & Siri.
1) Open the Photos app on your iPhone, iPad, or Mac and tap an image.
2) If you’re on an iPhone or iPad, tap the edit icon from the bottom. On Mac, just hit the Edit button from the top right.
3) Go to the Clean Up tab.

If you are here for the first time, your phone or computer will download the necessary files and then take a moment to prepare it. Note that this is a one-time process.
4) Run your finger over the object to highlight it, and then lift your finger. The selected object will be removed from the image.
You can also tap or circle the object you want to remove. If the object in question is very small, use two fingers to zoom in and then tap, brush, or circle the unwanted object you want to remove.
Tip: Unlike iPhone and iPad, the Clean Up tool on Mac lets you select a brush size. So, do that to highlight the unwanted object with precision.

5) Repeat step 4 to remove all the unwanted objects from your image.
If you’re removing a person or object that has a shadow, remember to run your finger over this shadow and eliminate that as well.
You can also undo a change by tapping the arrow button or hit the Reset button to start over.
6) Once you’re happy with the results, tap Done to save this new image.

Live Photos cannot have Clean Up effects
You can use the Apple Intelligence Clean Up tool to remove unwanted objects from a Live Photo, but the final image will be saved as a still picture with Live effects turned off. If you try to turn back the Live effect, it shows a banner informing you that Clean Up effects will be removed.

Modified with Clean Up label
When you swipe up or tap the info button ⓘ for an image that has been altered with the Clean Up tool, a new ‘Modified with Clean Up’ tag appears there. If you select this image in Finder on Mac and press Command + I, the Credit section shows Apple Photos Clean Up.

Revert the change
Like other edits in the Apple Photos app, modifications you make with the Clean Up tool can be reverted, letting you get back the original image. Simply open the image, tap the edit icon, and hit the red Revert button.

Note that the “Modified with Clean Up” tag seems to stay even after you have reverted the changes.
Clean Up tool could be better!
I used Clean Up to remove objects from several images on my iPhone, iPad, and Mac and faced some issues along the way.

- First off, the results are inconsistent and no better than what a free, decently-rated third-party app produces.
- When you run your finger to select something, it may not highlight that object, leaving you clueless without visual confirmation. This particularly happens when you zoom in significantly on the image, or the picture is huge in size and resolution.
- While Clean Up is a part of “Apple Intelligence,” it shows no intelligence at times and leaves the shadow in place. As a result, you have to run the finger over the shadow to remove it, adding an extra step. In some cases, it’s even impossible to remove the shadow!
- The Clean Up tools are downloaded just once, but they seem to take a moment to prepare every time I close the Photos app and return to use Clean Up. On some occasions, the “Preparing Clean Up” stays on the screen for a significant time, like a minute! Other times, it gets stuck, and I have to quit and reopen the Photos app.
Clean Up not getting ready to use?
When you go to the Clean Up section for the first time, it will download the necessary files over Wi-Fi. This download does not seem to happen over cellular data (5G or 4G), even if you have allowed more data in cellular settings. So, the first time you use Clean Up, remember to connect your iPhone or iPad to Wi-Fi.
Use a free app to remove unwanted objects from your iPhone photos
TouchRetouch (or simply Retouch) is an excellent iOS app that lets you remove objects, cover up blemishes, and get rid of lines in your photos right on your iPhone or iPad. This way, you can edit your pictures in a few taps and send them via text message or post them on social media within minutes.
Remove unwanted objects from the photo
- Open the Retouch app on your iPhone or iPad and allow it to access your photos. After that, select the image that needs unwanted photo removal.
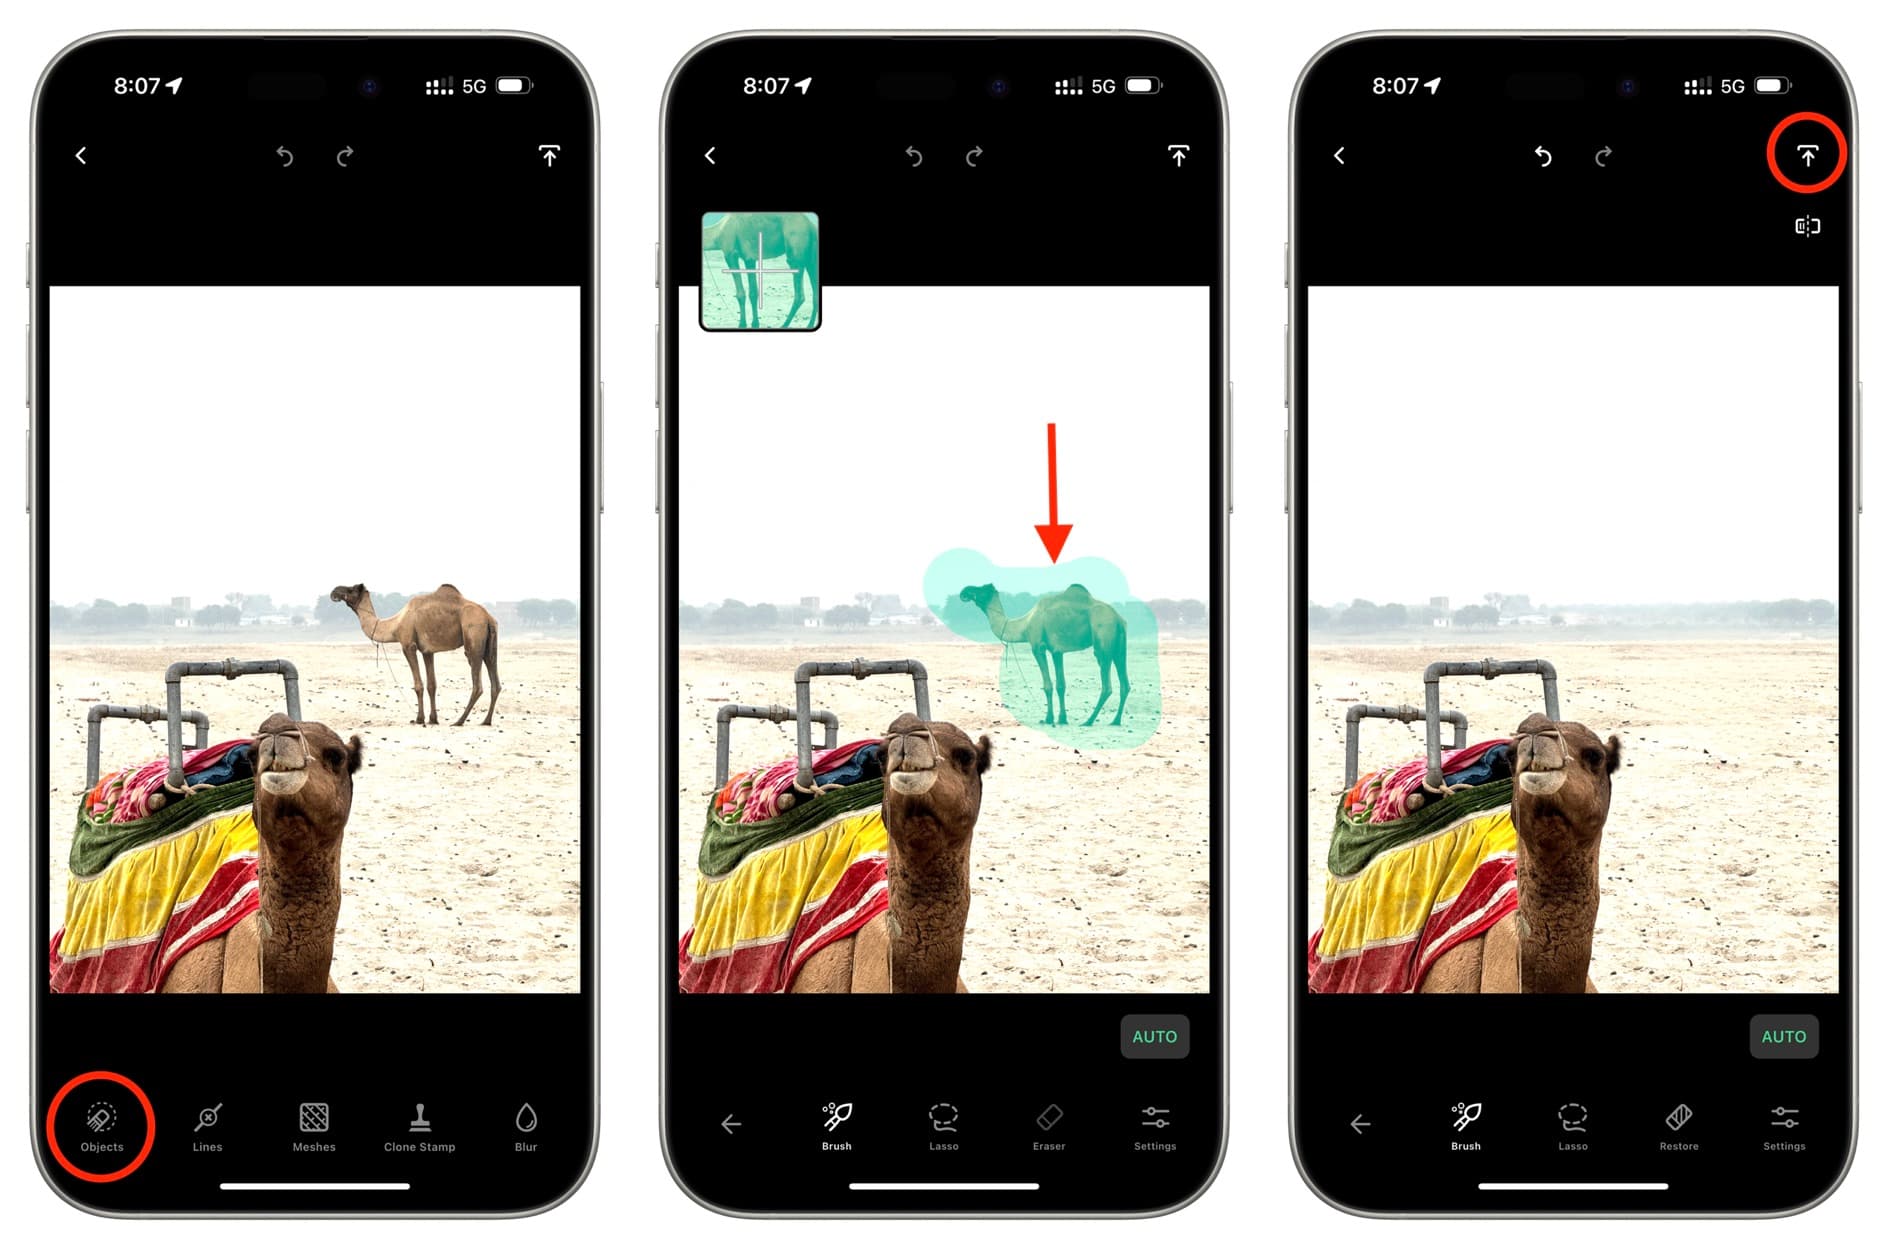
- Select the Objects tool.
- Now, select Brush and run your finger over the object you want to remove. You can also use the Lasso tool to draw an outline around the object.
- The app should start the removal process as soon as you finish selecting the unwanted object. If not, hit the GO button.
- In case you have selected too much, click the undo button and then use the Eraser tool to unhighlight the extra green areas. You can also tap Settings and adjust the Brush size.
- Once you’re happy with the results, tap the share icon from the top right and pick Save as Copy or Modify Original.
Remove meshes from your photos
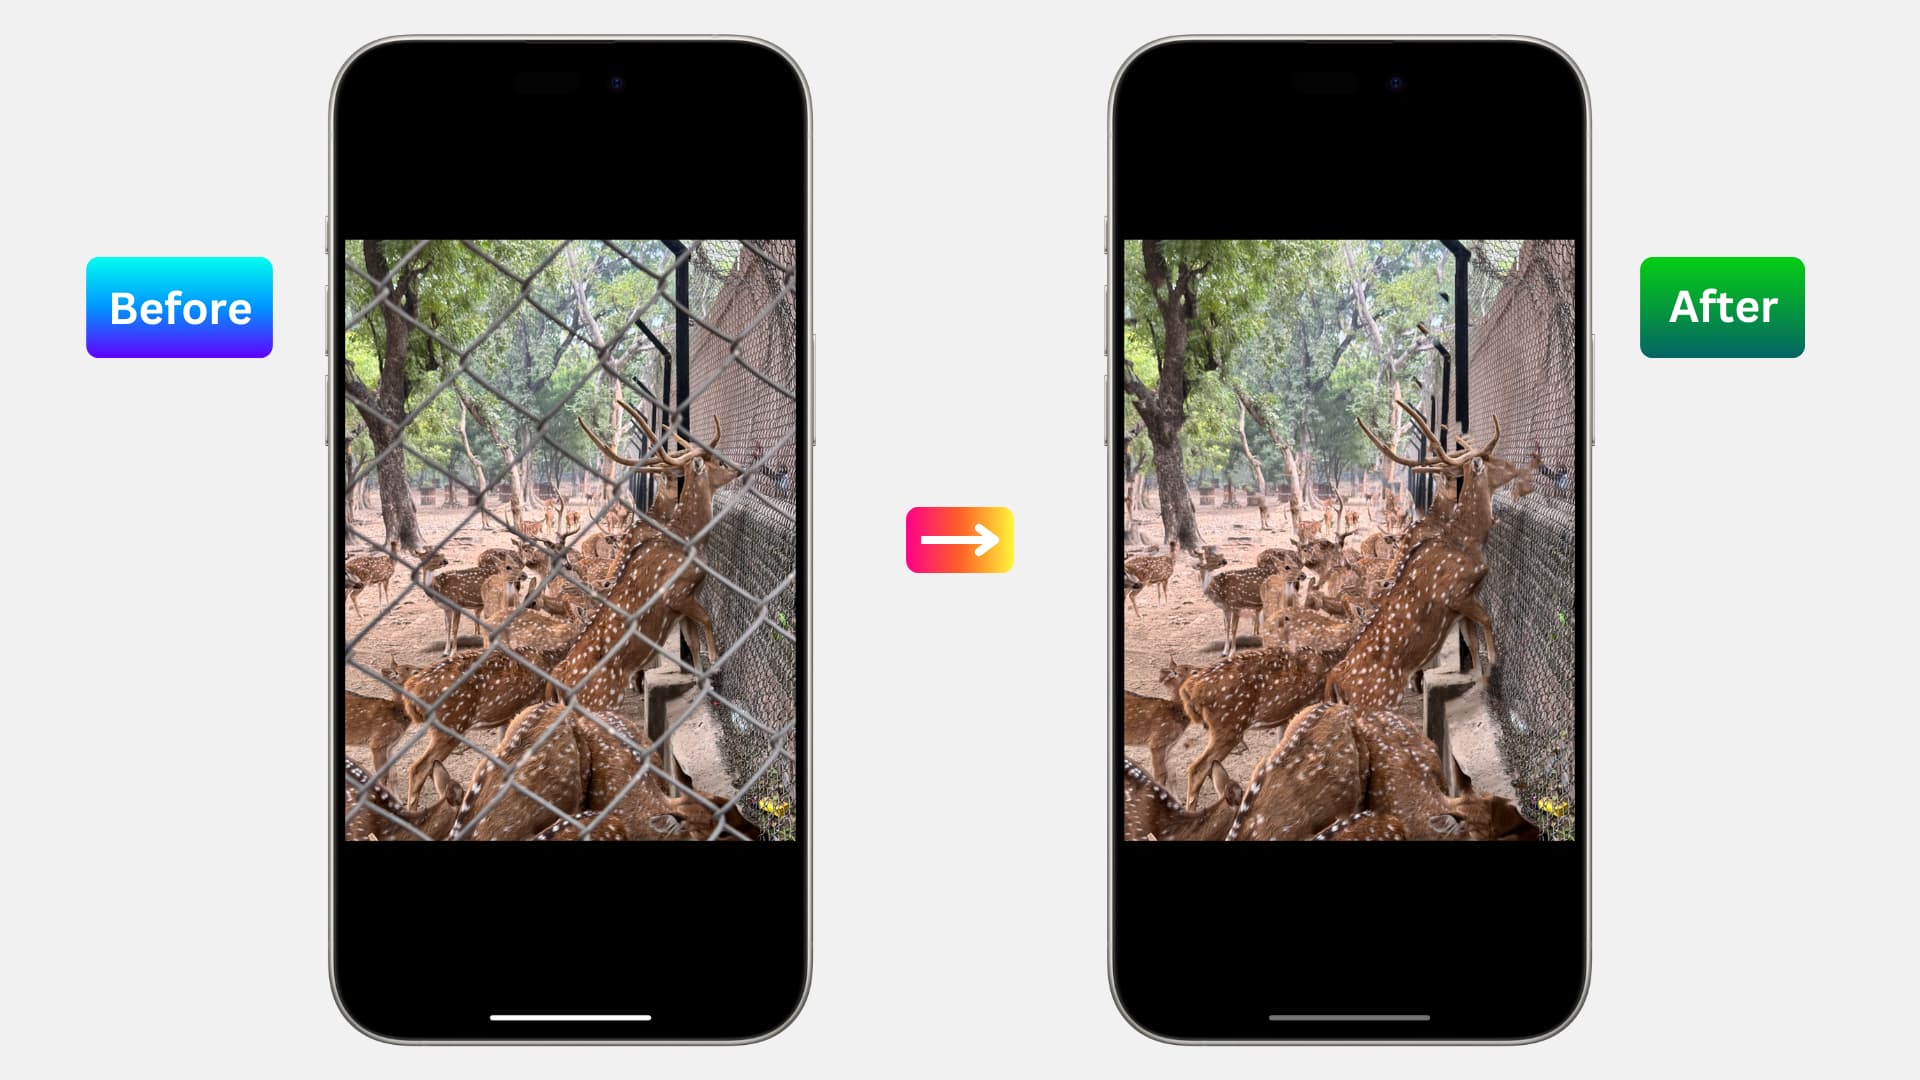
A few months back, I visited a zoo and took a picture of a deer herd on my iPhone 15 Pro Max. The only problem was that there was a high cage between them and me. Thankfully, I can remove the cage in just a few taps! Here’s how.
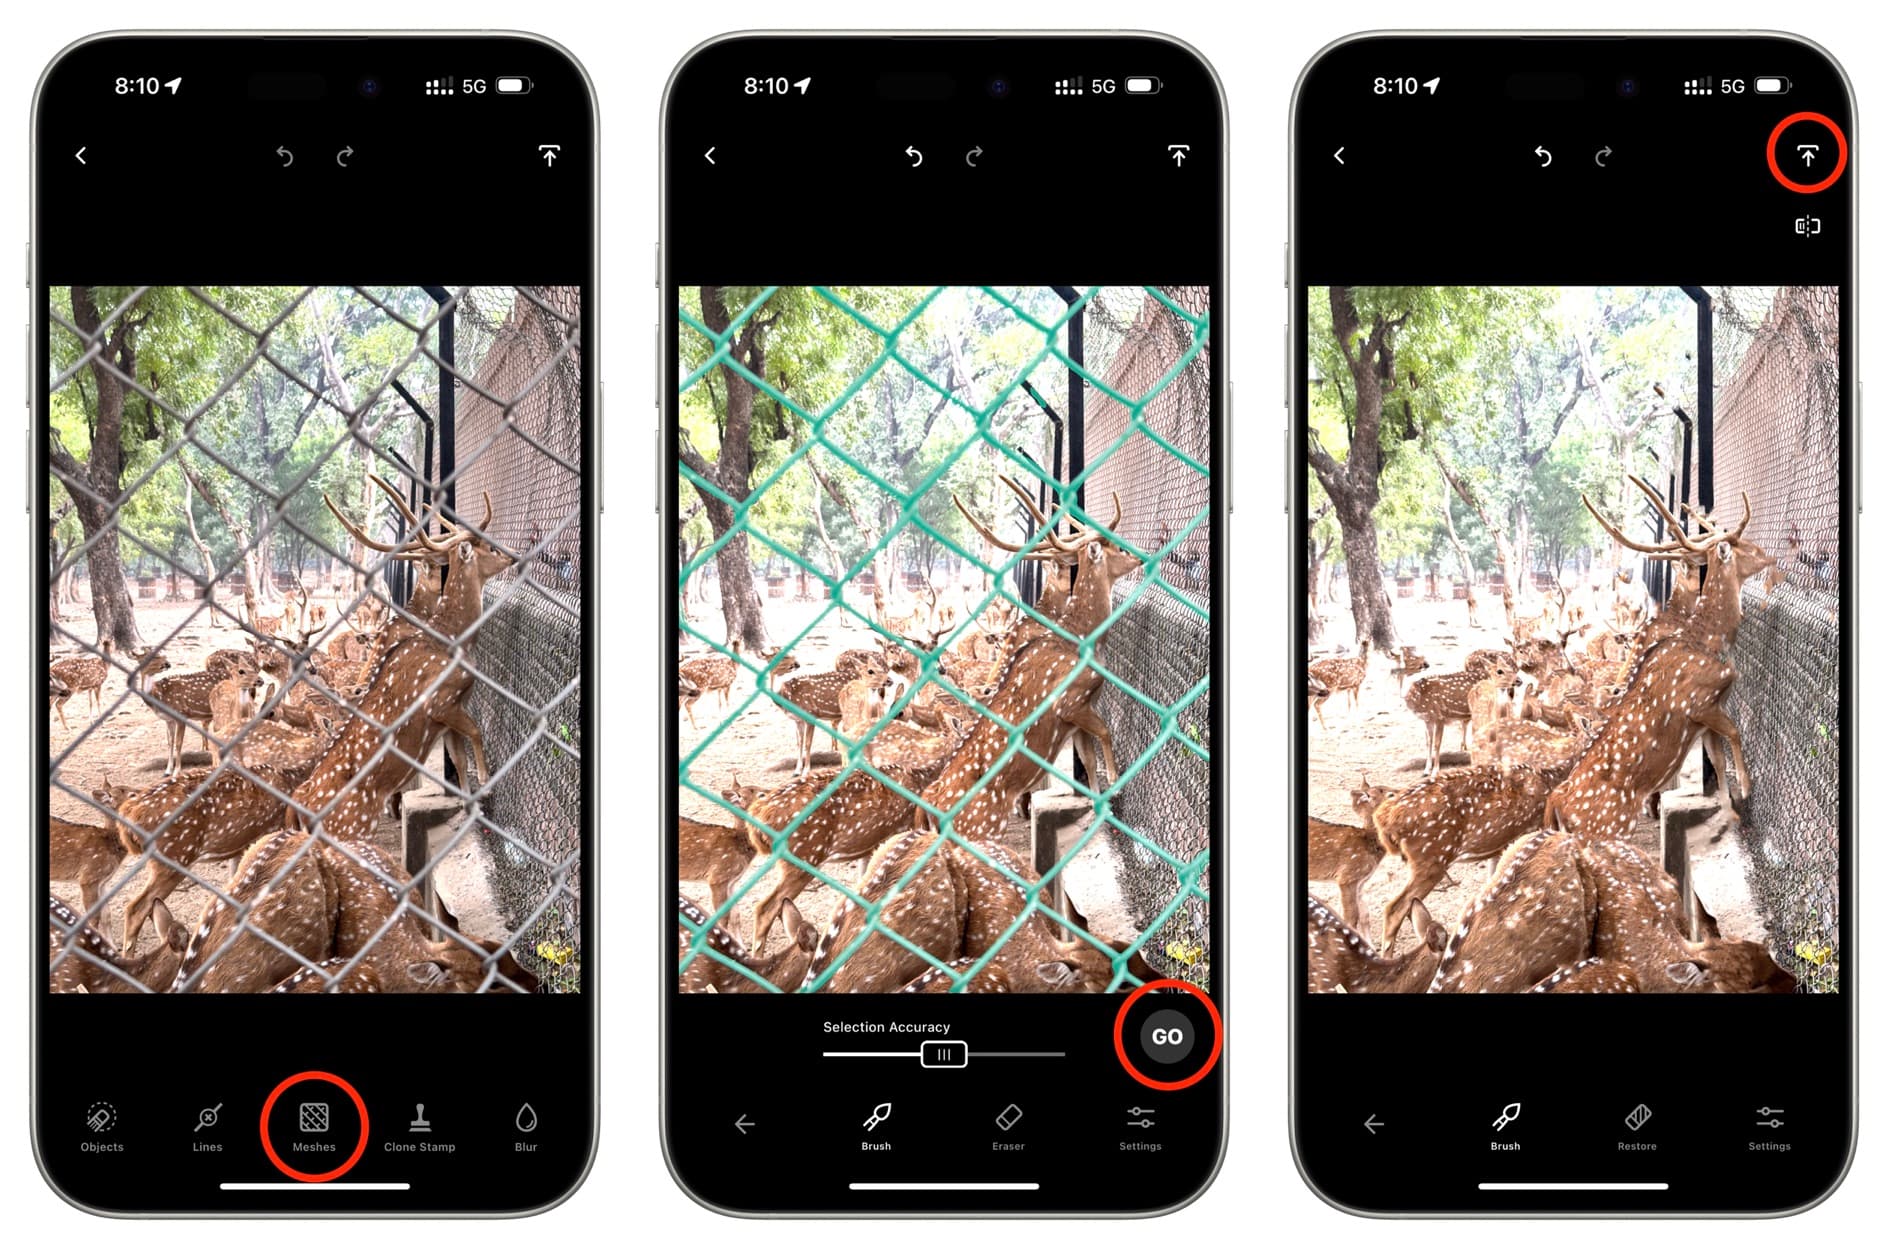
- Open the picture in the Retouch app.
- Select the Meshes tool, and the app will almost certainly recognize the mesh correctly and highlight it in green.
- Tap the GO button and tada, the object is gone!
- Hit the share button to save this image without the distracting mesh.
Remove lines from the picture
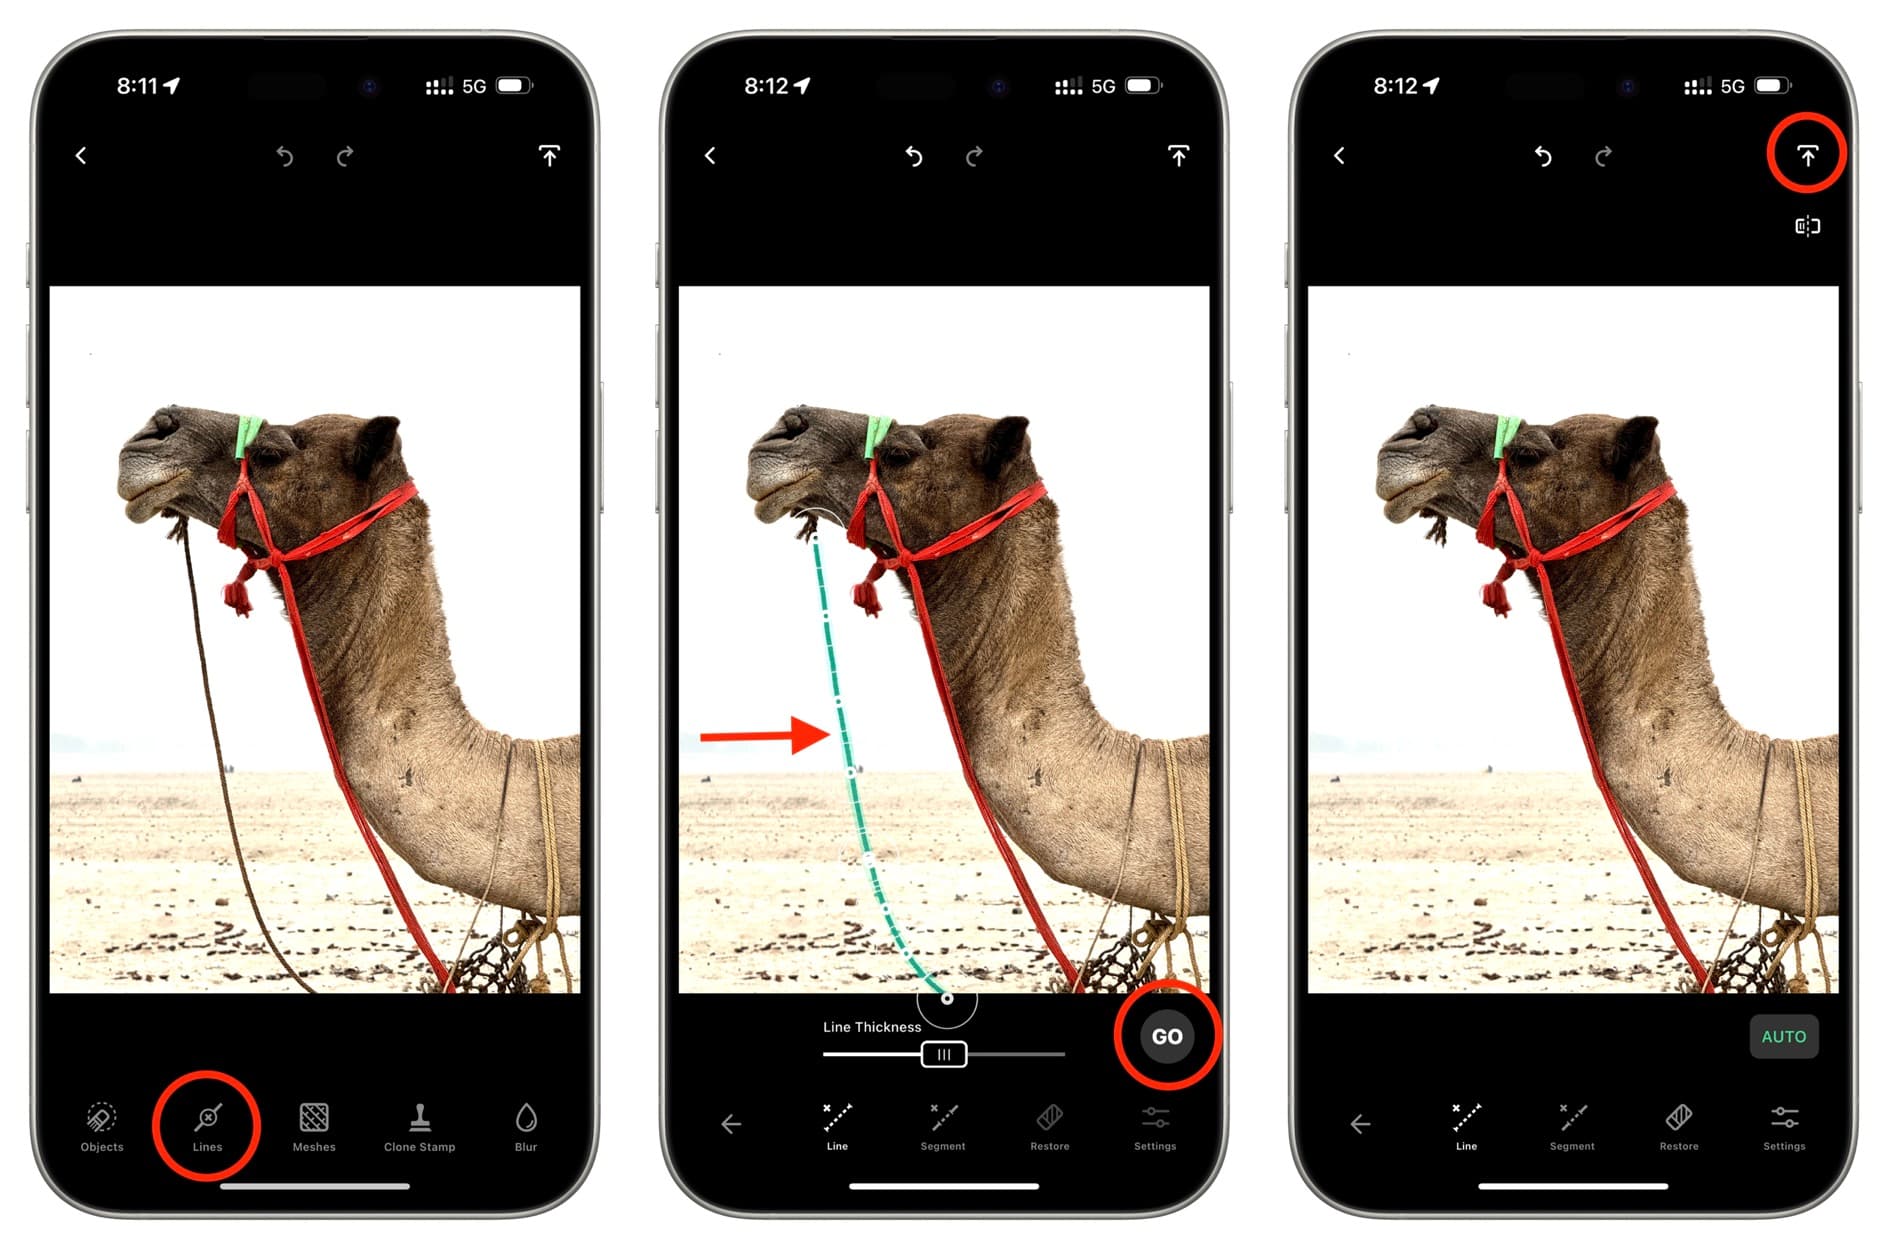
You can use this method to remove straight or curved lines from your image. For instance, it can get rid of electrical wires in your photo. However, for this tutorial, I will demonstrate by editing out the extra rope from the camel’s face to clean up the image.
- Open the image with lines or ropes in the TouchRetouch app on your iPhone or iPad.
- Pick the Lines tool.
- Use a finger to draw over or near the line or rope. The app will select it automatically and remove it. If not, hit the GO button.
- Tap the share icon to save the final picture without the distracting lines.
As you can see in the images above, TouchRetouch does a great job of removing unwanted things from your photos. And it really only takes a few minutes. So, you don’t have to wait until you get home from vacation or a special occasion to edit photos on your computer before sharing them.
Do more with Apple Intelligence: