Follow these AirPods Pro tips and tricks to ensure good seal and adjust essential settings like noise control, spatial audio, location tracking, hands-free Siri and more.
Keep in mind that some features are exclusive to the second-generation AirPods Pro. To access the AirPods settings, connect them to your iPhone, open the Settings app, and touch their name below your Apple account at the top. Or, select the Bluetooth section and hit the ⓘ (Info) button next to the AirPods name.

1. Answer or decline calls with head gestures
The AirPods Pro 2 and AirPods 4 support head gestures; you can pick up an incoming call by nodding your head up and down or decline by shaking it side to side. For this to work, go to Settings > Apple Intelligence & Siri or Settings > Siri, choose Announce Calls, and turn it on. Next, go to the AirPods settings and turn on the Head Gestures switch (detailed steps in our dedicated guide).

2. Adjust the volume
Force sensors in the AirPods Pro 2 let you swipe up or down on either stem to increase or decrease the volume. You may need to swipe a few times to hit the right volume level.
3. Learn AirPods playback controls
AirPods support these playback controls:
- Pause and resume: Press either AirPod stem once.
- Skip song: Double-press either AirPod stem.
- Previous song: Triple-press either AirPod stem.
4. Customize call controls
The following AirPods controls are available for calls:
- Answer: Press an AirPod stem once.
- Mute and unmute: Press an AirPod stem once during the call.
- End: Press either AirPod stem twice.
The default setup is practical and easy to memorize. If you disagree, customize the mute/unmute and end call actions in the Call Controls section of the AirPods settings.
5. Block out unwanted noise
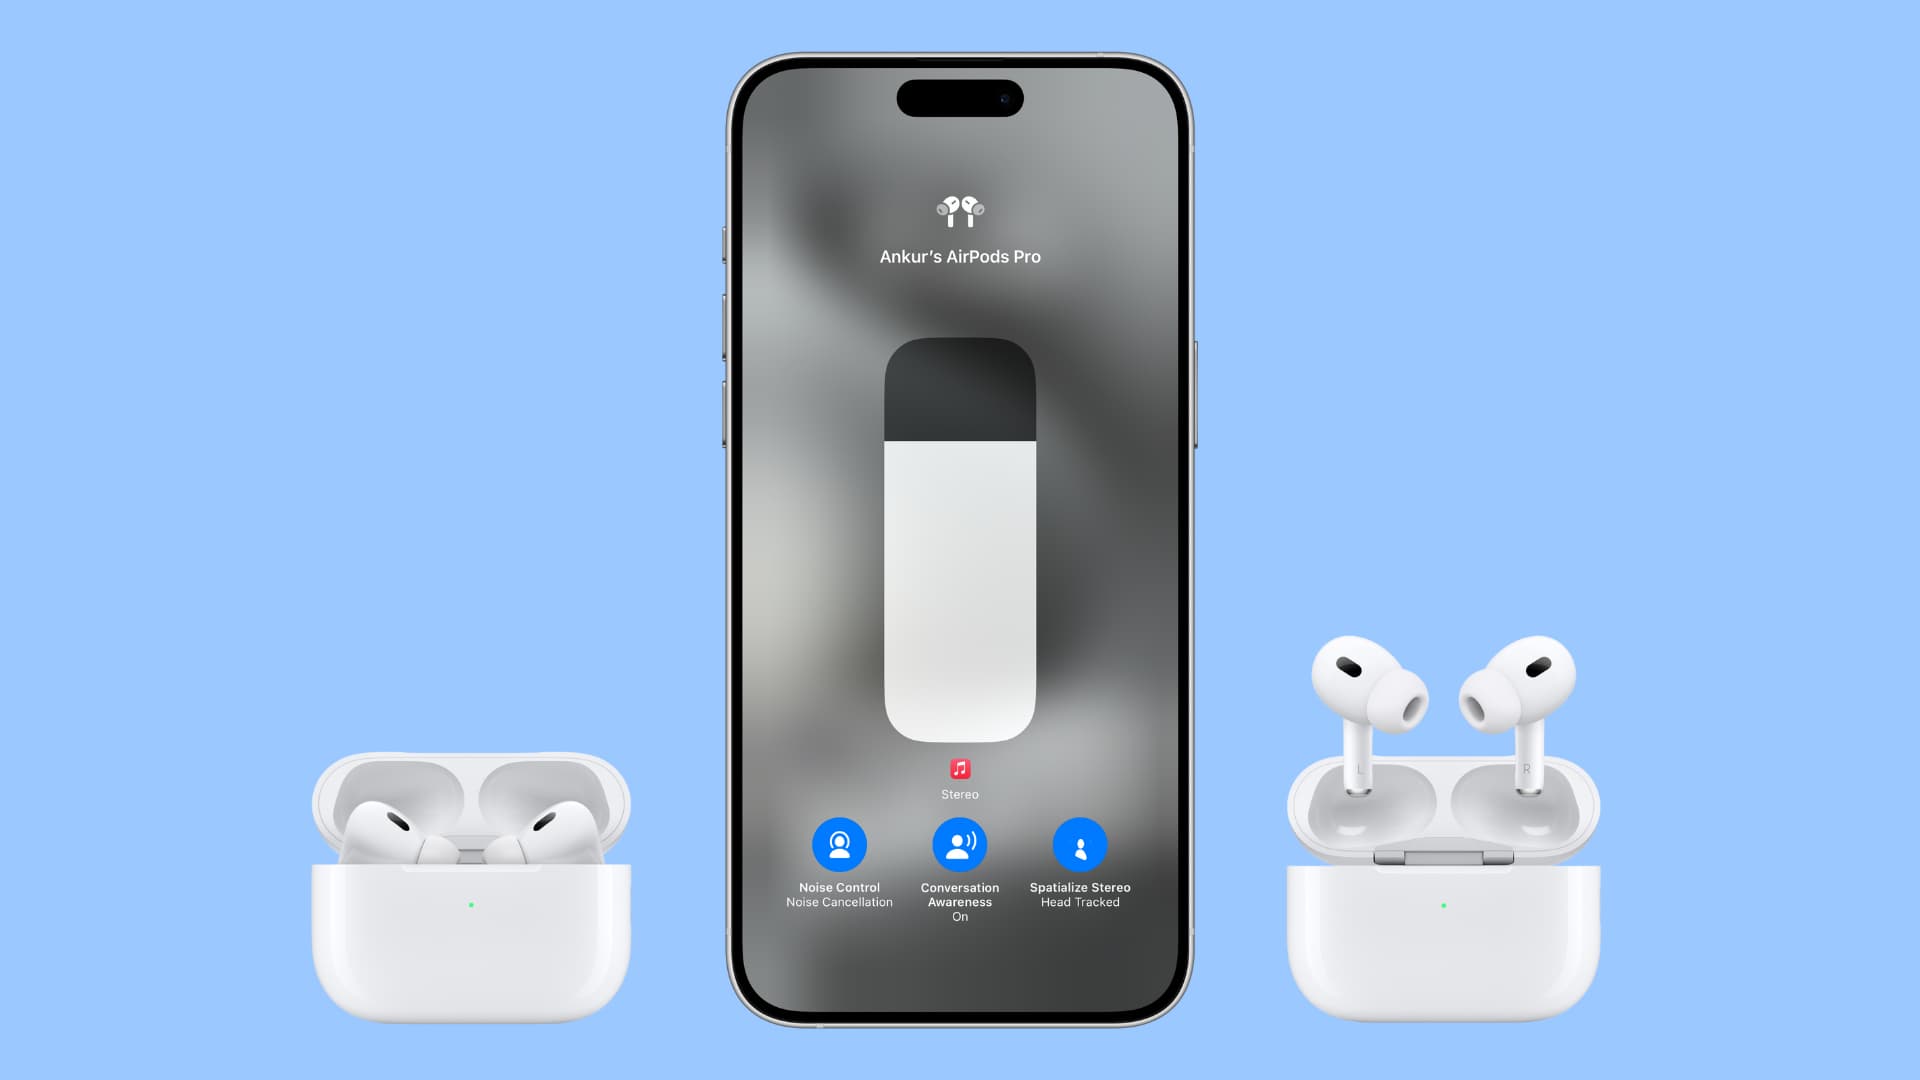
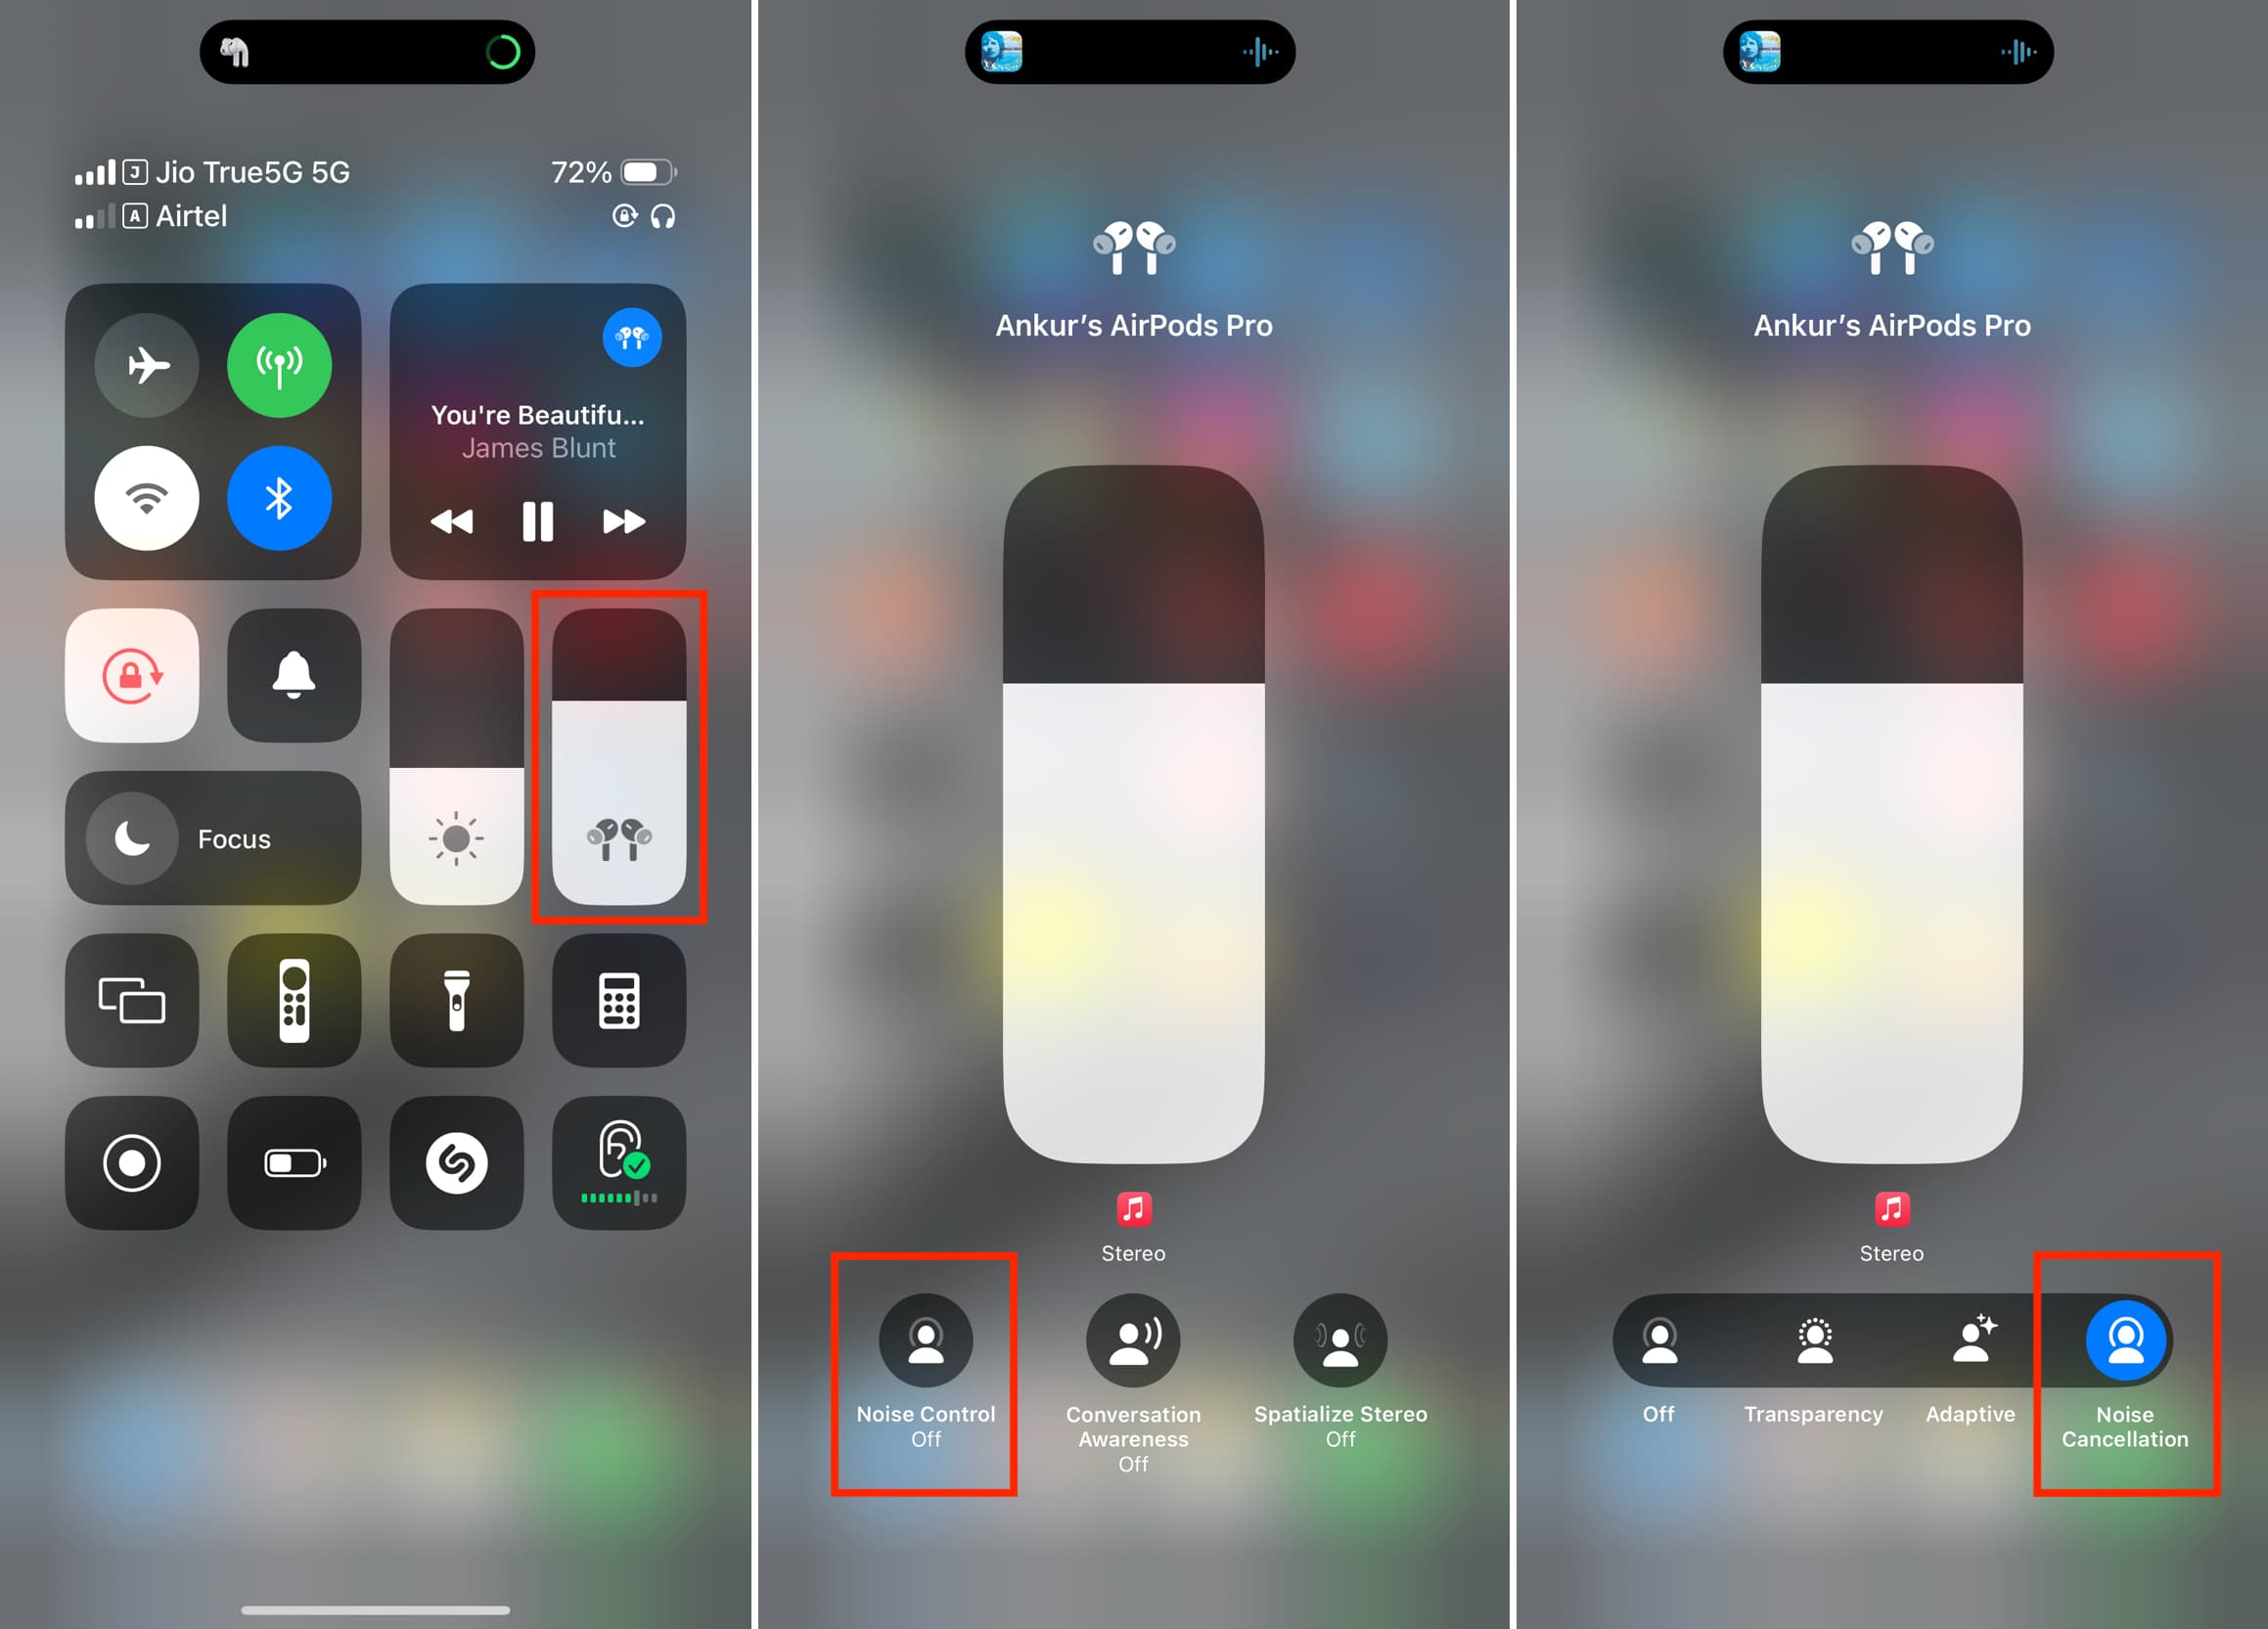
AirPods Pro offers active noise cancellation, making them ideal for use in noisy environments like flights and train rides. Active noise cancellation uses inwardly-faced microphones to help suppress the noise around you, so you can enjoy music with minimal environment sounds. Hit the volume slider in the Control Center to reveal hidden options, then choose Noise Control, and select Noise Cancellation. To use noise cancellation with either left or right AirPod, be sure to turn on Noise Cancellation with One AirPod in the Accessibility section of the AirPods settings.
6. Turn on Transparency mode
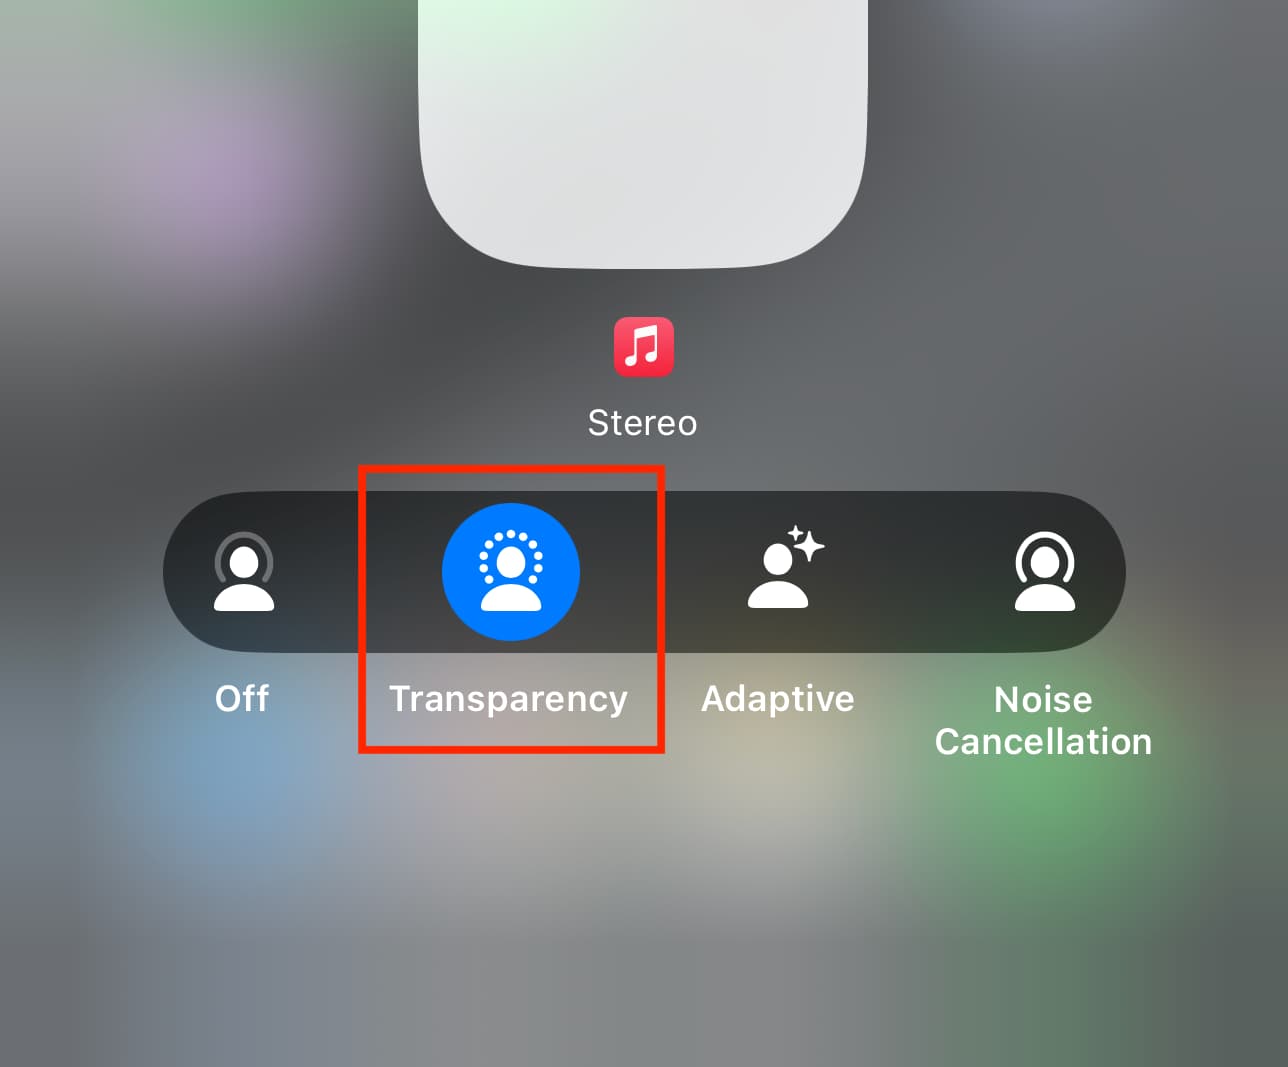
Transparency mode allows certain environment sounds to pass through, so you’re aware of potential dangers in your surroundings. For example, you could be watching a movie with your AirPods on and still hear an oven timer going off. To turn this feature on, hold the volume slider in the Control Center, tap Noise Control, and select Transparency.
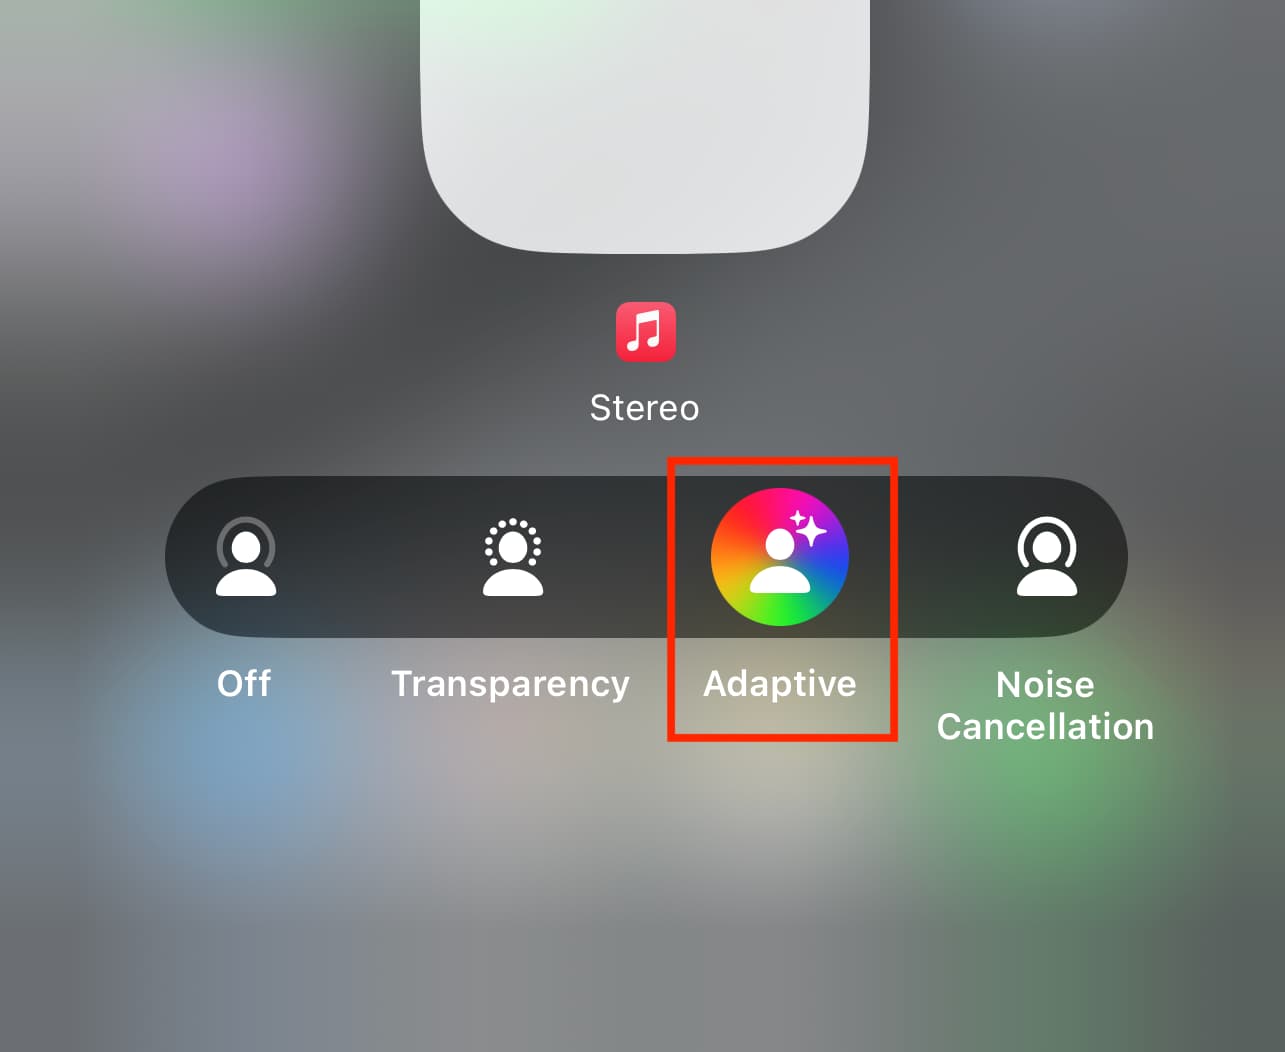
7. Use adaptive noise control
Adaptive noise control on the second-generation AirPods Pro (USB-C and Lightning versions) blends noise cancellation and Transparency mode dynamically based on surrounding noise. Select Adaptive instead of Noise Cancellation or Transparency in the AirPods volume menu. To customize the level of adaptive audio, select Adaptive Audio in the AirPods setting and choose between Less Noise, Default, and More Noise.
8. Take advantage of conversation awareness
Conversation awareness is an AirPods Pro feature that lowers the volume when you start talking while simultaneously enhancing voices around you, so you can hear what the other person is saying without stopping your music. When the conversation ends, the volume level and noise control automatically return to the previous levels. To turn this feature on, hold the volume slider in the Control Center and tap Conversation Awareness. To return the volume to the original level, swipe across or press and hold the stem while the feature is active.

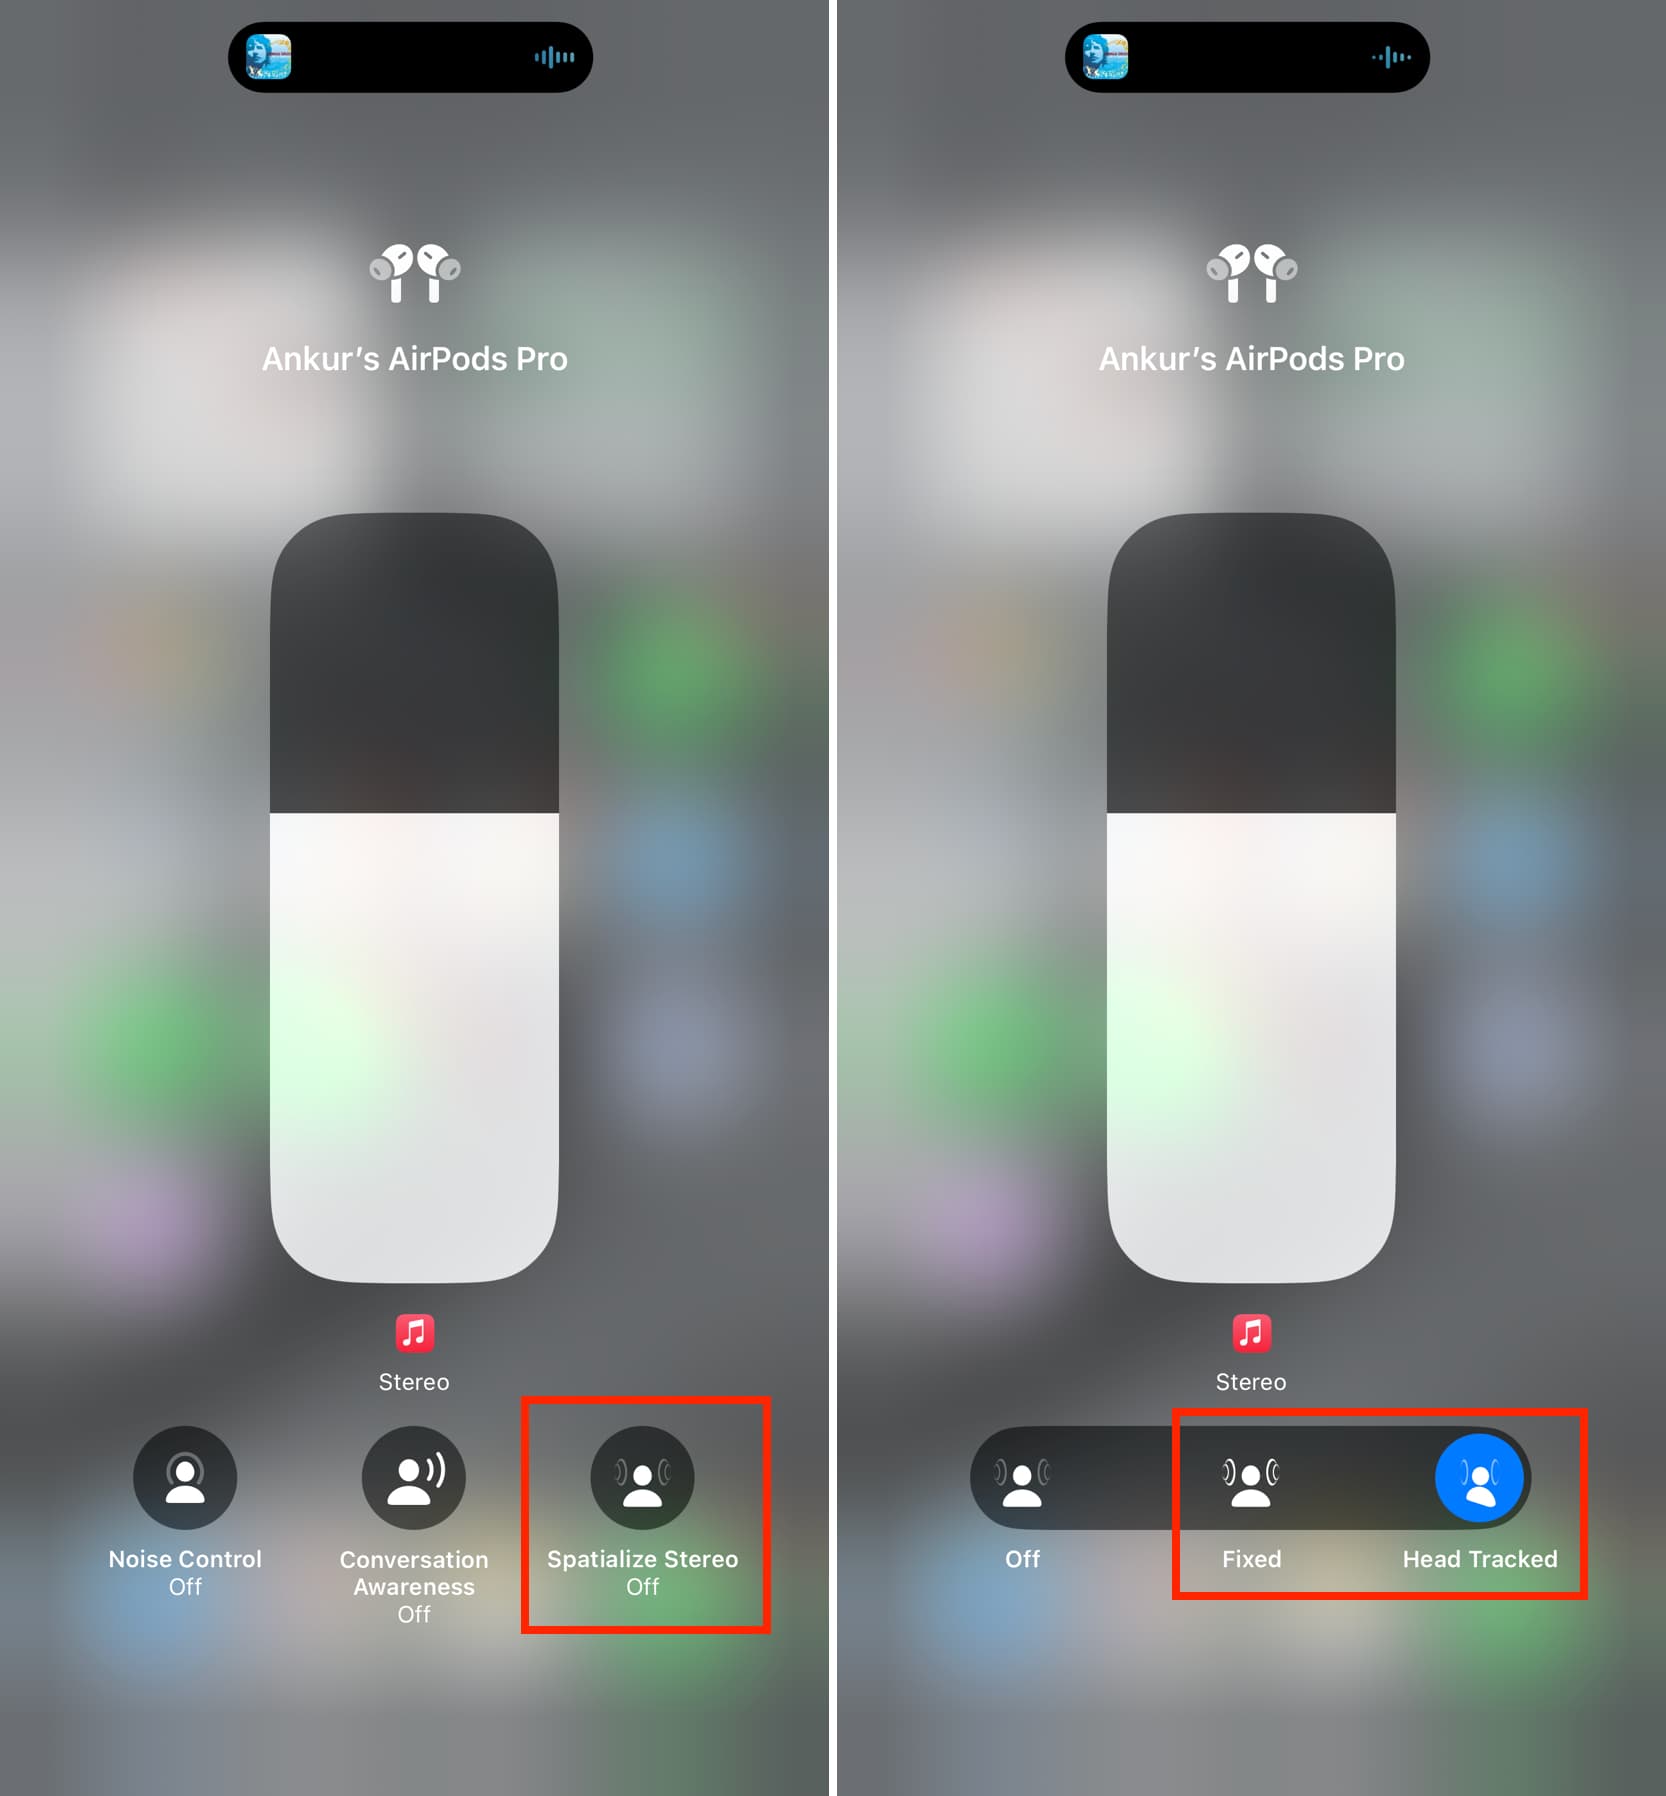
9. Adjust head tacking for spatial audio
Spatial audio creates a faux 3D listening experience with audio filters and effects, making it seem as if the sound was coming from all around you. Spatial audio can also track your head movement: Select Spatial Audio or Spatialize Stereo below the volume slider and choose Fixed or Head Tracked. If you cannot toggle Spatialize Stereo, navigate to Personalized Spatial Audio > Personalize Spatial Audio in the AirPods settings and finish setup.
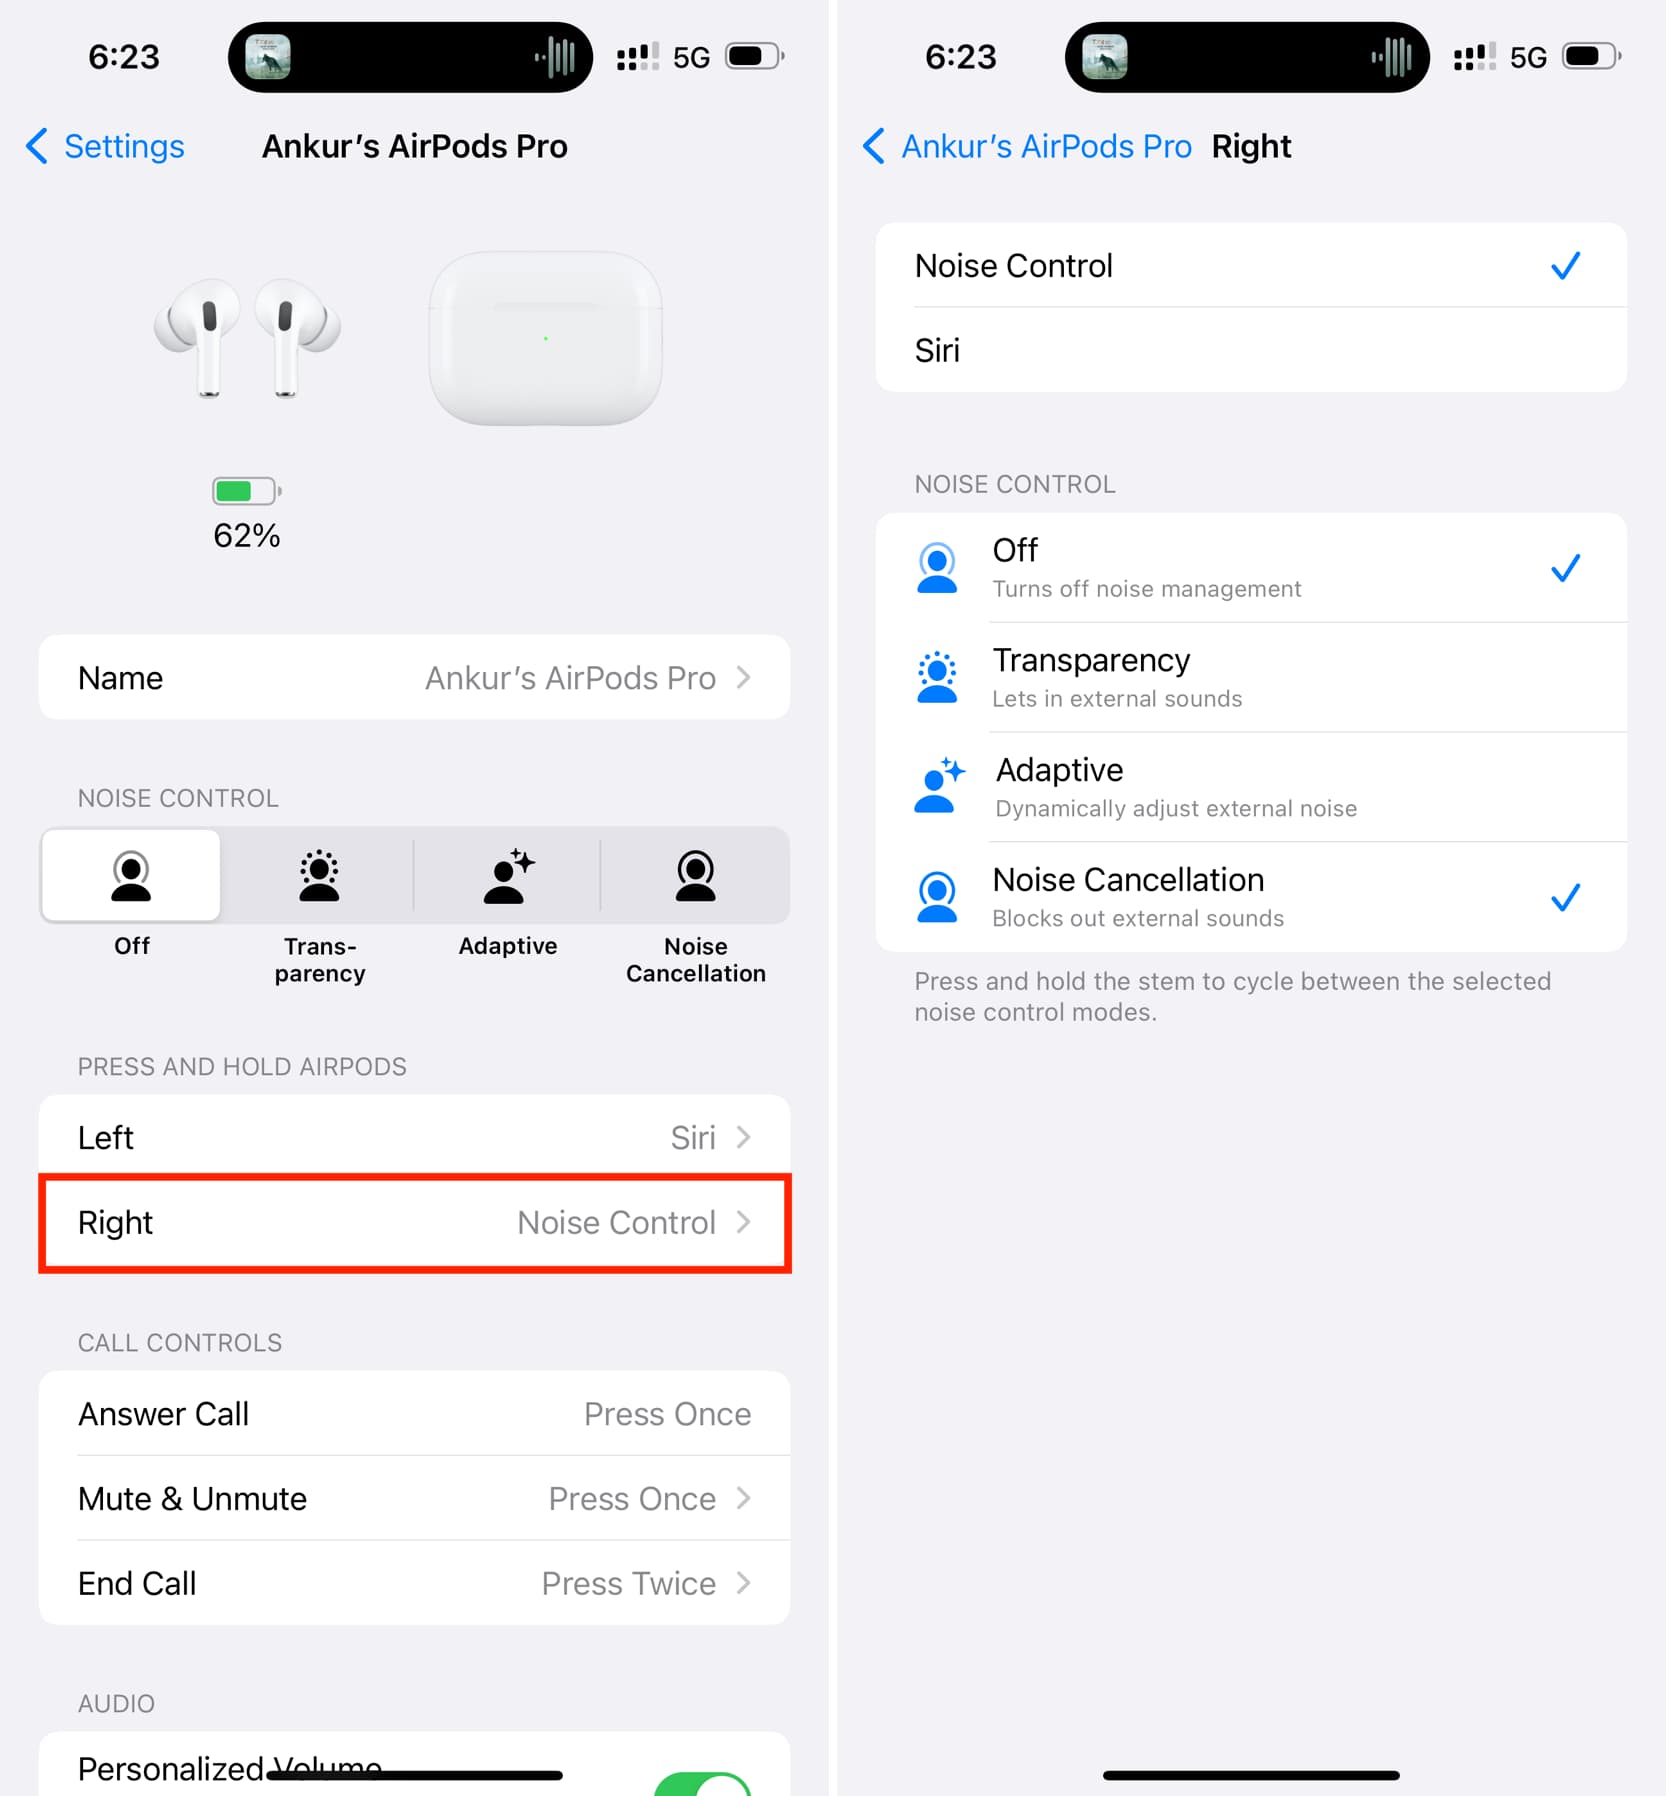
10. Assign Siri or noise control to earbuds
Out of the box, your AirPods will invoke Siri when you press and hold the left stem, with the right stem mapped to noise control, but you can change this in the settings.
11. Pick noise control modes to cycle through
In the AirPod settings, select the earbud assigned to noise control and tick the noise control modes you’d like to cycle through when holding the stem. For example, I’ve restricted my right AirPod to only toggle noise cancellation without cycling through other noise control modes.
To share audio with a friend, connect two sets of AirPods (except the first-generation model), or AirPods Pro, or compatible Beats headphones to your iPhone or iPad.
13. Make AirPods adapt the volume for you
Turn on Personalized Volume in the AirPods settings so the earbuds learn your listening habits over time to adjust the volume based on your surroundings. Here, you can also enable Loud Sound Reduction to protect your hearing from loud sounds.

14. Toggle automatic ear detection
All AirPods models have sensors to automatically pause music when you take one out of your ear and resume playback when you put it back in. To manage this feature, select Automatic Ear Detection in the AirPods settings.
15. Stop AirPods from switching between devices
If you own multiple devices like a Mac, and iPhone and an iPad, your AirPods automatically connect to the device you’re currently using. Some people find automatic device switching annoying. To turn it off, go to the AirPods settings, choose Connect to This iPhone/iPad/Mac and select When Last Connected to This Device instead of Automatically.
16. Manually select the microphone
There are microphones in each AirPod, but only the left or right one is used for calls. If you always use a specific earbud like the right one while keeping your left ear attuned to your surroundings, set it as your default microphone in the Microphone section of the AirPods settings.
17. Find misplaced or stolen AirPods
If you’ve misplaced your AirPods Pro, the Precision Finding feature in the built-in Find My app on an iPhone 11 or later. comes to the rescue. Precision Finding guides you to the exact location of your AirPods if they’re within range, with guidance provided through visual feedback, sound, and haptics. If you suspect your AirPods are stolen or you left them at some place, use the Find My app to see their location on a map.
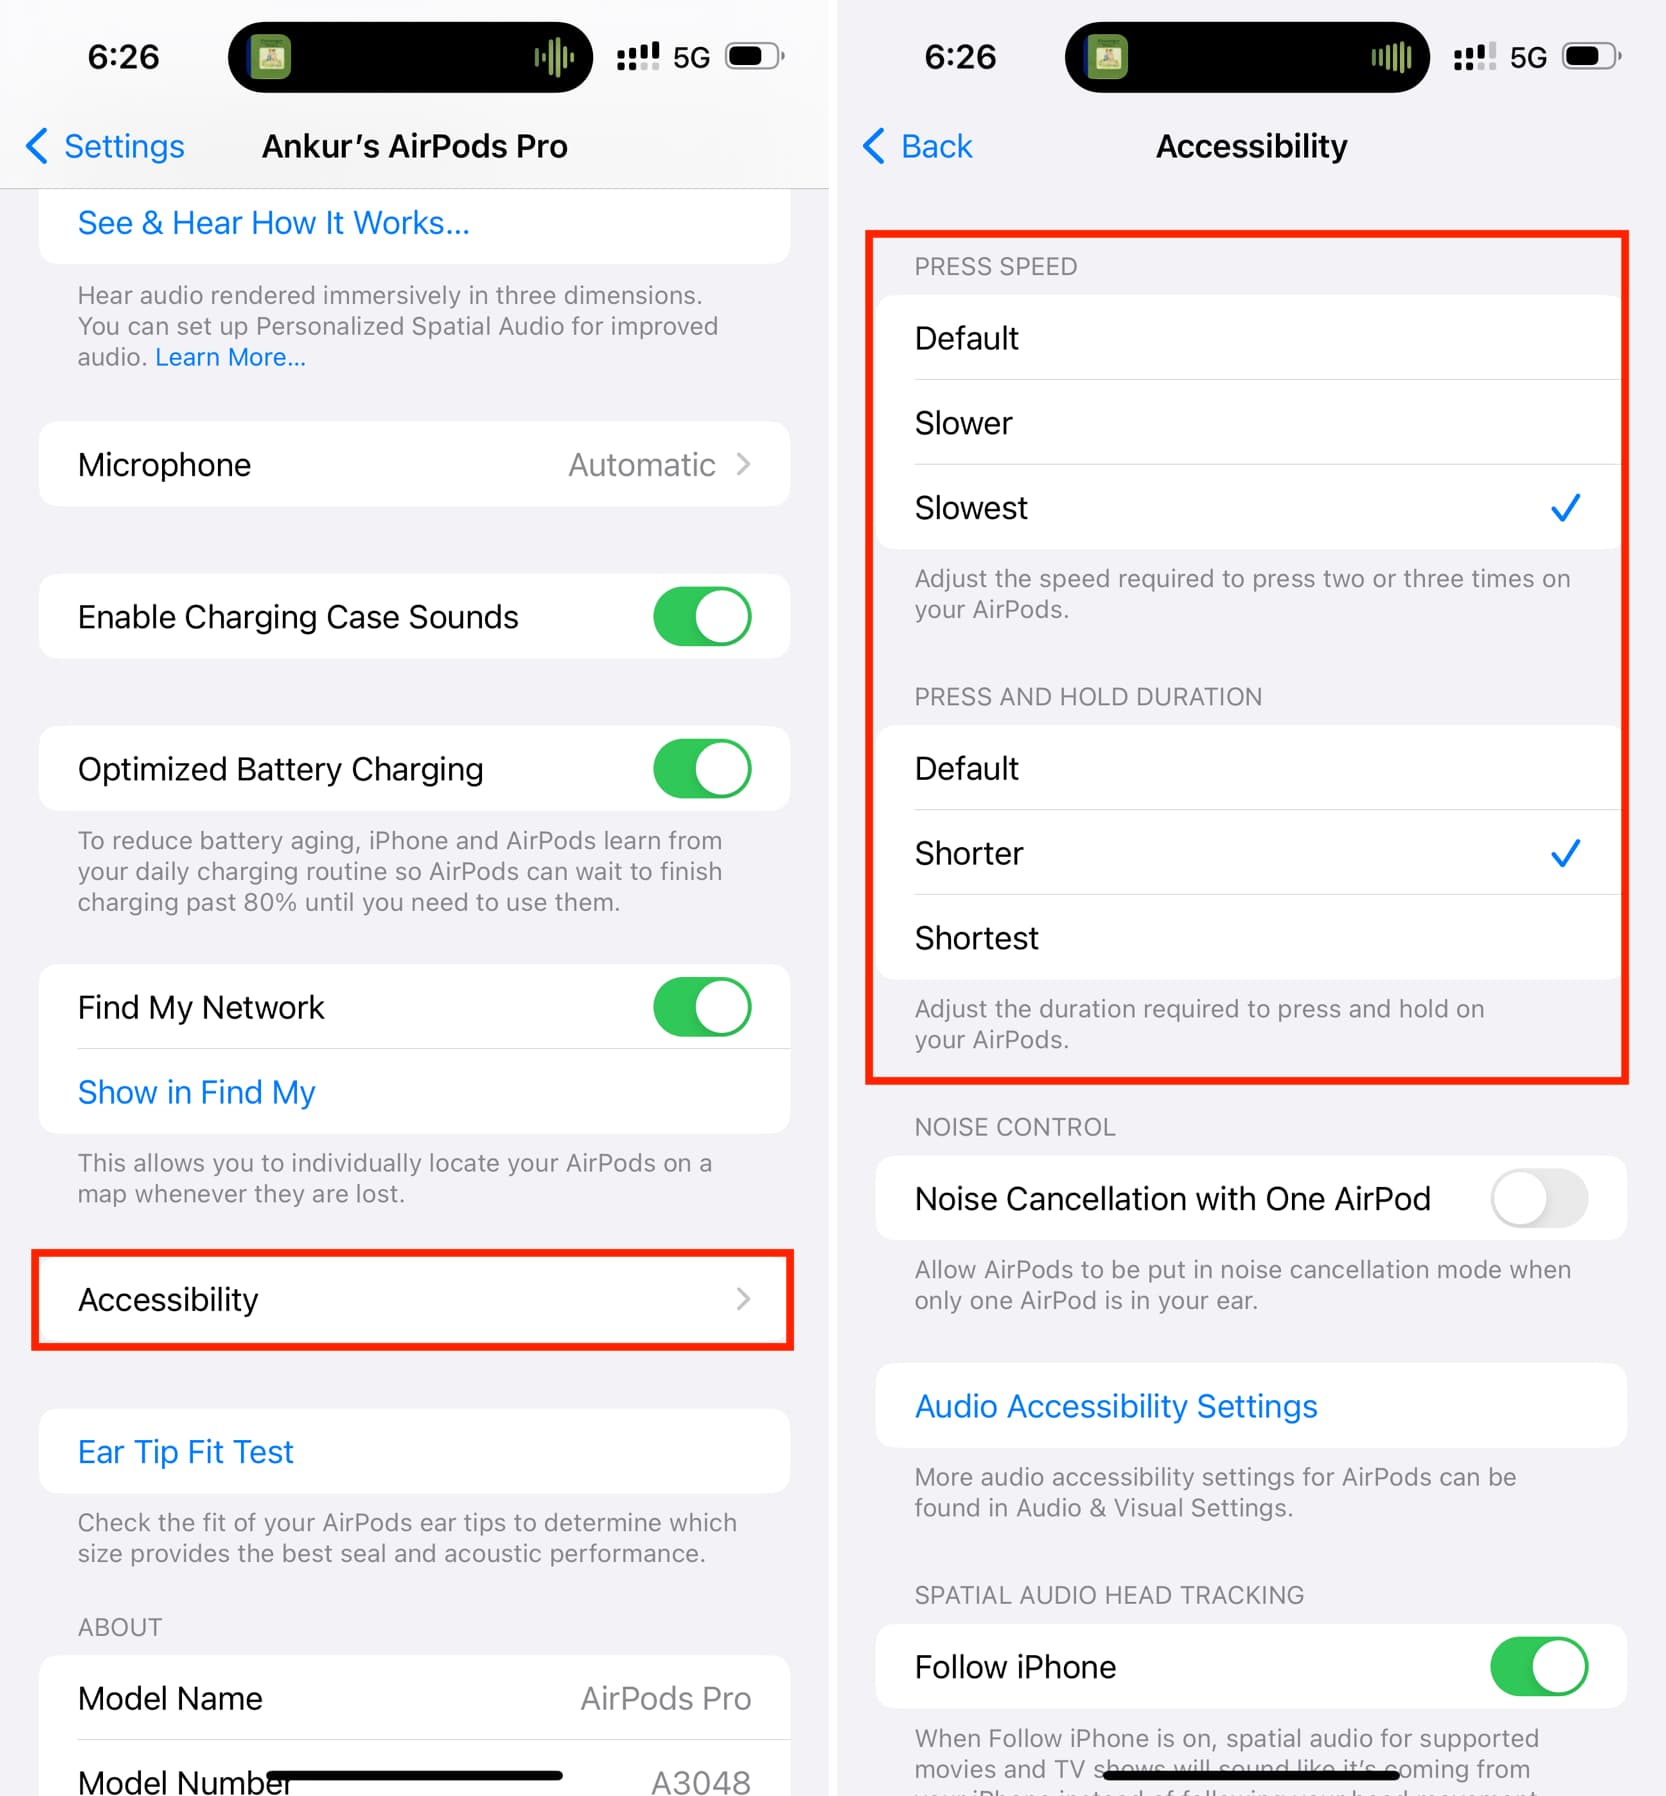
18. Change the press speed
If you have large fingers or find it otherwise challenging to press the tiny stem two or three times in a quick succession, select Accessibility in the AirPods settings and pick Slower or Slowest under the Press Speed heading.
19. Adjust the press and hold duration
To change the duration of the press and hold gesture, choose Shorter or Shortest under the Press and Hold Duration heading in the Accessibility section of the AirPods settings.
20. See the AirPods battery charge
Unlike with older AirPods, AirPods Pro can report battery charge with just one earbud in the charging case.
21. Explore versatile charging options
In addition to wired charging via Lightning or USB-C, you can place your AirPods on your Apple Watch charger or any wireless charger compatible with the MagSafe, Qi, and Qi2 protocols. And for those times when there’s no power source nearby, you can charge your AirPods using your iPhone.

22. Turn on optimized battery charging
The Optimized Battery Charging setting reduces battery aging and extend battery health. This handy feature is turned on by default, and we recommend keeping it on.
23. Limit the volume to protect your hearing
The AirPods Pro’s design and the included silicone tips block outside sounds, which makes them louder. But you don’t want to use your AirPods on full blast for prolonged periods of time, as doing so can damage your hearing. Setting a lower headphone volume limit will help protect your hearing health.
24. Have iPhone announce calls
When you get an incoming call notification on your iPhone while wearing a pair of AirPods or other Bluetooth headphones, Siri can announce caller name. To turn on this feature, go to Settings > Apps > Phone > Announce Calls and select Headphones Only.
25. Boost your conversations
Conversation Boost is a feature designed for people with hearing issues, but anyone can use it. Conversation Boost uses computational audio to boost the voice of the person talking in front of you, so you can hear what they’re saying more clearly.
26. Rename your AirPods
Change the default name of your AirPods to identify them more easily in AirPlay, audio menus and other places.
27. See the warranty left on your AirPods
If you’r wondering how long before your AirPods coverage expires, check the remaining warranty period for your Apple devices in the Setting app.
28. Run an ear tip fit test
AirPods Pro noise cancellation not work well, poor bass, and muffled audio are all indications that you’re probably using the wrong tip size for your ear. Perform a built-in ear tip fit test in the AirPods settings to see if there’s a problem with fit and seal.
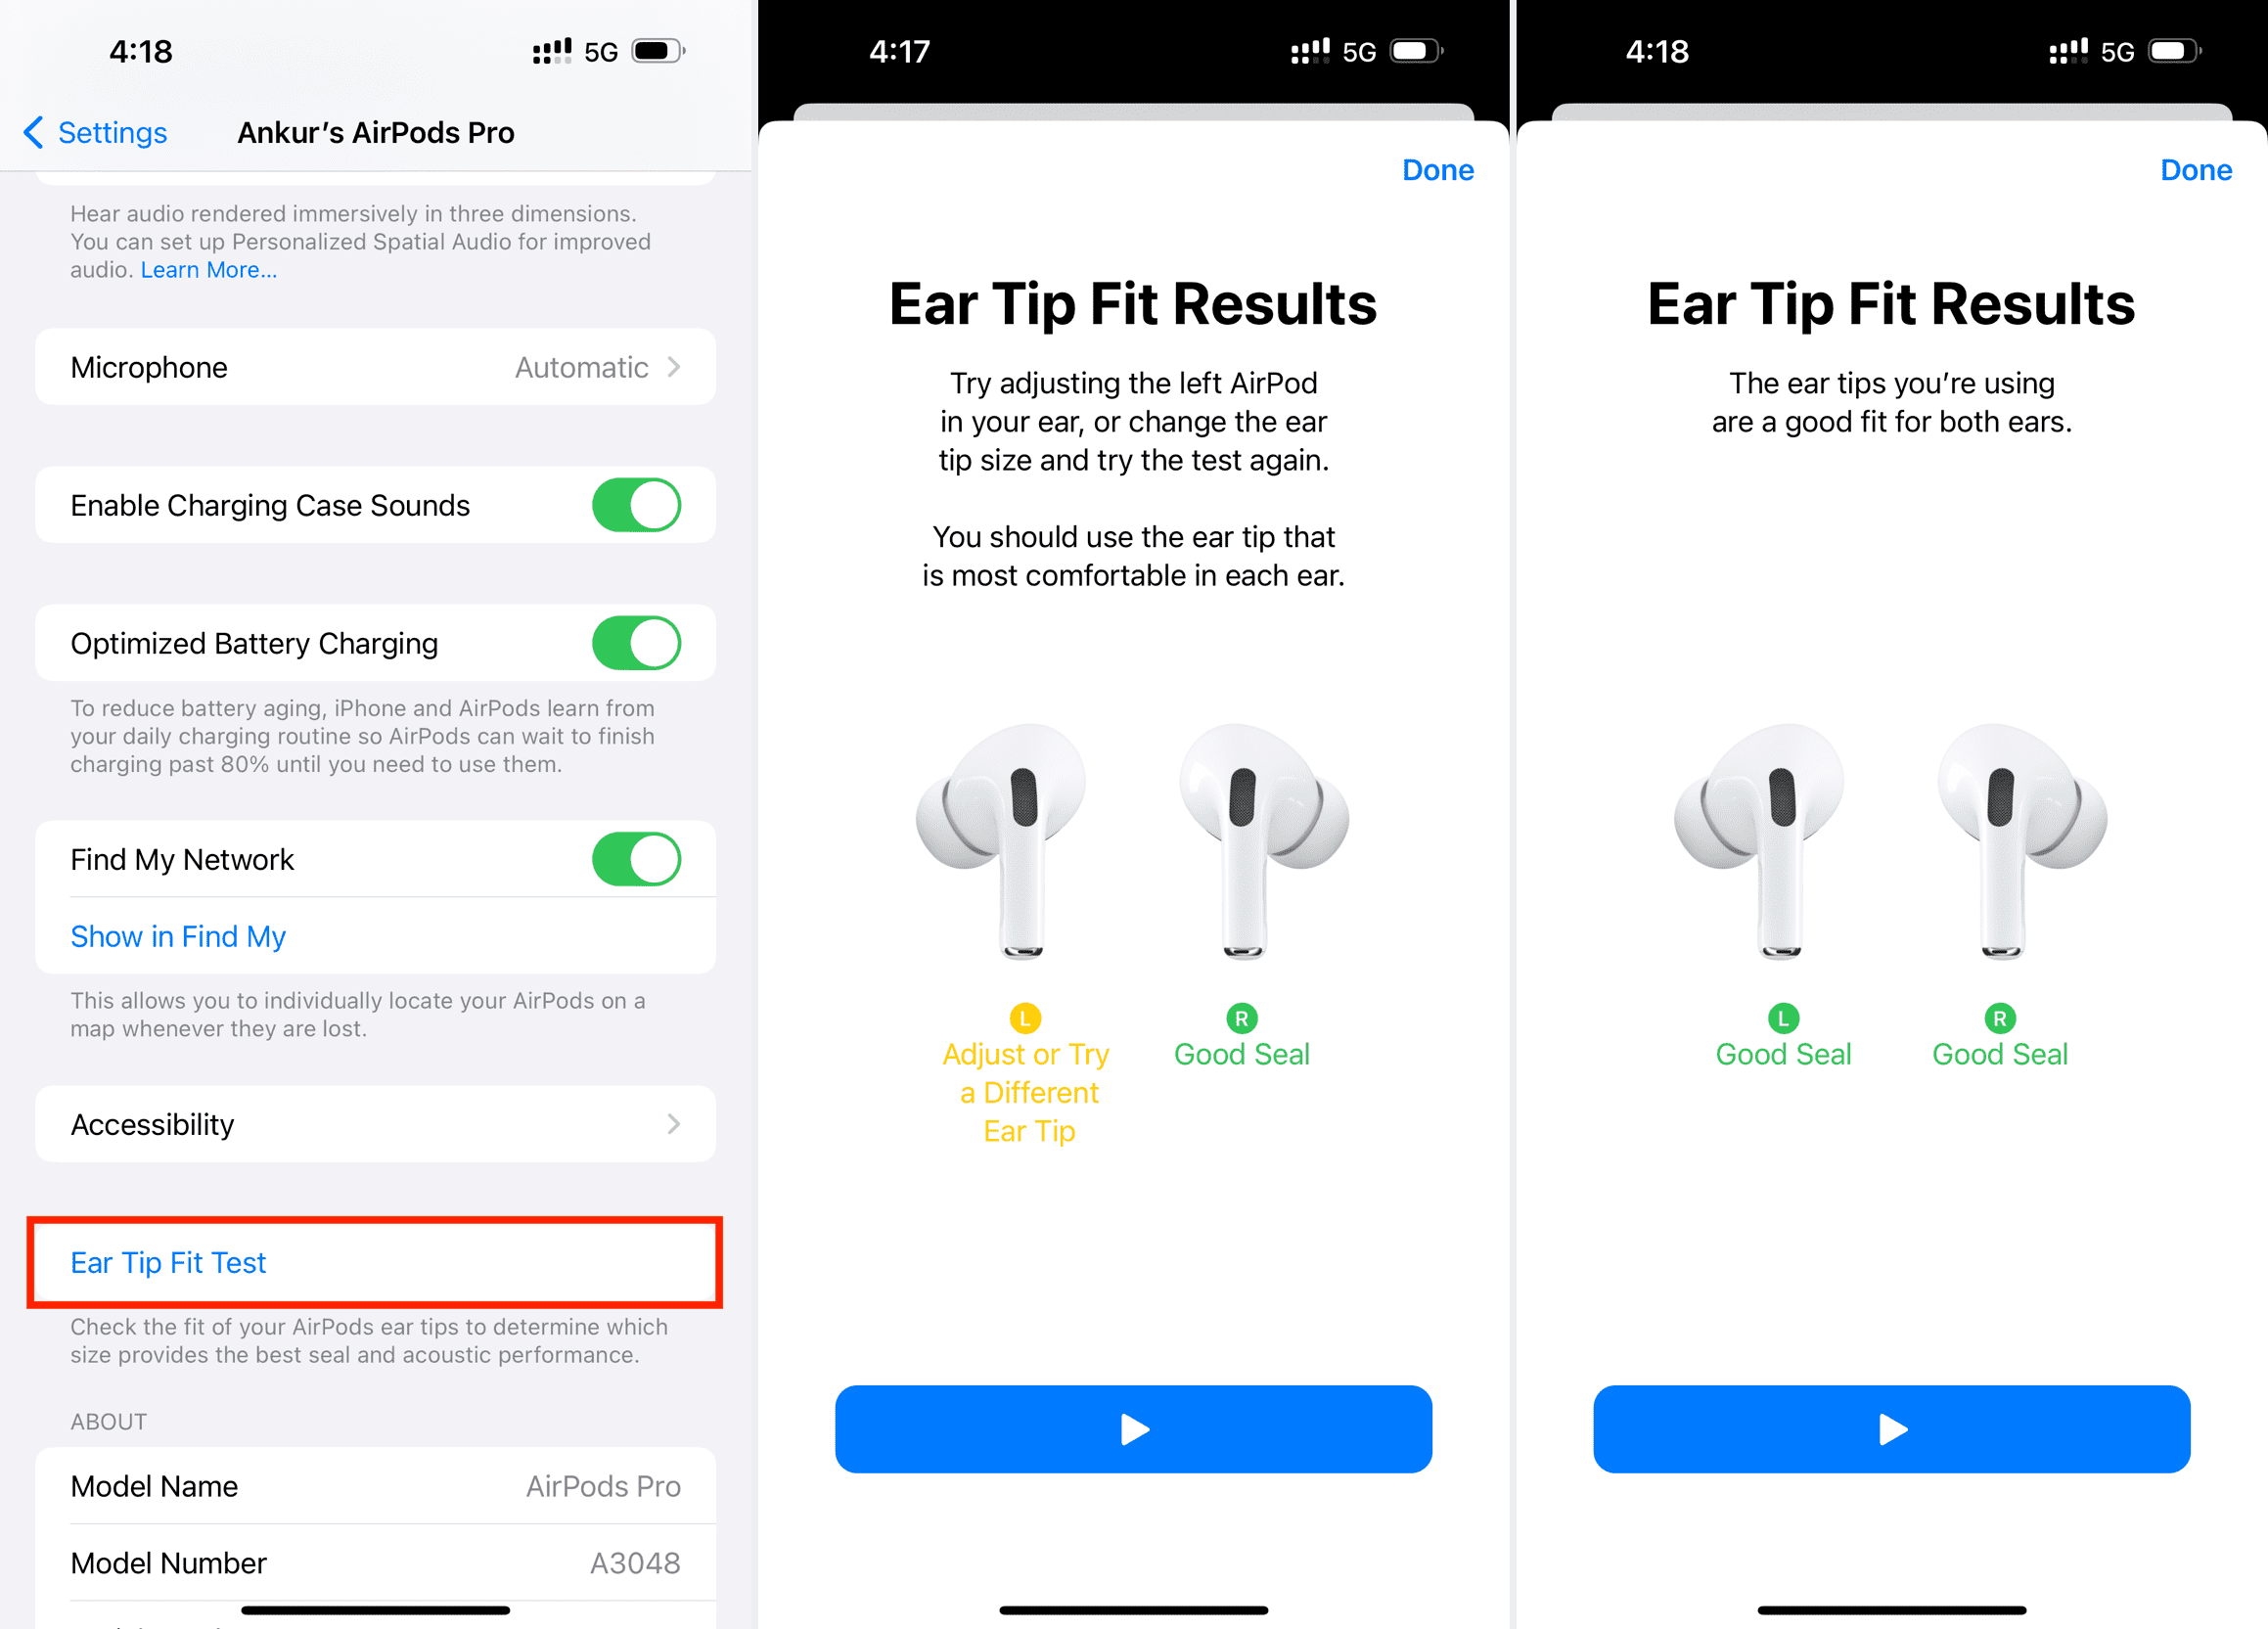
29. Try other silicon tip sizes
The AirPods Pro ship with the silicone ear tips in the box:
- AirPods Pro 1st generation: Small (S) and large (L) tips
- AirPods Pro 2nd generation: Extra small (XS), small (S), and large (L) tips
The ear tip test may suggest trying a bigger tip size for a better seal. If you’ve passed the test but still feel uncomfortable, trying a smaller tip may reduce ear pain.
30. Avoid AirPods allergy
AirPods allergy is a thing; if you feel itching or other sensations in your ears, peruse our write-up covering AirPods allergy.
31. Use your AirPods with Android and other platforms
Many AirPods features like zero-configuration pairing are exclusive to Apple devices. On non-Apple hardware like smart TVs and Android handsets, AirPods work like regular Bluetooth earphones. To connect them manually, open the charging case and press and hold the button on the back to enter pairing mode.
If you fell in love with your AirPods Pro and want to buy a pair for your parents, siblings, or close friends, consult our list of the best deals for all AirPods models.