Learn what the ‘Trust This Computer‘ alert on your iPhone or iPad means and how to revoke access for previously trusted Macs and PCs.
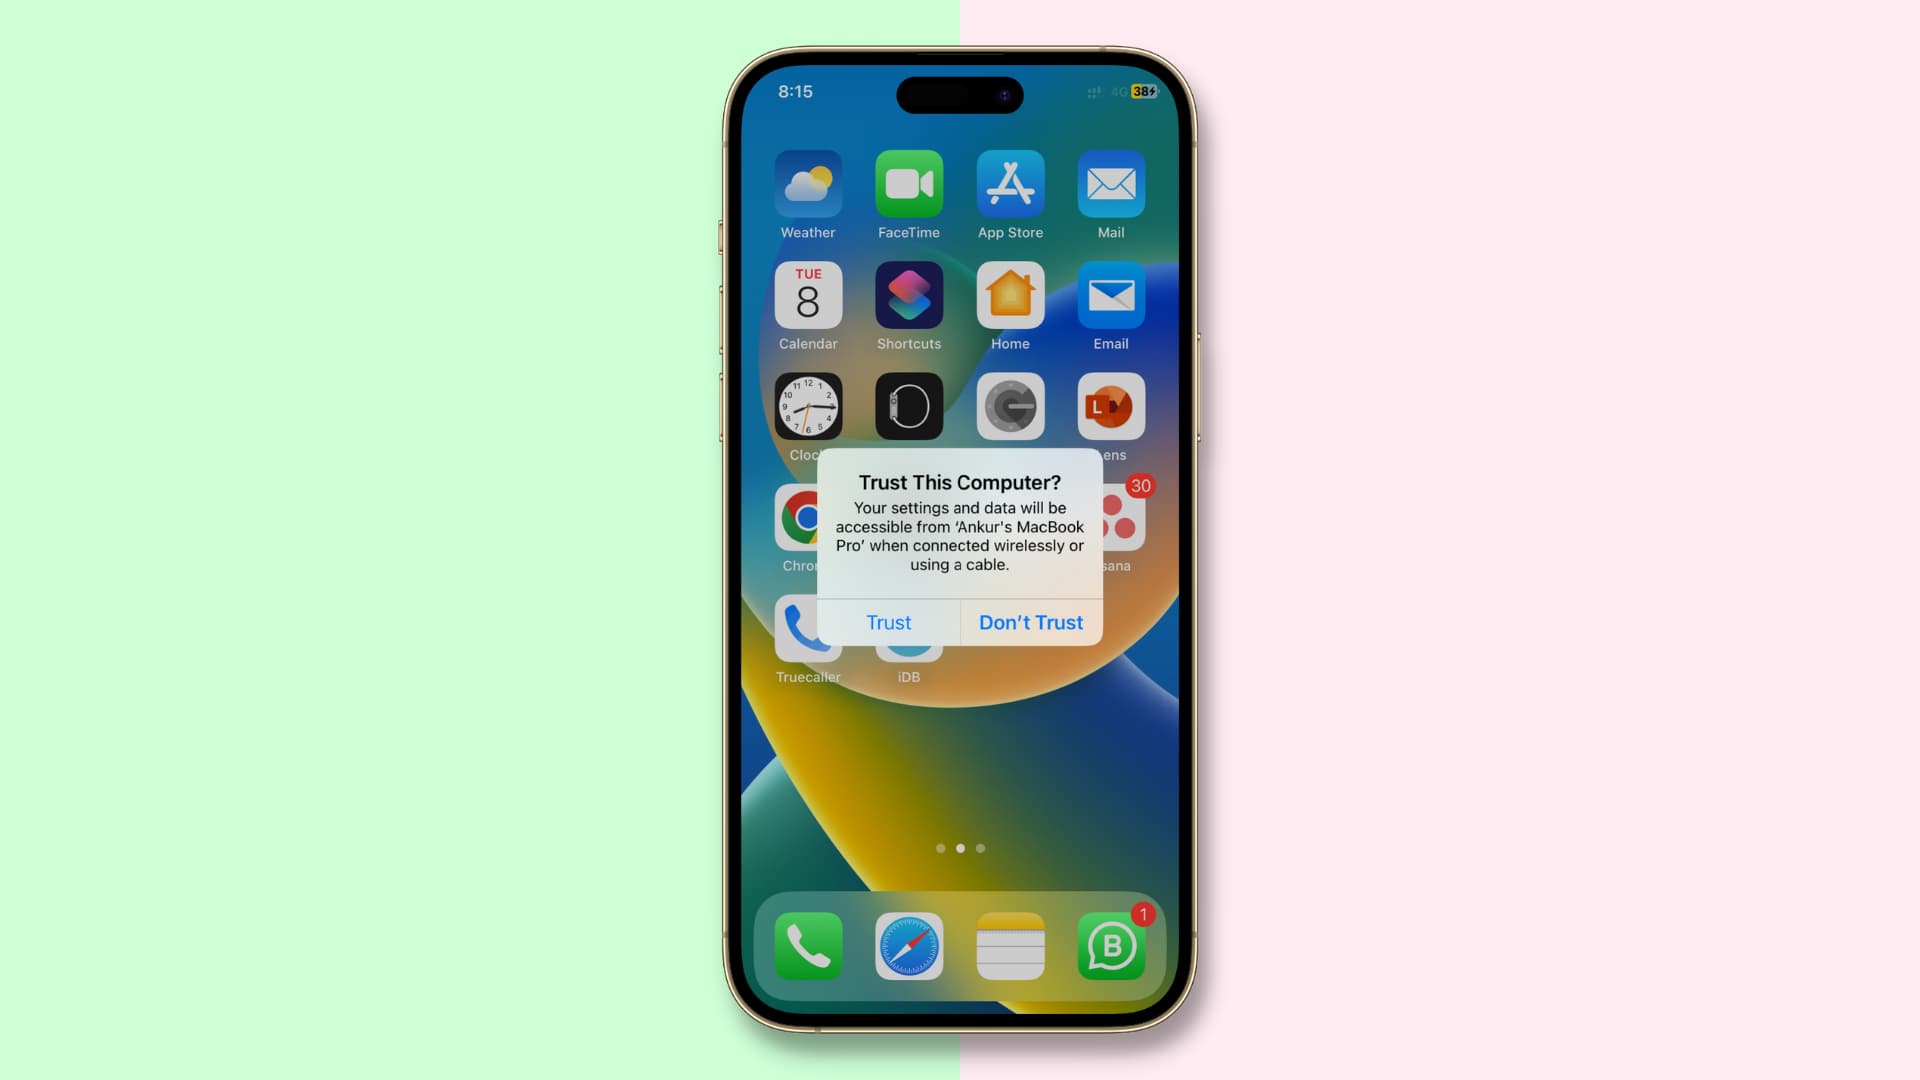
When you connect your iPhone, iPad, or iPod touch via a USB cable to a Mac or Windows PC for the first time, a prompt pops up asking you to trust the computer. This prompt also appears when another device is attempting to access the files on your iOS device for the first time or occasionally as a safety measure.
Note: You may see the ‘Trust This Computer” alert even if you connect your iPhone to your iPad with a USB-C cable.
What’s a trusted device?
A trusted device can access the files and settings of your iOS device, create backups, import photos, and access movies, videos, contacts, and other items.
Your iOS device’s data isn’t exposed until you enter your passcode and choose to trust the connected computer or device. If you decide not to trust the computer, you can still charge your device through the USB cable, but the computer won’t be allowed to access your content.
When you connect your iPhone to a computer or plug a device into your iPhone’s USB-C or Lightning port, the alert essentially informs you that you’ve connected your device to an unfamiliar computer or device it hasn’t been connected to before.
Apple introduced this feature in iOS as a sort of chain of trust to prevent outside machines (both computers and peripherals) from easily getting access to your data. The owner of the device needs to express trust for the machine by tapping the Trust button before iOS communicates with it. If the Don’t Trust button is tapped, then the device will not communicate with the computer it’s plugged into.
When you trust a machine, a special key is saved on both the machine and the iOS device you are establishing a chain of trust on. If the keys match, iOS allows a secure transfer of information between the machine and the device; but when they don’t match, iOS is designed to keep your information safeguarded.
Before trusting a computer, you must first unlock your iOS device using its passcode. This step ensures that only the device’s owner can grant permission for the device to be accessed by the machine.
The alert won’t reappear for machines that have already been trusted. However, if you recently chose not to trust a machine and you unplug and plug the device back in again, the alert will reappear, giving you the option to either Trust or Don’t Trust the computer again. If unused for a period longer than six months, you may experience a chain of trust expiration, and the trust will have to be reestablished once again.
When to untrust a computer
Some of the situations that might warrant untrusting a Mac or Windows PC from your iPhone or iPad include:
- You accidentally trusted a computer.
- You trusted a friend’s computer: If I’m transferring a friend’s media over to my iPhone and the file is too large, I resort to syncing with their iTunes. After that, I untrust the friend’s computer from my iPhone.
These are just two common examples of when untrusting computers may be necessary.
Each user has their own needs and specific ways of doing things, so you might want to untrust all computers from your iOS devices for reasons not stated above.
Things to know before untrusting devices
Untrusting devices will reset all location and privacy settings on your iPhone, iPad, or iPod touch, so you’ll need to recreate them afterward. Though a tad clunky, this workaround is more user-friendly versus resetting the entire device to its factory settings, like on iOS versions prior to iOS 8.
Another thing to note is that you will be untrusting all computers your iPhone or iPad has previously trusted.
Untrust your computer from iPhone and iPad
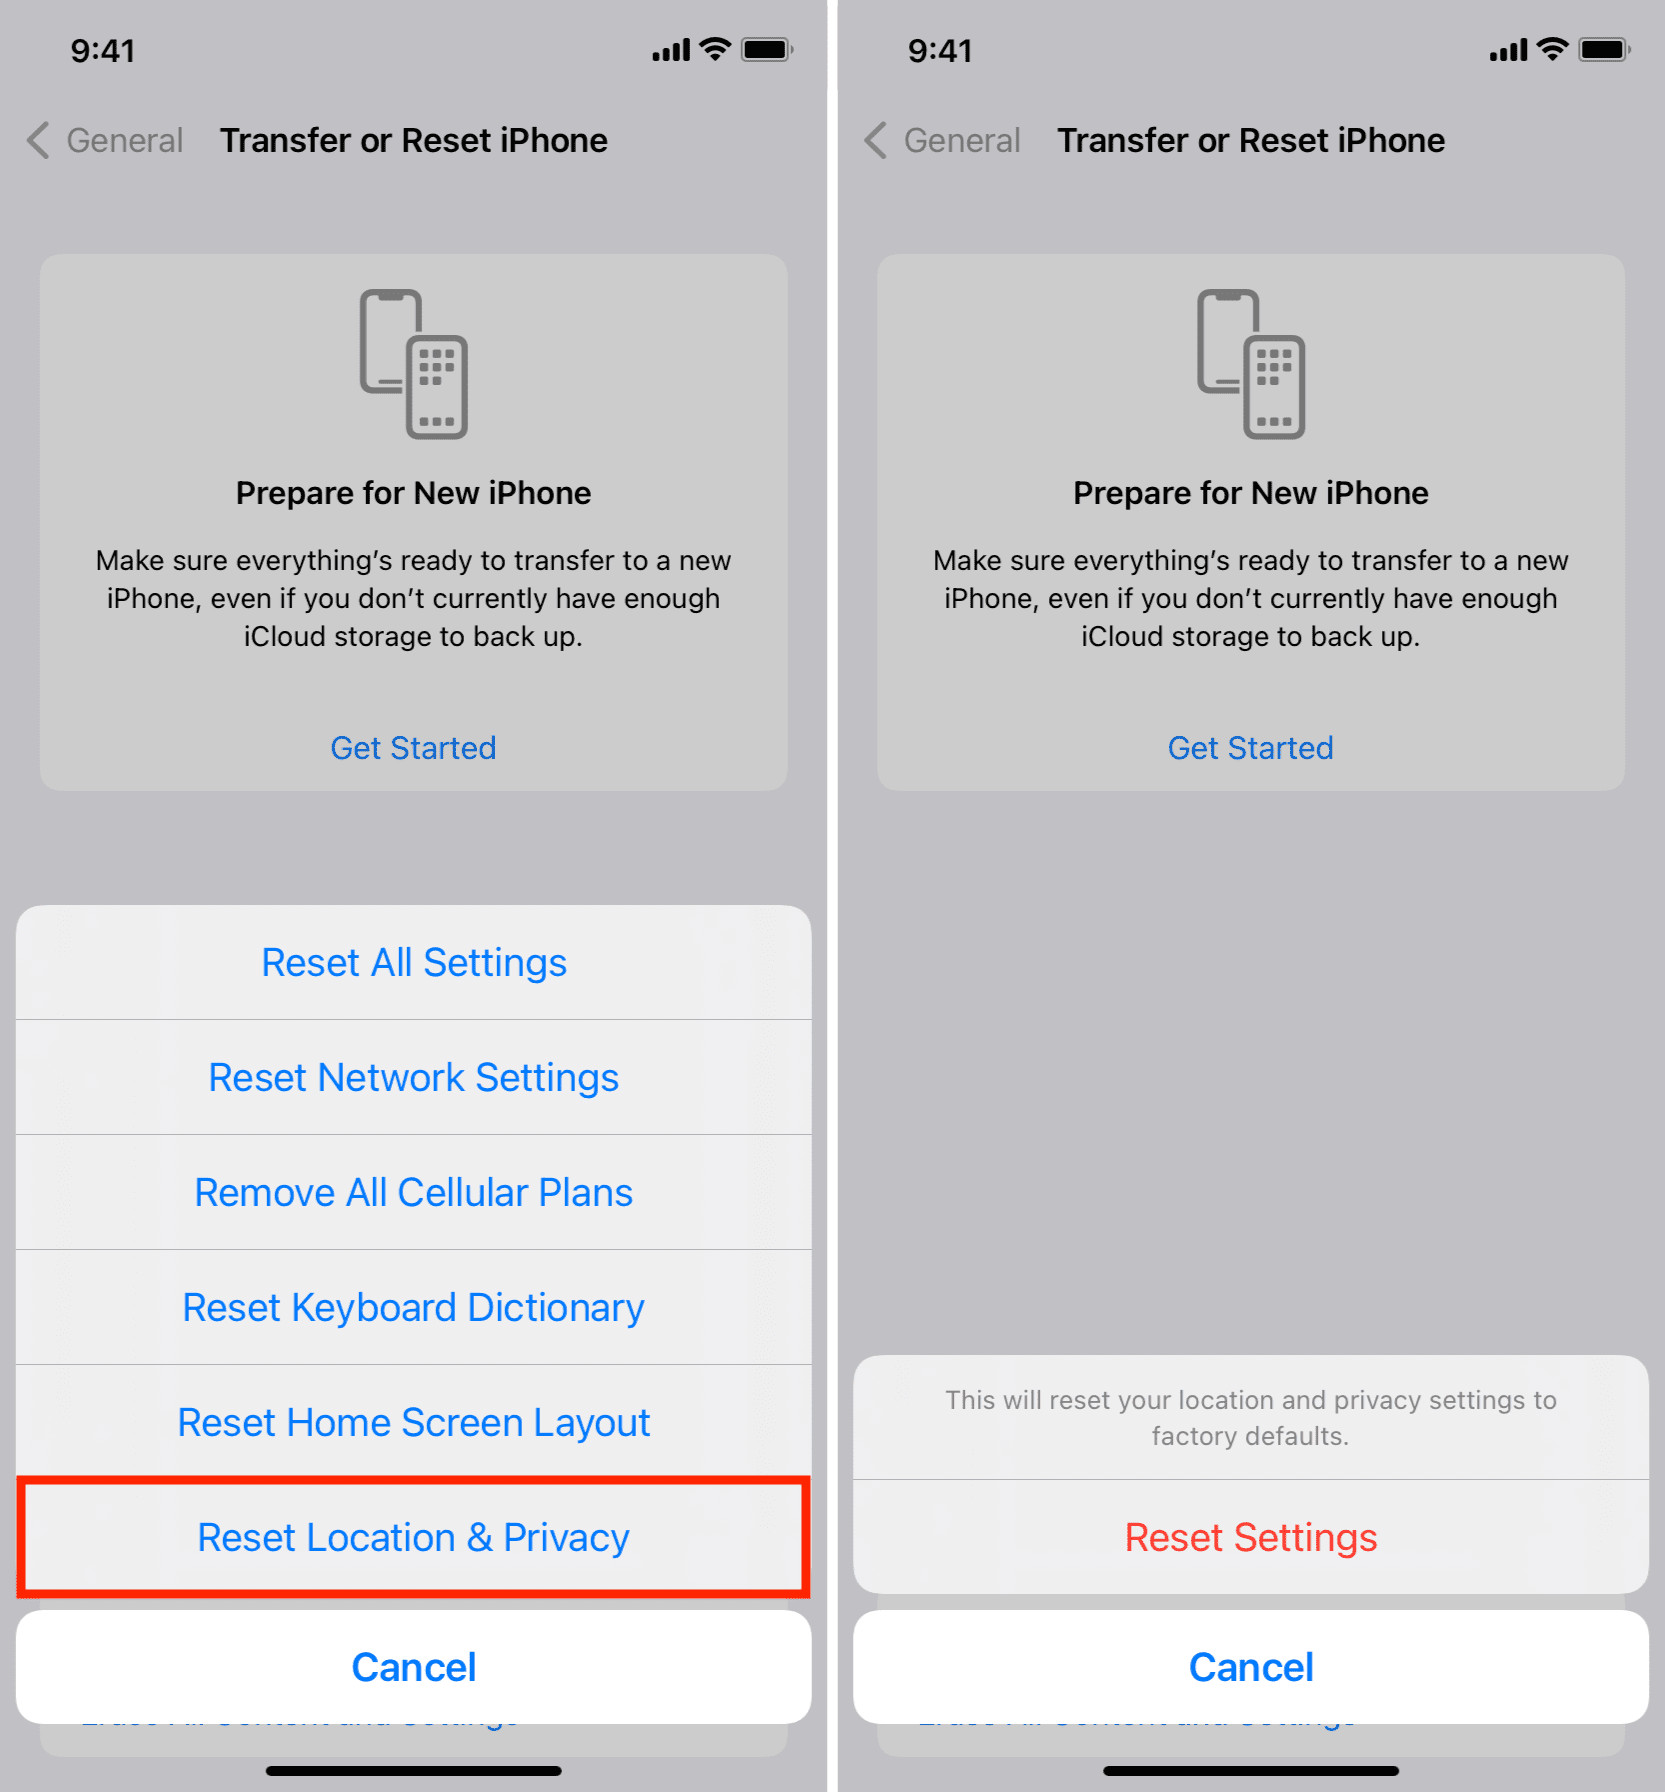
- Open the Settings app and go to General > Transfer or Reset iPhone.
- Tap Reset.
- Select Reset Location & Privacy and enter your device’s passcode.
- Confirm that you want to reset all location and privacy settings on your device. Close the Settings app when complete.
Tip: Now is a good time to reconfigure your location and privacy customizations. Just visit the Privacy & Security section in the Settings app to adjust your settings to match what you had prior to the reset.
Another method for untrusting computers on iOS devices
If you don’t like the idea of resetting your privacy and location settings just to break all trusted connections, you can just as easily untrust all computers by resetting your network settings.
Simply navigate to Settings > General > Transfer or Reset iPhone > Reset and tap Reset Network Settings. This will also reset your network settings and saved Wi-Fi passwords, so you’ll need to set these up again later.
Tip: Wiping your device clean also untrusts all connected computers.
Can you trust that computer again?
Yes, you can. When you connect your iPhone or iPad to Finder, Image Capture, Photos app, etc., with a USB connection, the familiar dialog box with Trust and Don’t Trust options will appear on the screen of your iOS device. In some cases like Finder, you will have to first click Trust in Finder to get the alert on your iPhone or iPad.
Hit Trust to give Finder access to your iOS device. If you tap on Don’t Trust, you’ll see this alert each time you connect your device to that computer. If your iOS device is passcode locked, you need to unlock it before you see the alert.
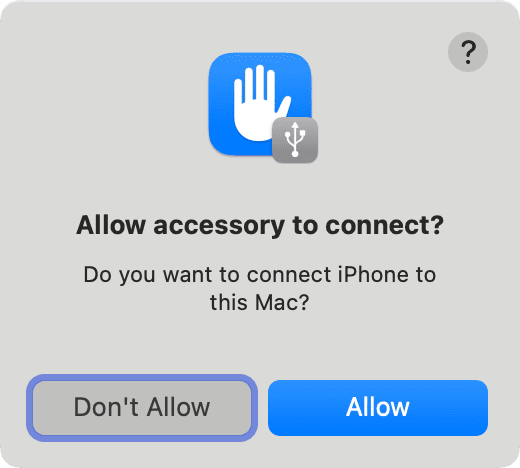
Note: On recent versions of macOS, you first have to click Allow from the Allow accessory to connect alert or Finder. Once you do that, you will see the Trust This Computer alert on your iOS or iPadOS device.
What to do if the Trust alert isn’t showing up?
In some rare cases, the Trust This Computer alert may not even show up when it’s supposed to. Here are a few things you can try:
- Turn everything off and on again: If a USB port’s driver has failed to initialize, restarting the computer can help. It doesn’t hurt to restart the iOS device at the same time. Afterward, try connecting again.
- Update iTunes or Apple Devices app: An outdated version of iTunes or the Apple Devices app on Windows PC can cause this issue. It’s part of Apple’s verification process.
- Reseat the device: In some cases, the USB connection could have failed or malfunctioned. Try unplugging the device and using a different USB port.
- Try another USB cable: If the Lightning or USB-C cable is faulty, the alert may not show up. Try another cable to see if the issue persists. Non-MFi Lightning cables are notorious for causing these issues.
- Reset your device’s trust settings again: Try resetting your location and privacy settings, which may help allow you to finally trust the computer..
- Reset your device’s network settings: If the above didn’t work, resetting your network settings can sometimes fix the problem quickly.
- Worst case scenario – contact Apple: If the alert still isn’t showing up, contact Apple for support.
Next, check out: iPhone not showing up in Finder on Mac? 15 reliable solutions to fix this