In this guide, we go over 18 expert tips to secure your iPhone or iPad and protect its data from getting misused, hacked, or exploited.
Your iPhone has a ton of sensitive and private information. This includes your photos, videos, audio notes, bank apps, notes, passwords, contacts, emails, and so much more. Therefore, to ensure your valuable data isn’t misused, stolen, or hacked, you must take these simple yet effective measures to keep your device secure.
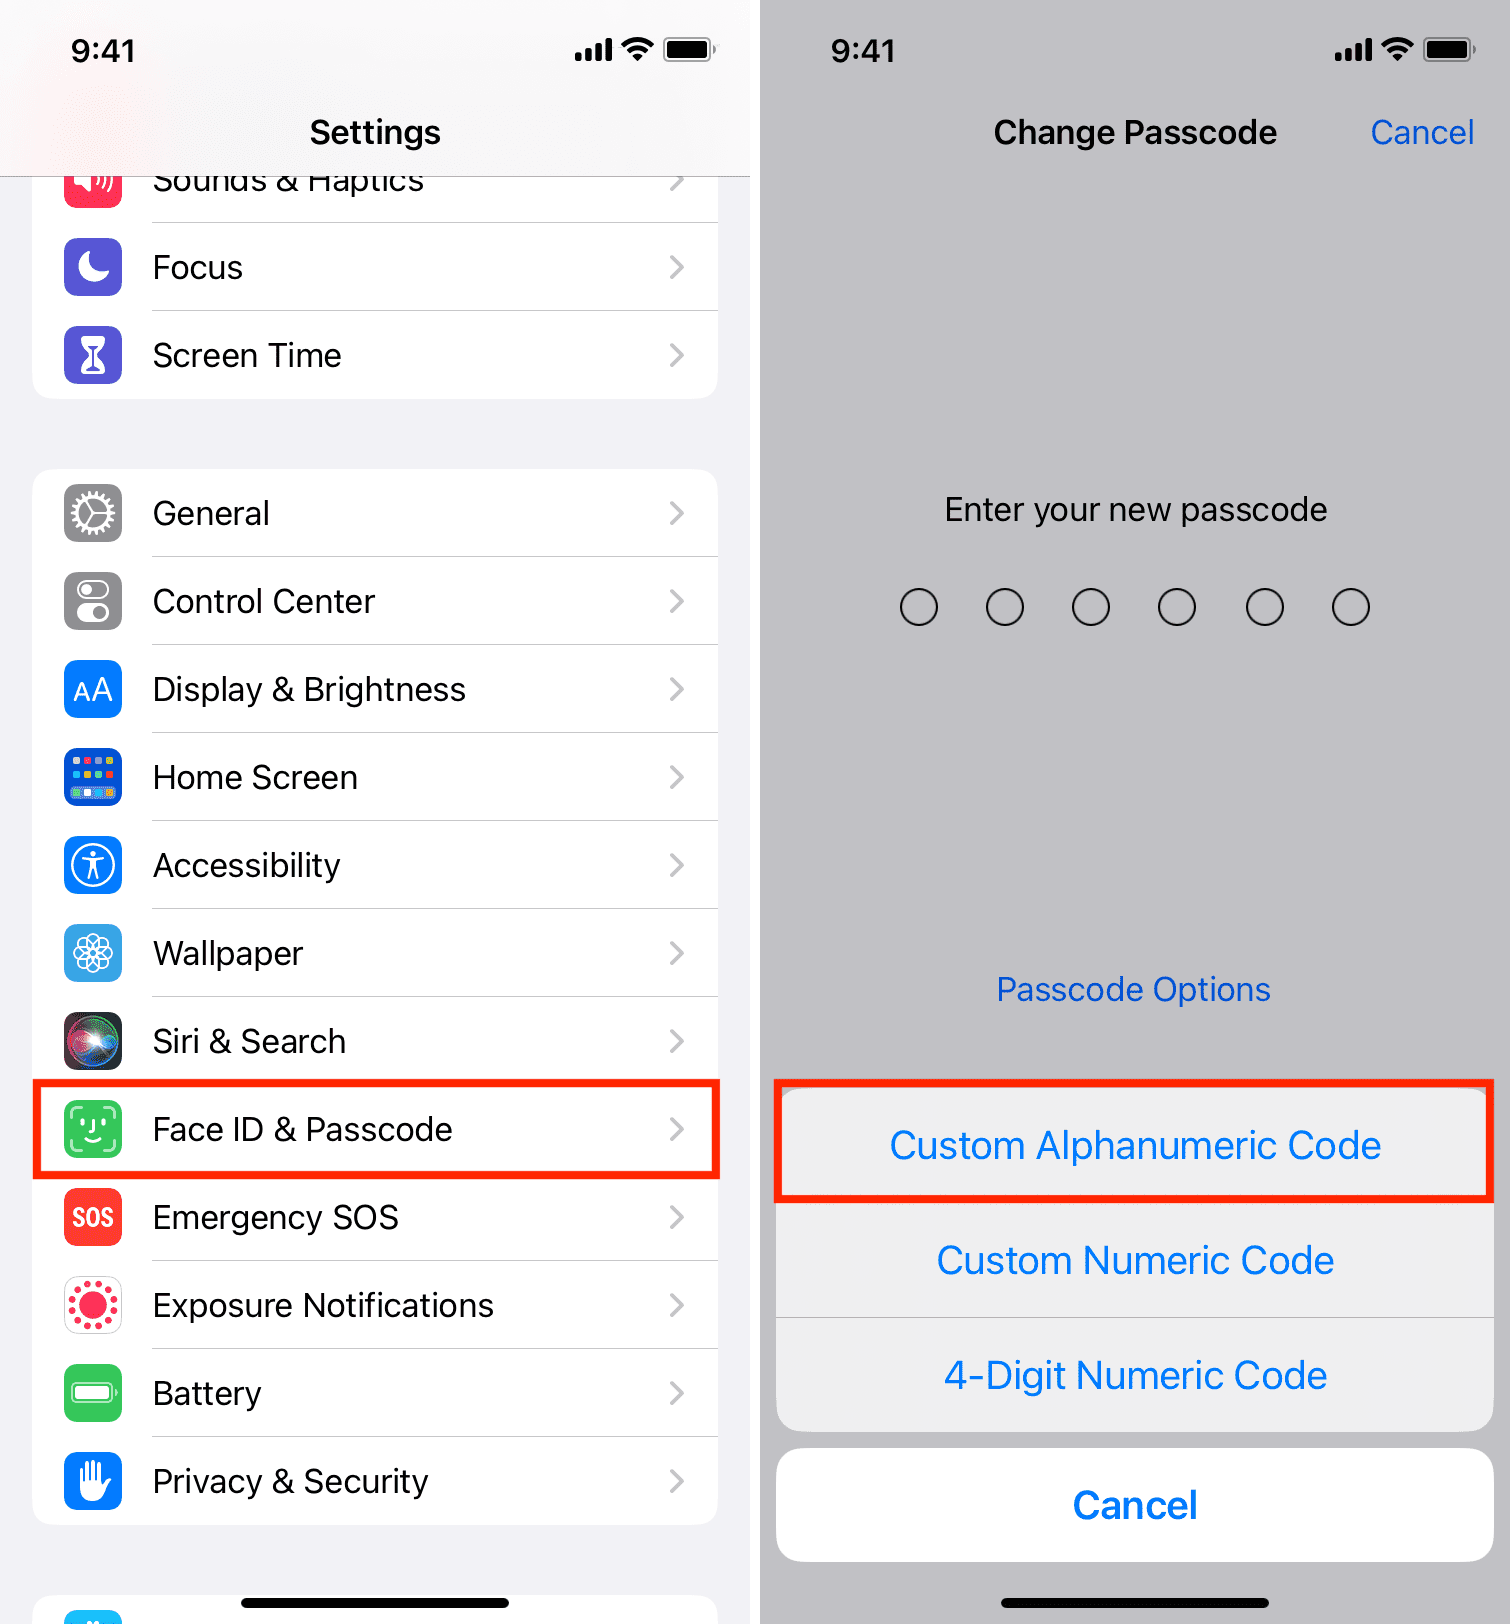
1. Add a strong alphanumeric passcode
You should not use your iPhone without a passcode. And even the passcode you set should be long and difficult to guess. This will make it almost impossible for others to guess your passcode, even if they happen to get physical access to your device.
You can create a strong password by going to iPhone Settings > Face ID/Touch ID & Passcode. Now, if you already use a passcode, tap Change Passcode > Passcode Options and choose Custom Alphanumeric Code.
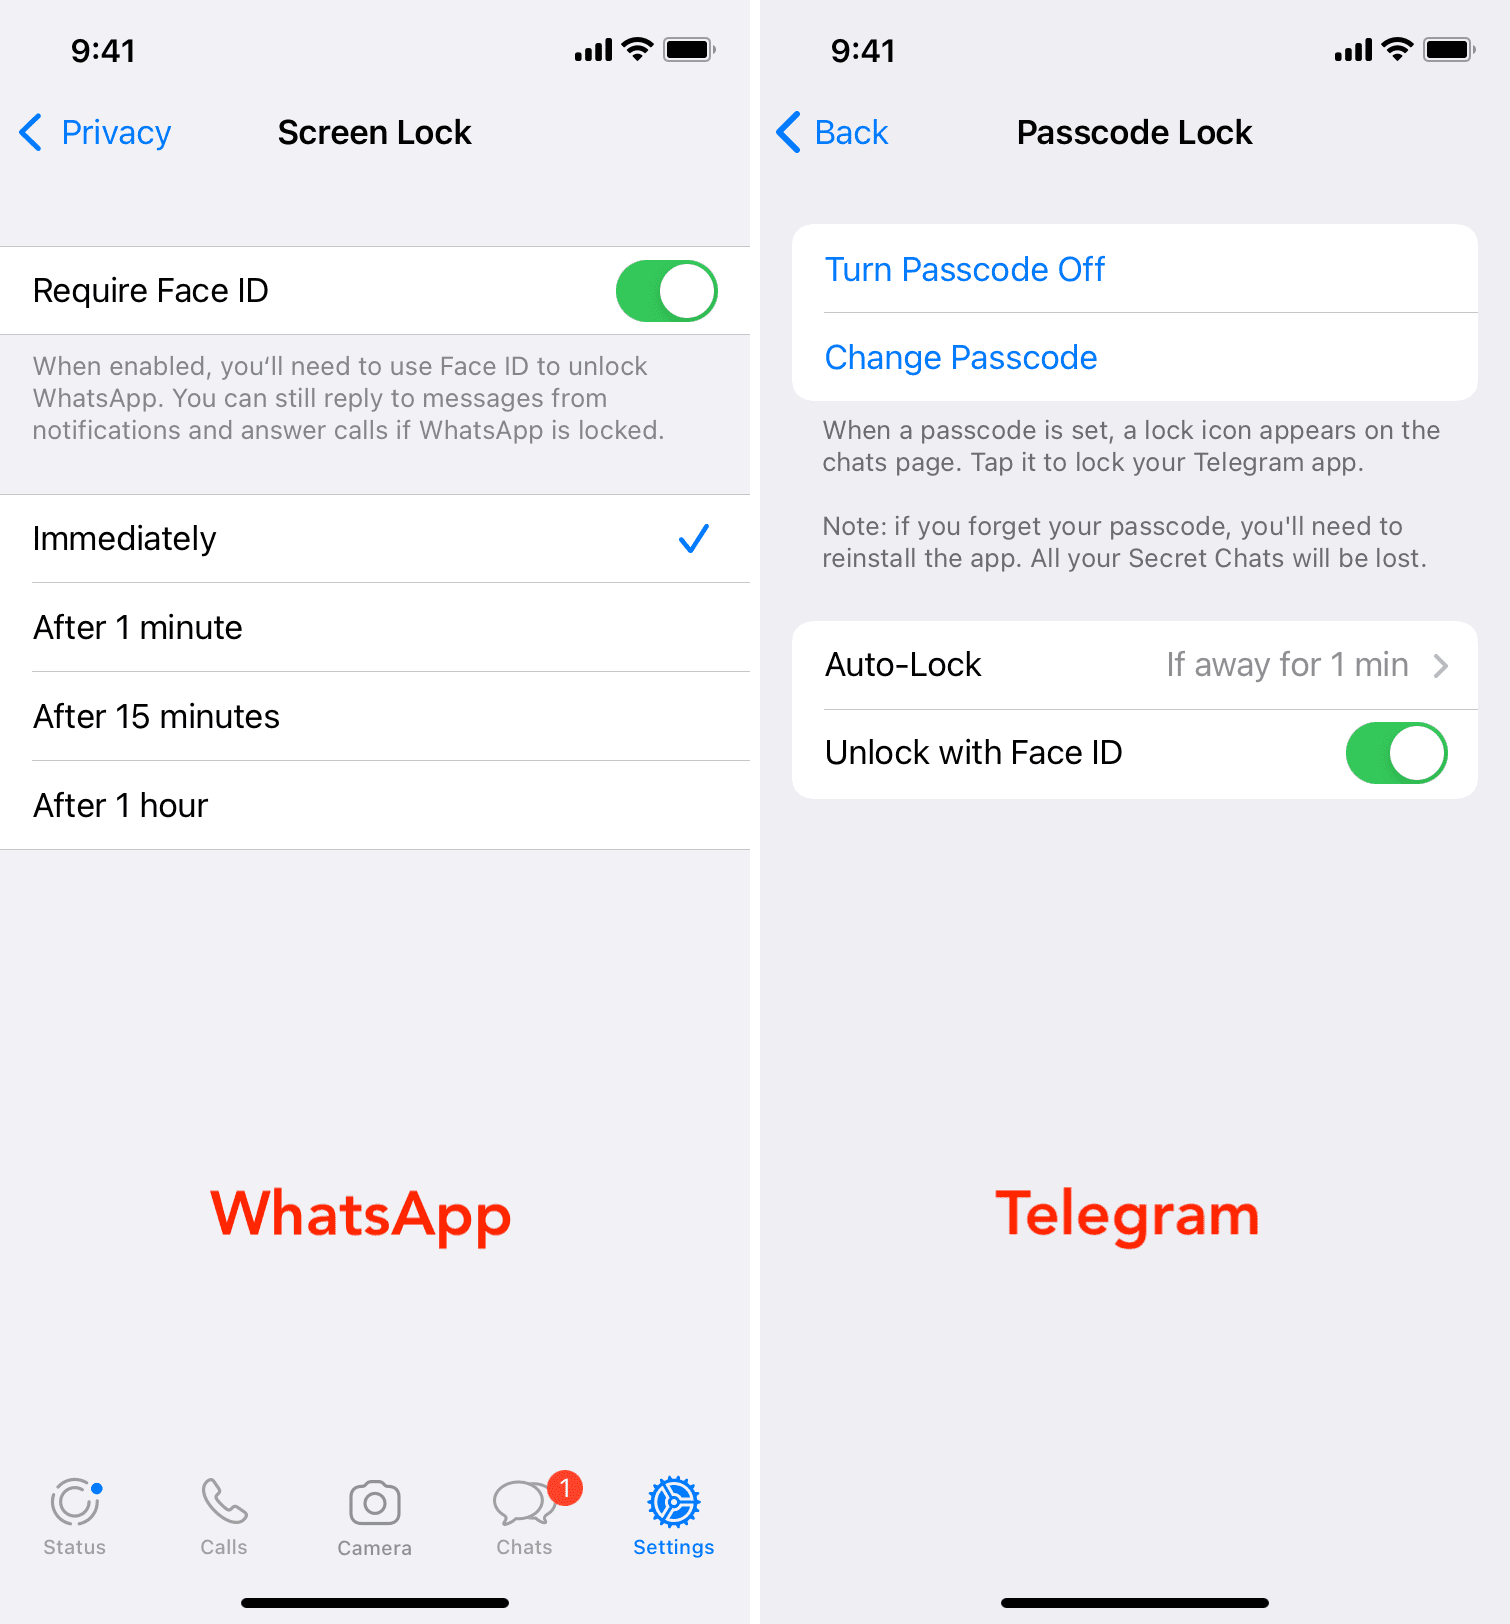
2. Add additional app-specific passwords
Many chat apps, bank apps, payment apps, notes apps, and such offer an extra option to add a password lock. Dig inside the respective app setting and enable that. If an app doesn’t have one, you can contact its app developer and request such a feature.
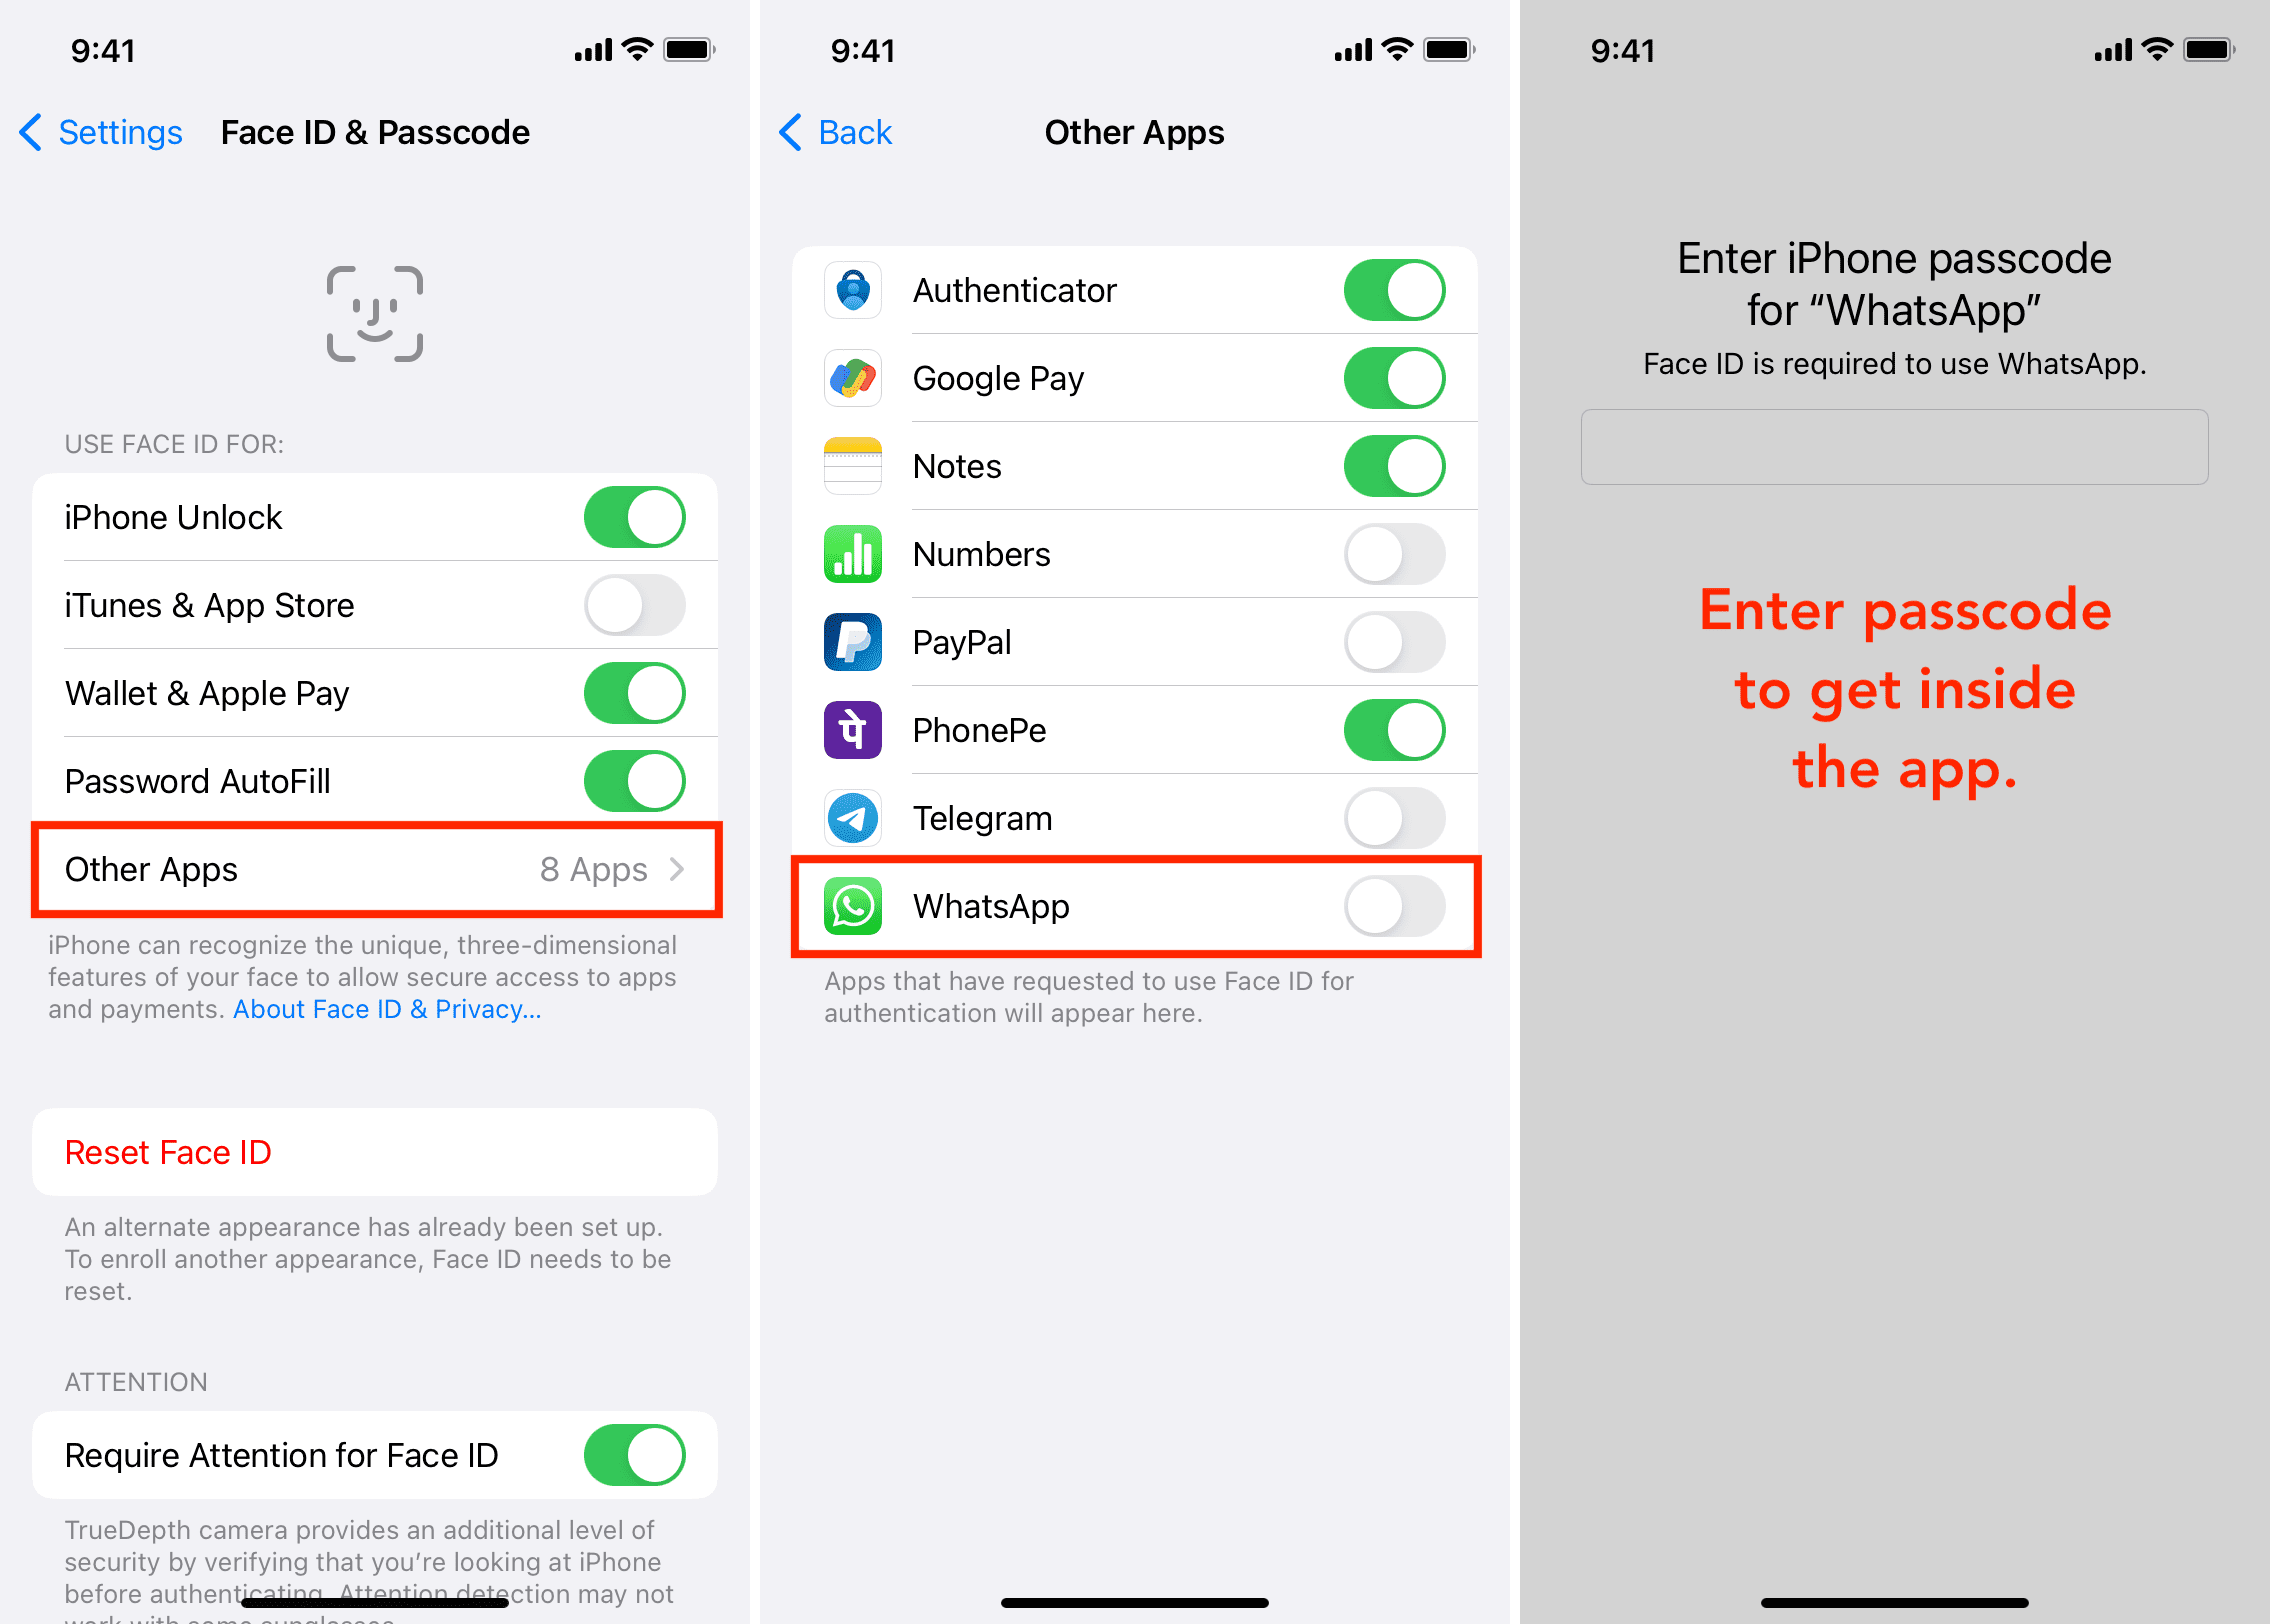
3. Don’t let apps unlock with Face ID or Touch ID on shared iPhone
If you have added a second Face ID or Touch ID of other people on your iPhone, they can get inside your iPhone and your apps that are unlocked by biometrics. To address this, set up your concerned third-party app to open via passcode and not Face ID or Touch ID.
You can see all apps that use Face ID (or Touch ID) by going to Settings > Face ID & Passcode. From here, tap Other Apps and turn off the toggle for the desired app. After this, that app can’t use Face ID and will unlock only with your device passcode (which you shouldn’t share with others).
Alternatively, you can also remove extra unnecessary fingerprints or face from Face ID.
4. Remove fingerprints and Face ID of other people
You can add up to five fingerprints to iPhone’s Touch ID and two faces to Face ID.
When you got your iPhone, you might have excitedly added the fingerprints of multiple family members or set up a second face to Face ID.
- Go to Settings > Face ID & Passcode and Reset Face ID. This will remove all faces. After that, set up Face ID again for yourself.
- If your iPhone has Touch ID, go to Settings > Touch ID & Passcode. Swipe left on the extra fingerprints and delete them. Tip: When you’re on the Touch ID screen and place your finger on the Touch ID button, it will highlight the added fingerprint corresponding to that finger. You can also assign proper names to added fingerprints to identify them easily.
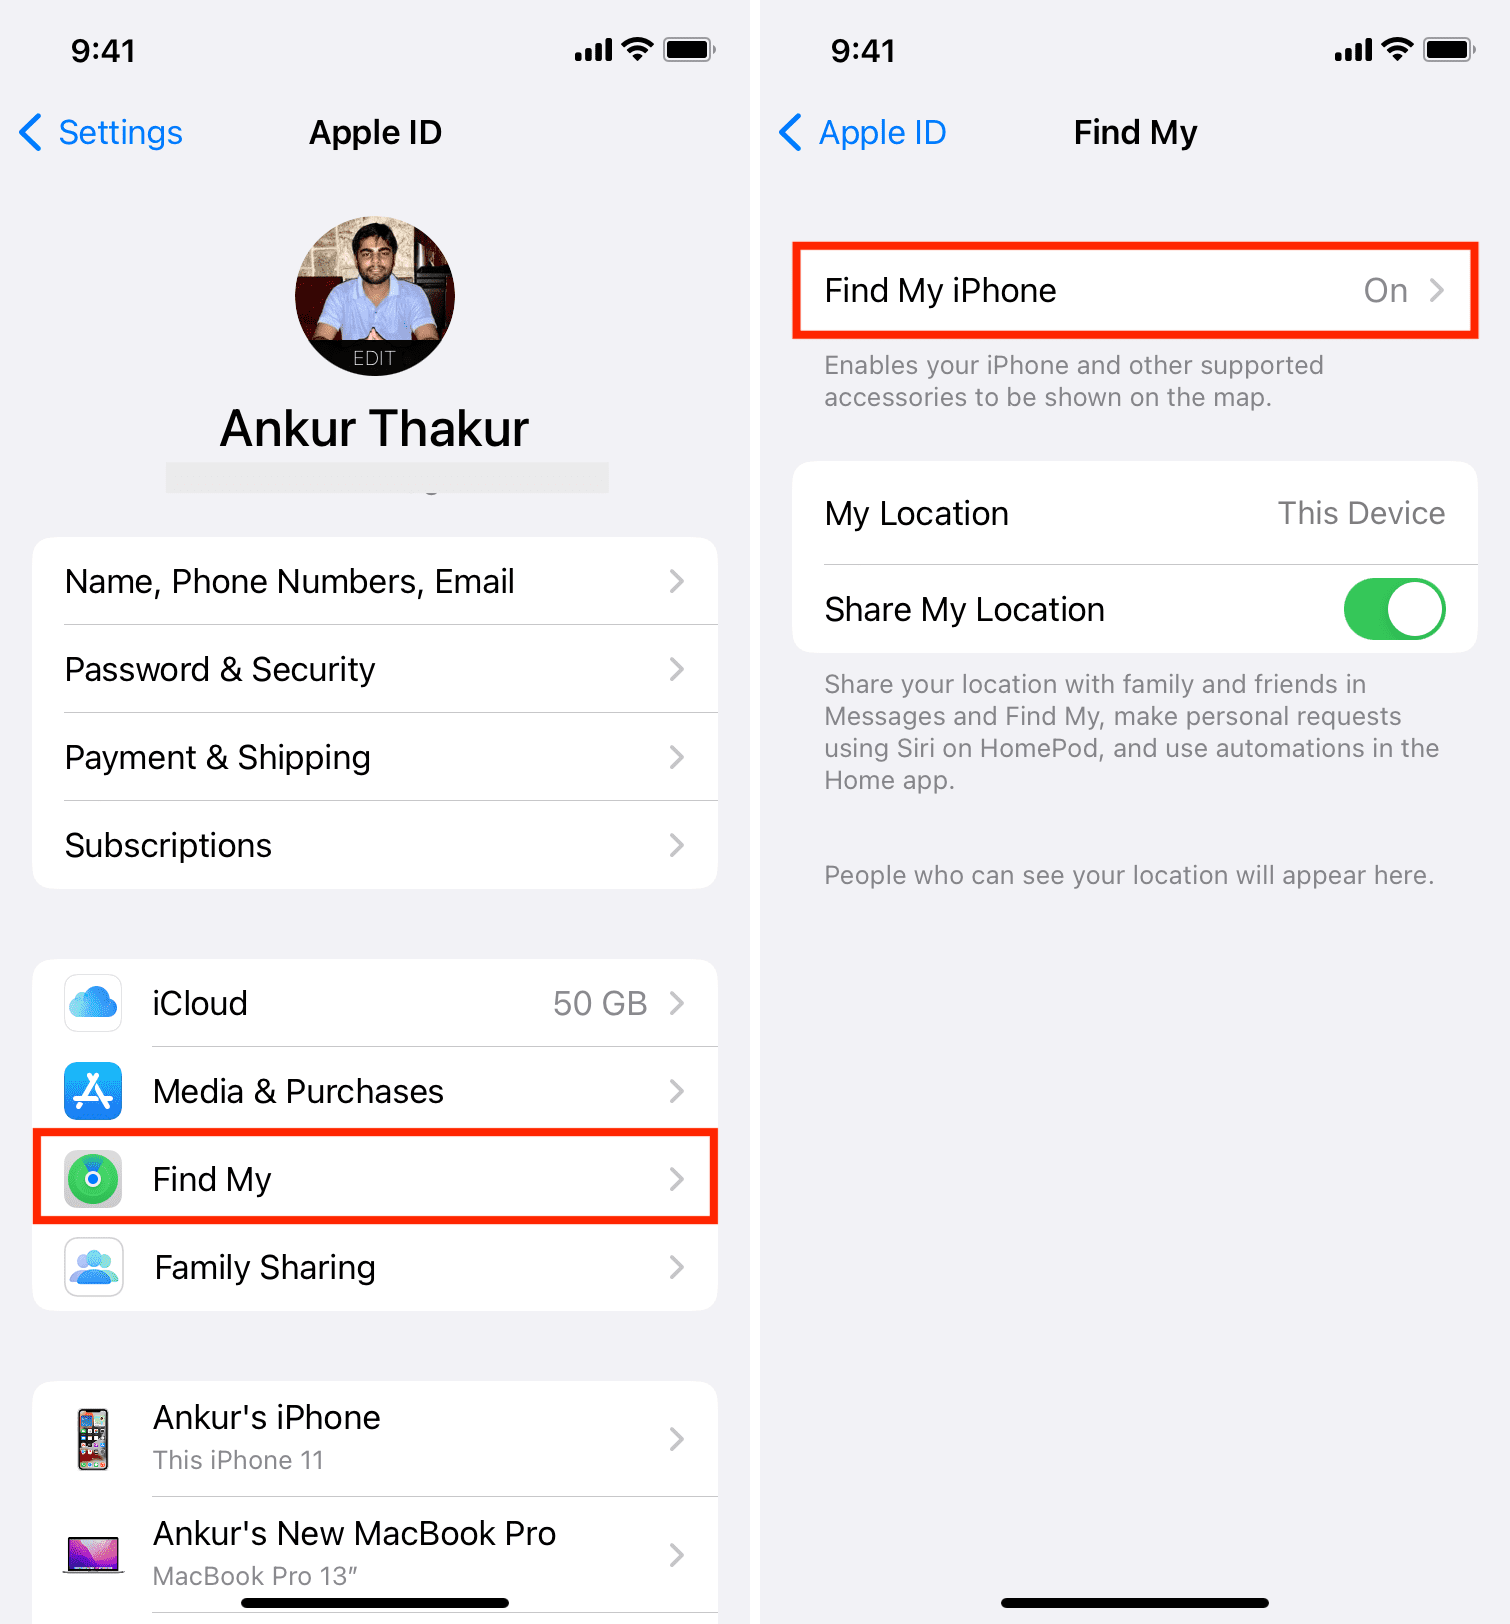
5. Make sure Find My iPhone is enabled
Find My service lets you know the location of your iPhone, lock it, display a message on the Lock Screen, play a sound, and erase the device in case it’s misplaced.
Find My is one of the most important features you must keep enabled on your iPhone, iPad, Mac, and Apple Watch. You can check its status by going to Settings > your name card > Find My > Find My iPhone.
6. Enable Stolen Device Protection
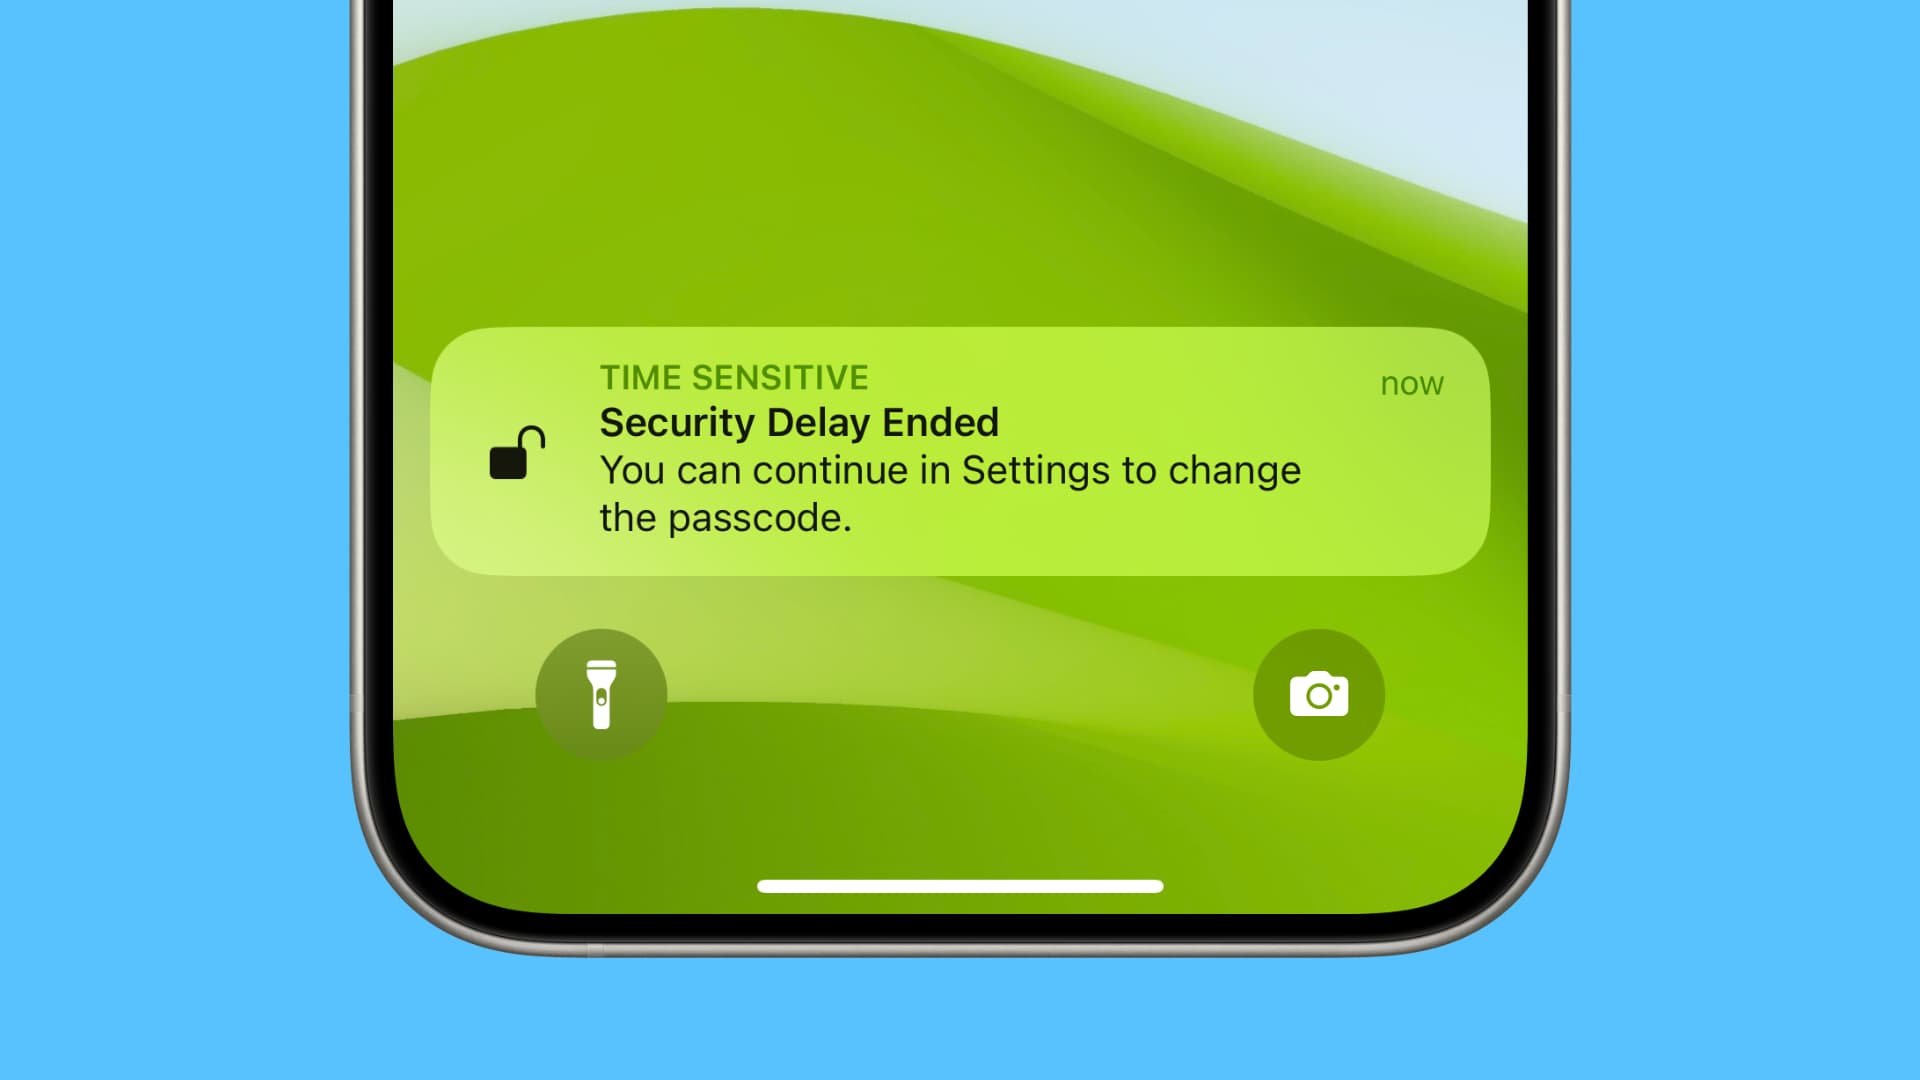
Once you turn on Stolen Device Protection on your iPhone, your device will need Face ID confirmation and force you to wait for an hour before you can change your phone passcode, Apple ID password, update the phone number added to your Apple ID, or make other such sensitive changes in an unknown location.
This security measure ensures that even if someone somehow knows your iPhone passcode, they cannot get complete control over your device as Face ID is required. Plus, the one-hour waiting period gives you time to track your device or put it in lost mode.
7. Remove unknown and unnecessary configuration profiles
Configuration profiles allow large corporations and offices to better manage their employees’ iPhones and iPads. However, some shady websites will show a professional-looking iOS-style popup and trick you into installing random profiles, which can be used to exploit your data and your device.
If you aren’t using the beta version of older iOS, or your iPhone isn’t given to you by your organization/school or not managed by them for special settings, apps, etc., then ideally, there should be no configuration profiles on your device.
To check, go to iPhone Settings > General > VPN & Device Management. If you see unnecessary profiles here, delete it and restart your iPhone.
8. Set a shorter auto-lock duration
Auto-lock locks your iPhone if you don’t lock it manually. A shorter auto-lock setting is better as it reduces the duration your iPhone stays unlocked. So, go to iPhone Settings > Display & Brightness > Auto-Lock and set it to 30 seconds or 1 minute.
9. Use two-factor authentication for all supported services
Two-factor authentication acts as an extra wall of protection. Nearly every major service, from email and social media to bank and payment apps, supports this. Dig inside the privacy and security settings of the concerned service to find the two-factor authentication option.
Related: How to set up and use the built-in two-factor authentication code generator on iPhone and iPad
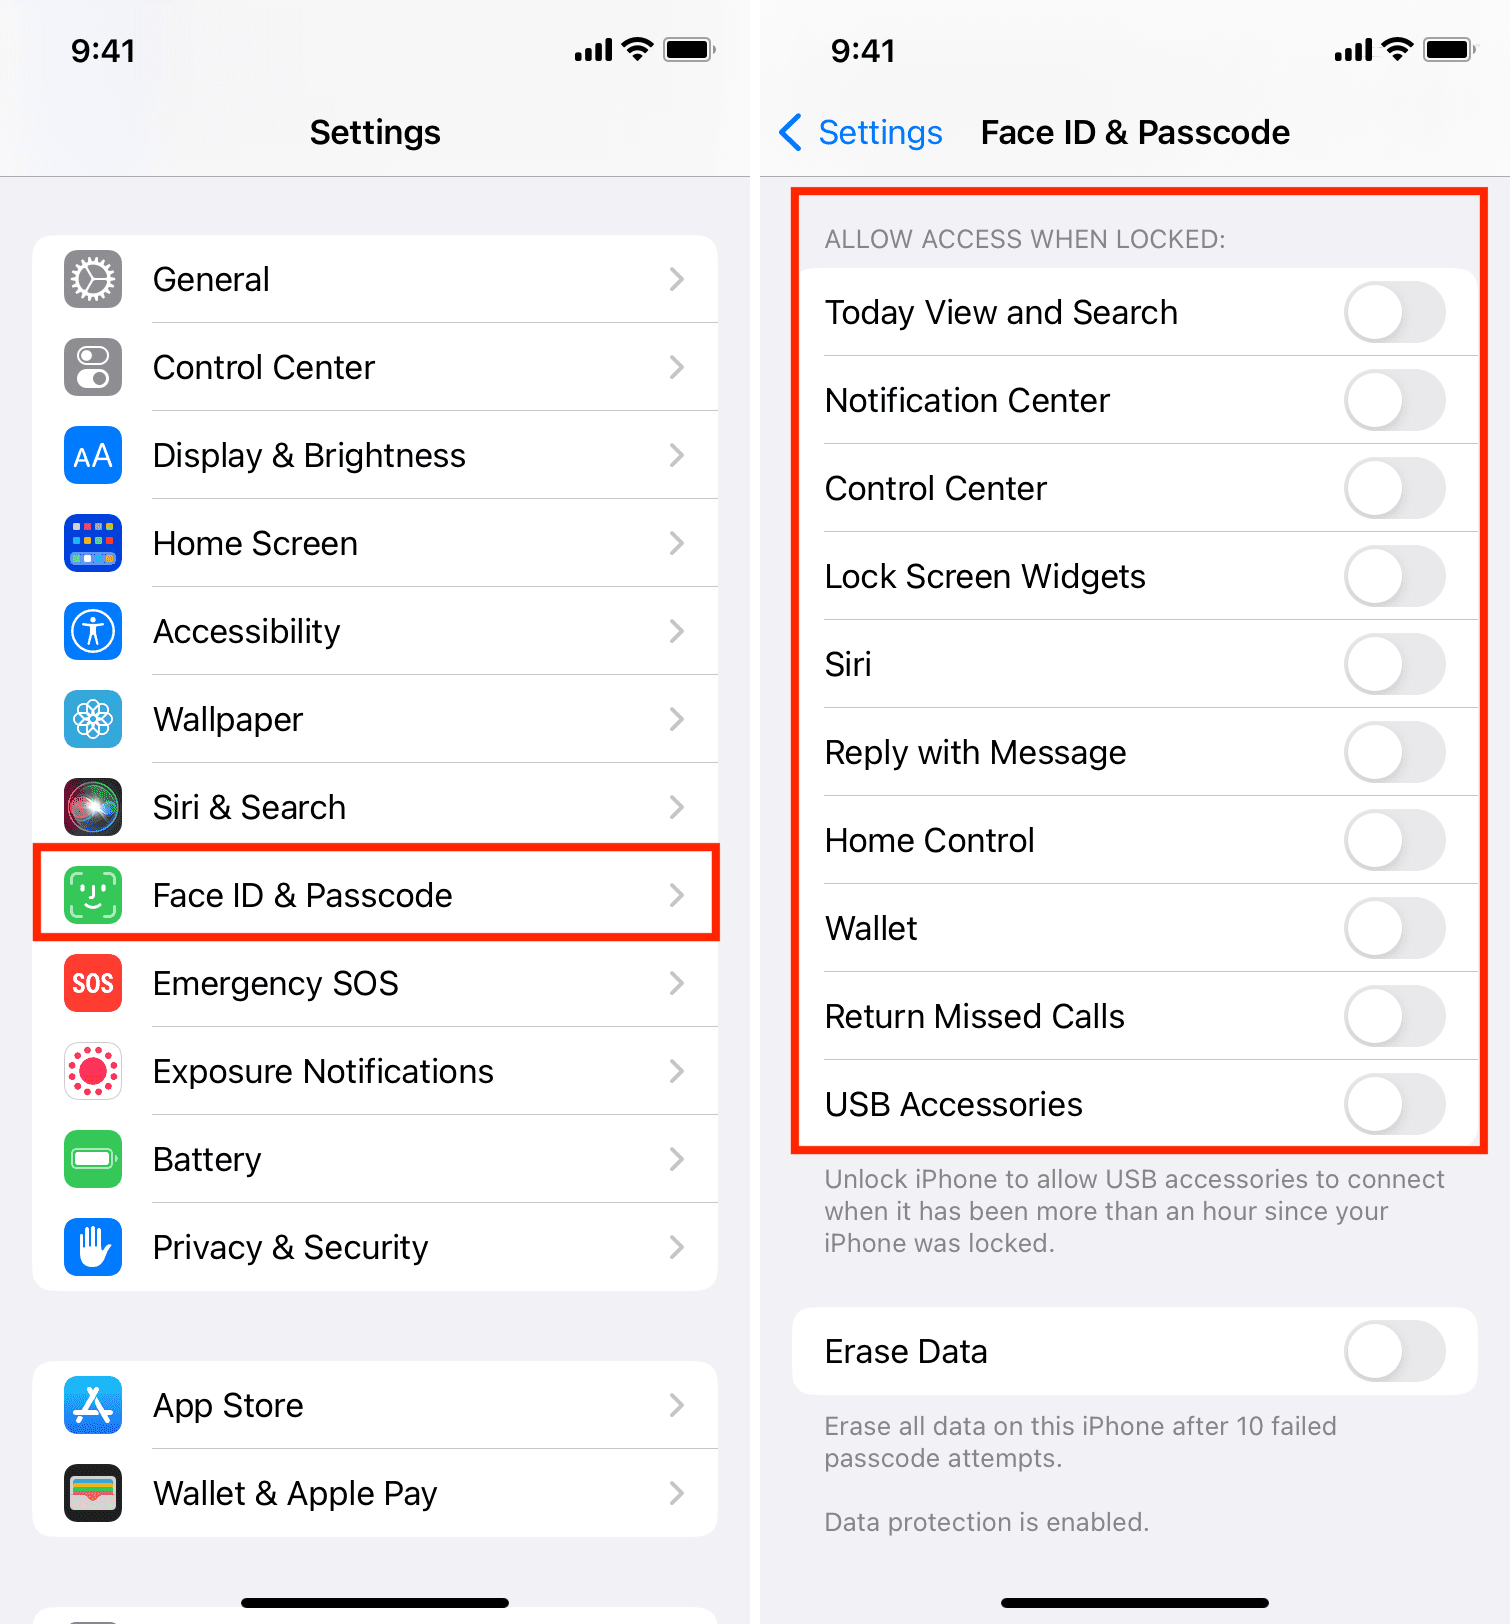
10. Prevent sensitive information from appearing on the Lock Screen
You can prevent apps from showing notifications on the Lock Screen (next tip). In addition to that, if you go to iPhone Settings > Face ID/Touch ID & Passcode, you can turn off certain things like Today View, Search, Wallet, Reply with Message, and more from working on the Lock Screen.
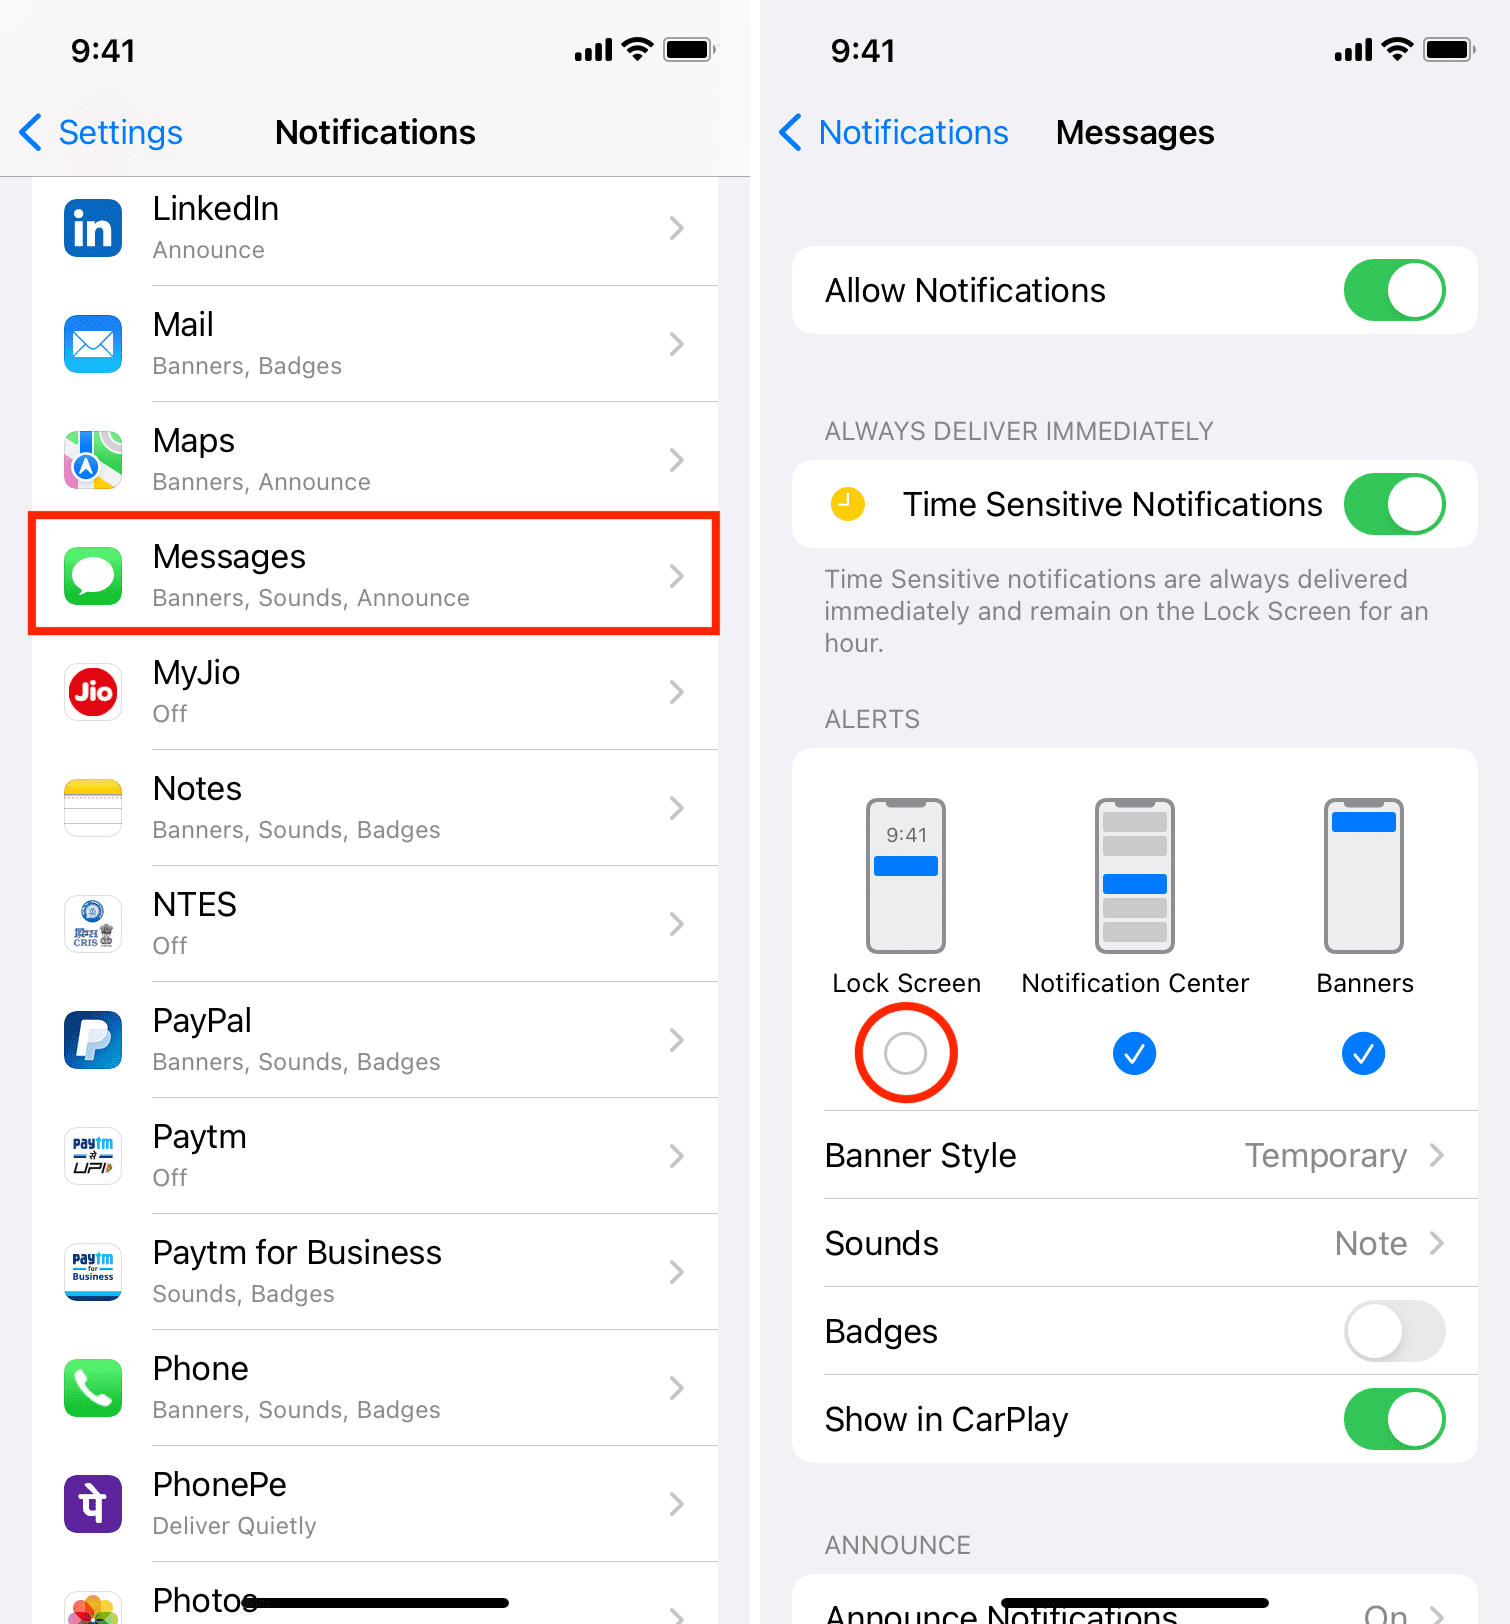
11. Control app notifications on the Lock Screen
If you have some sensitive apps, you can prevent their notification from showing on the Lock Screen. This will ensure that an onlooker can’t see a preview of these notifications.
Go to Settings > Notifications and tap the app name. Next, uncheck the box for Lock Screen to prevent this app’s notification from appearing on the Lock Screen. For more, check out our guide on securing your iPhone Lock Screen.
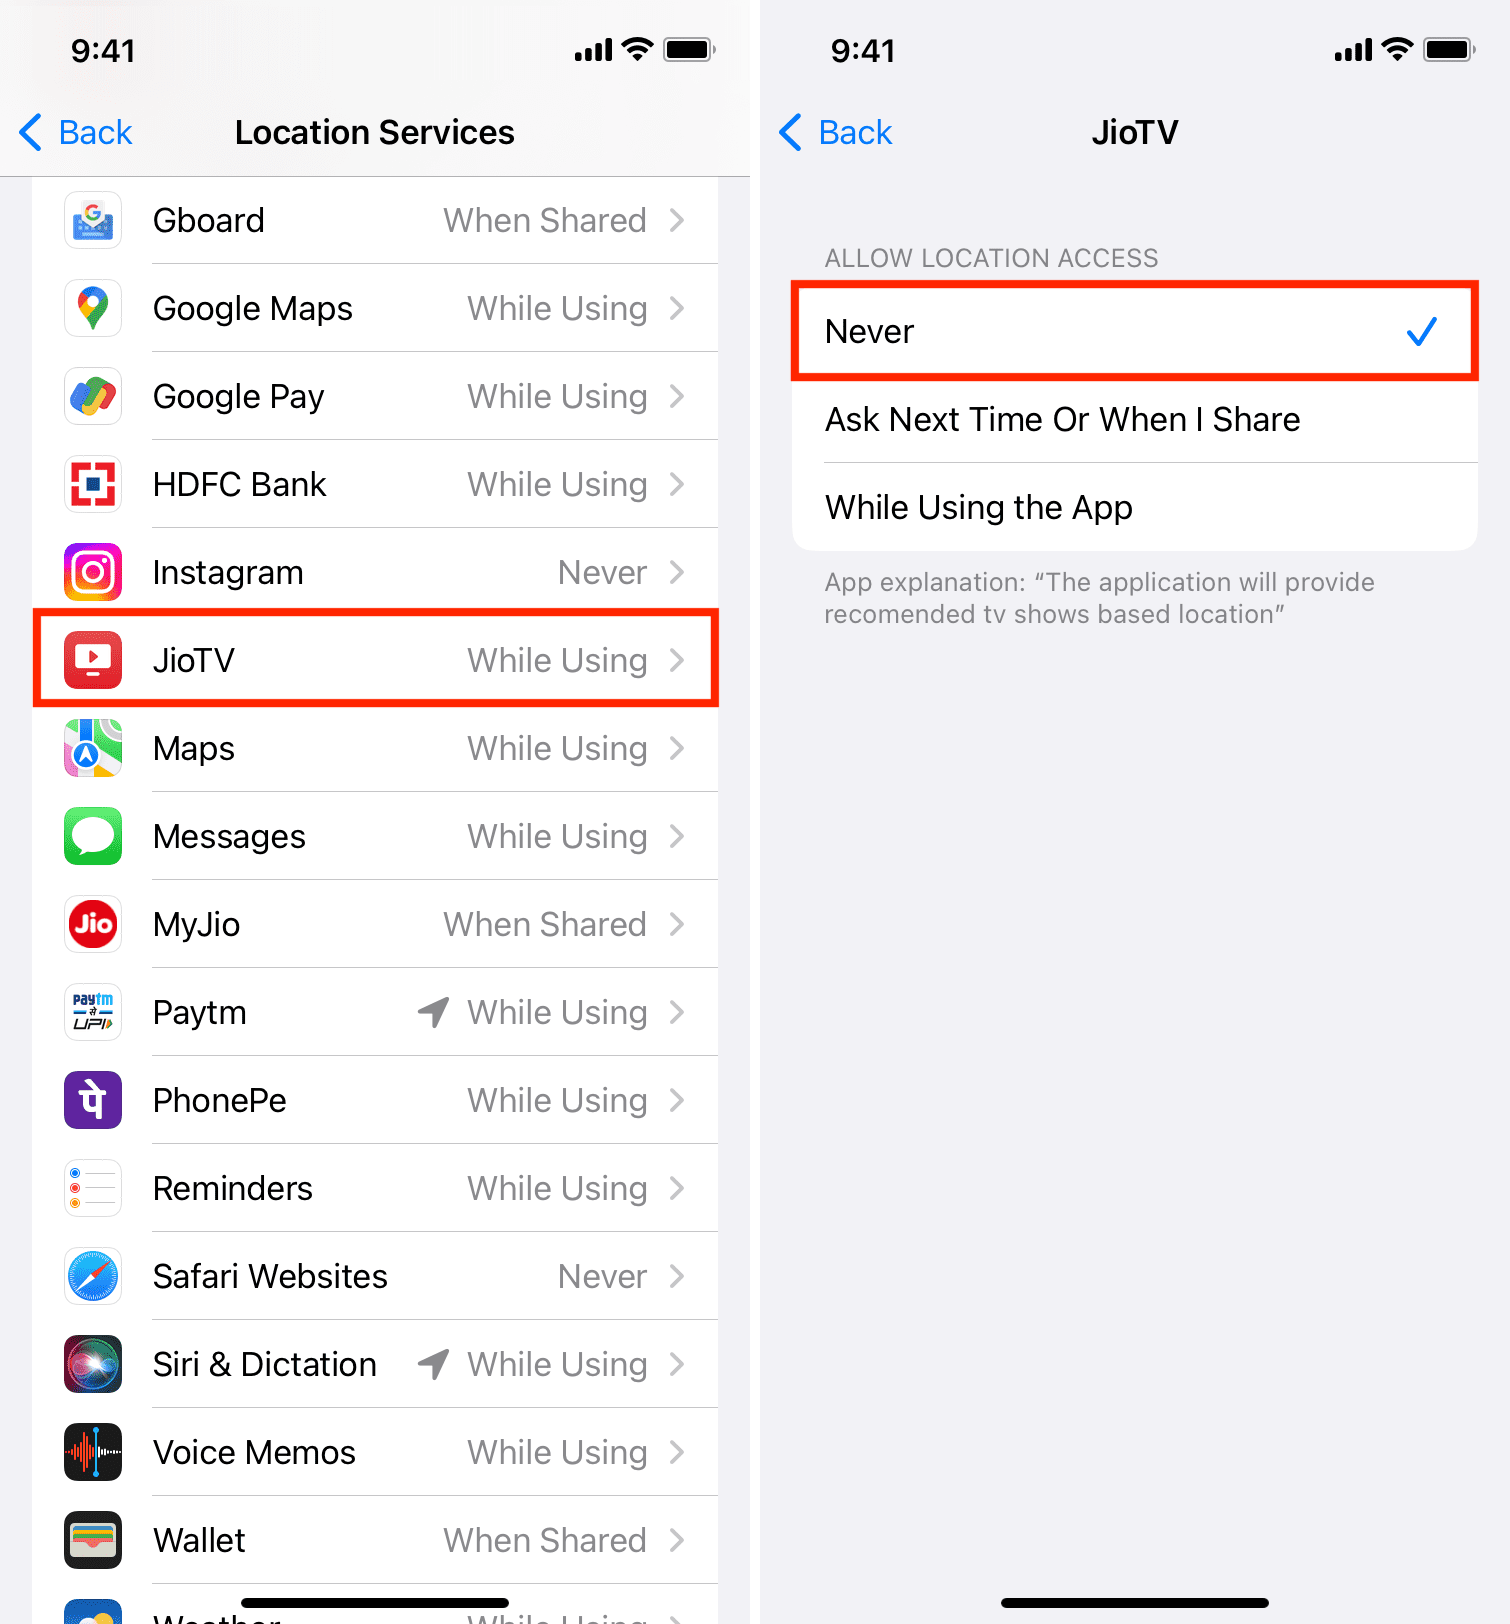
12. Review app location access
Some apps like Uber must have access to your location to function. However, several apps request your location but can work perfectly fine even if their location privileges are withdrawn.
You can see and manage these from iPhone Settings > Privacy & Security > Location Services. Tap an app from here and choose Never to stop it from accessing your location.
13. Double-check other privacy settings
You should go to iPhone Settings > Privacy & Security on a regular basis and make sure only a few apps have access to your contacts, microphone, camera, and other sensitive options.
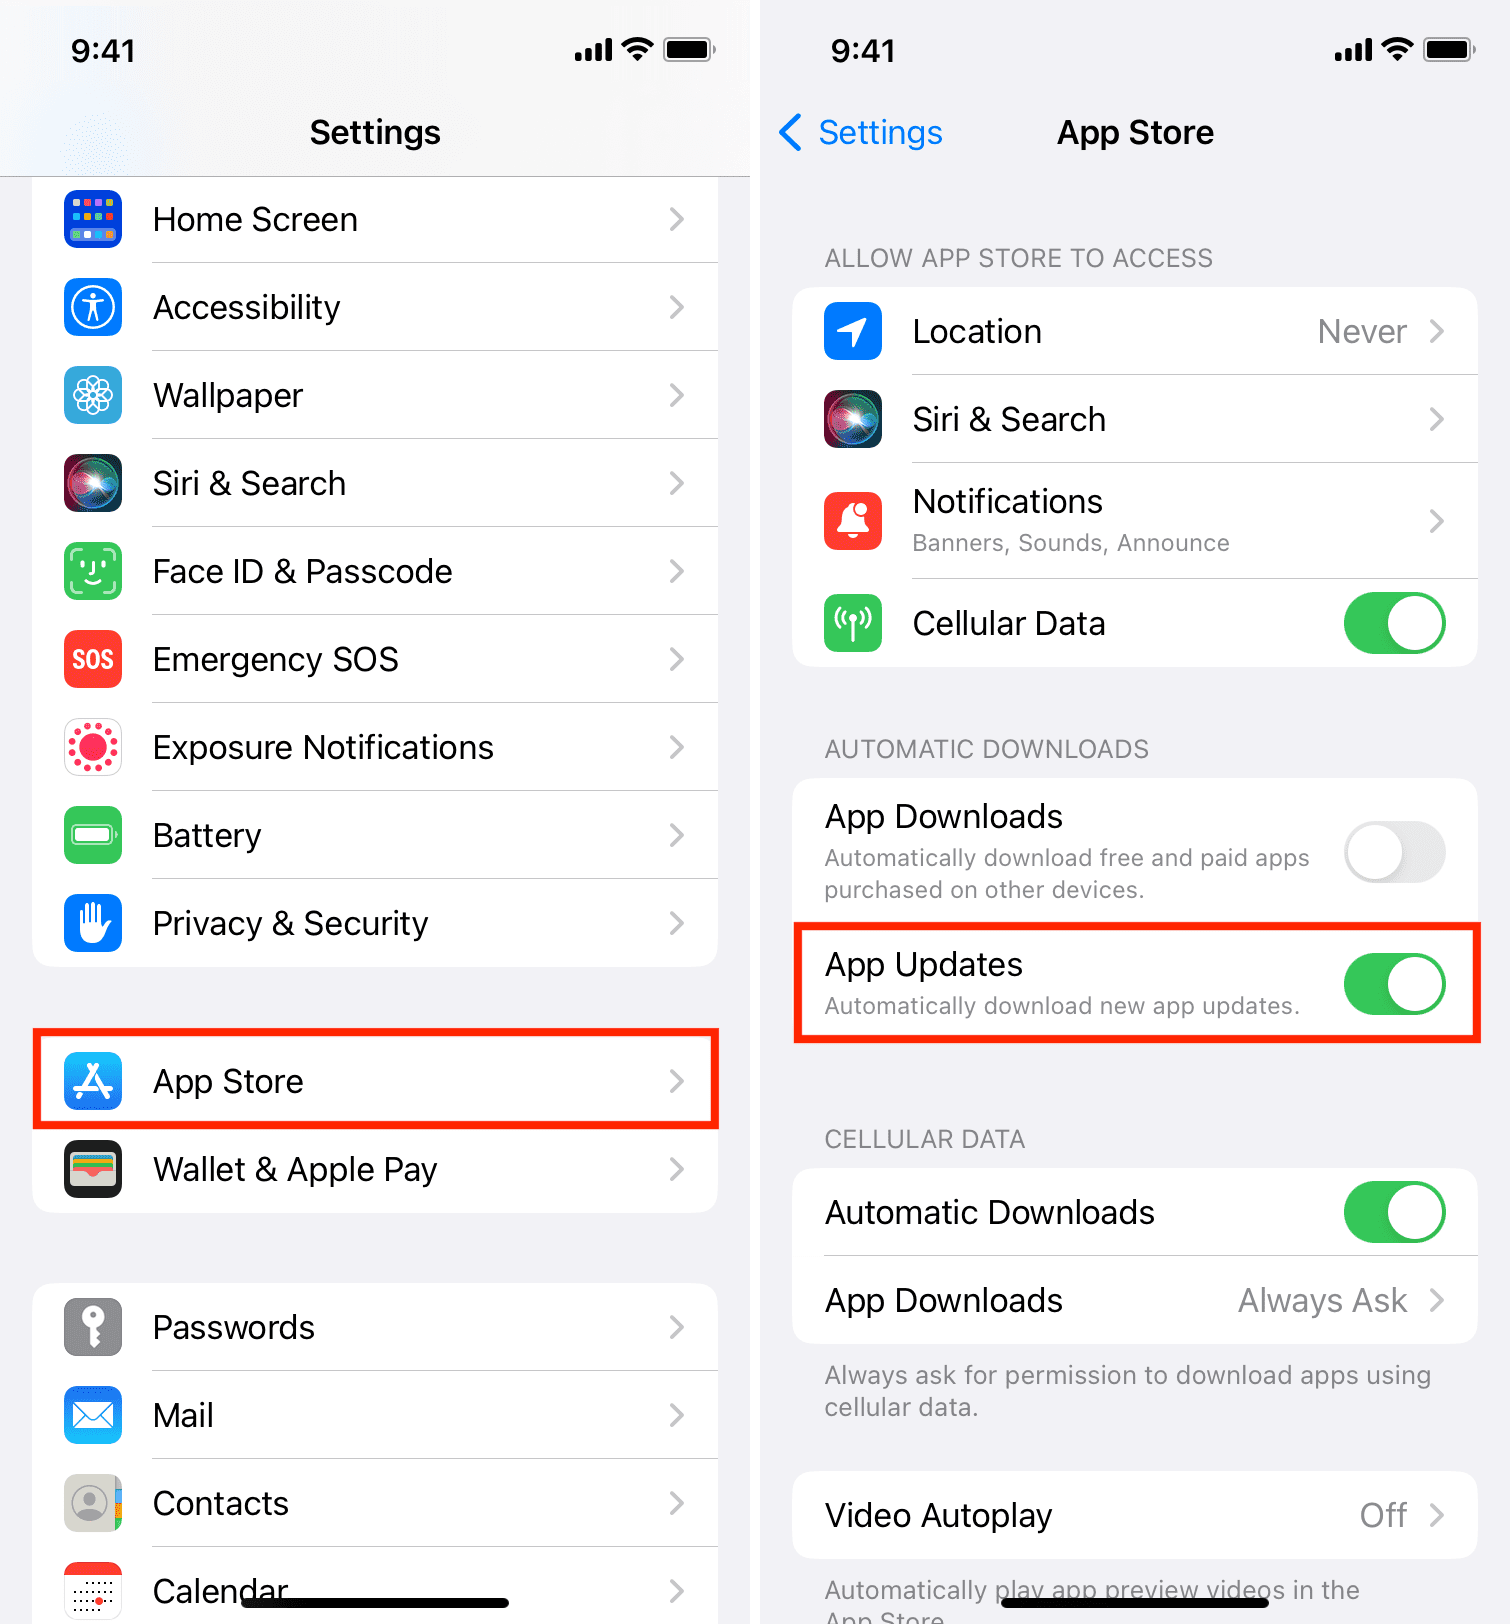
14. Keep your apps updated by enabling auto-update
App developers regularly publish updates to fix bugs and add new features. The newest version of an app is generally better with security patches and improvements.
Since manually updating every app can be a chore, go to iPhone Settings > App Store and enable App Updates under Automatic Downloads. If you don’t have Wi-Fi often but have unlimited cellular data, you can enable Automatic Downloads to take care of app updates over mobile data.
15. Install the latest version of iOS
Apple pushes iOS updates that fix known bugs, improve the overall security, and are recommended for all iPhone users. If you’re on an outdated version of iOS, go to Settings > General > Software Update to download and install the latest build of iOS.
16. Prevent your iPhone from auto-joining Wi-Fi and hotspots
You can stop your iPhone from auto-joining open Wi-Fi networks and hotspots, as these can easily be exploited (and are deployed publicly in many cases) to steal your data.
To control this, go to iPhone Settings > Wi-Fi and choose Off for Ask to Join Networks and Never for Auto-Join Hotspot.
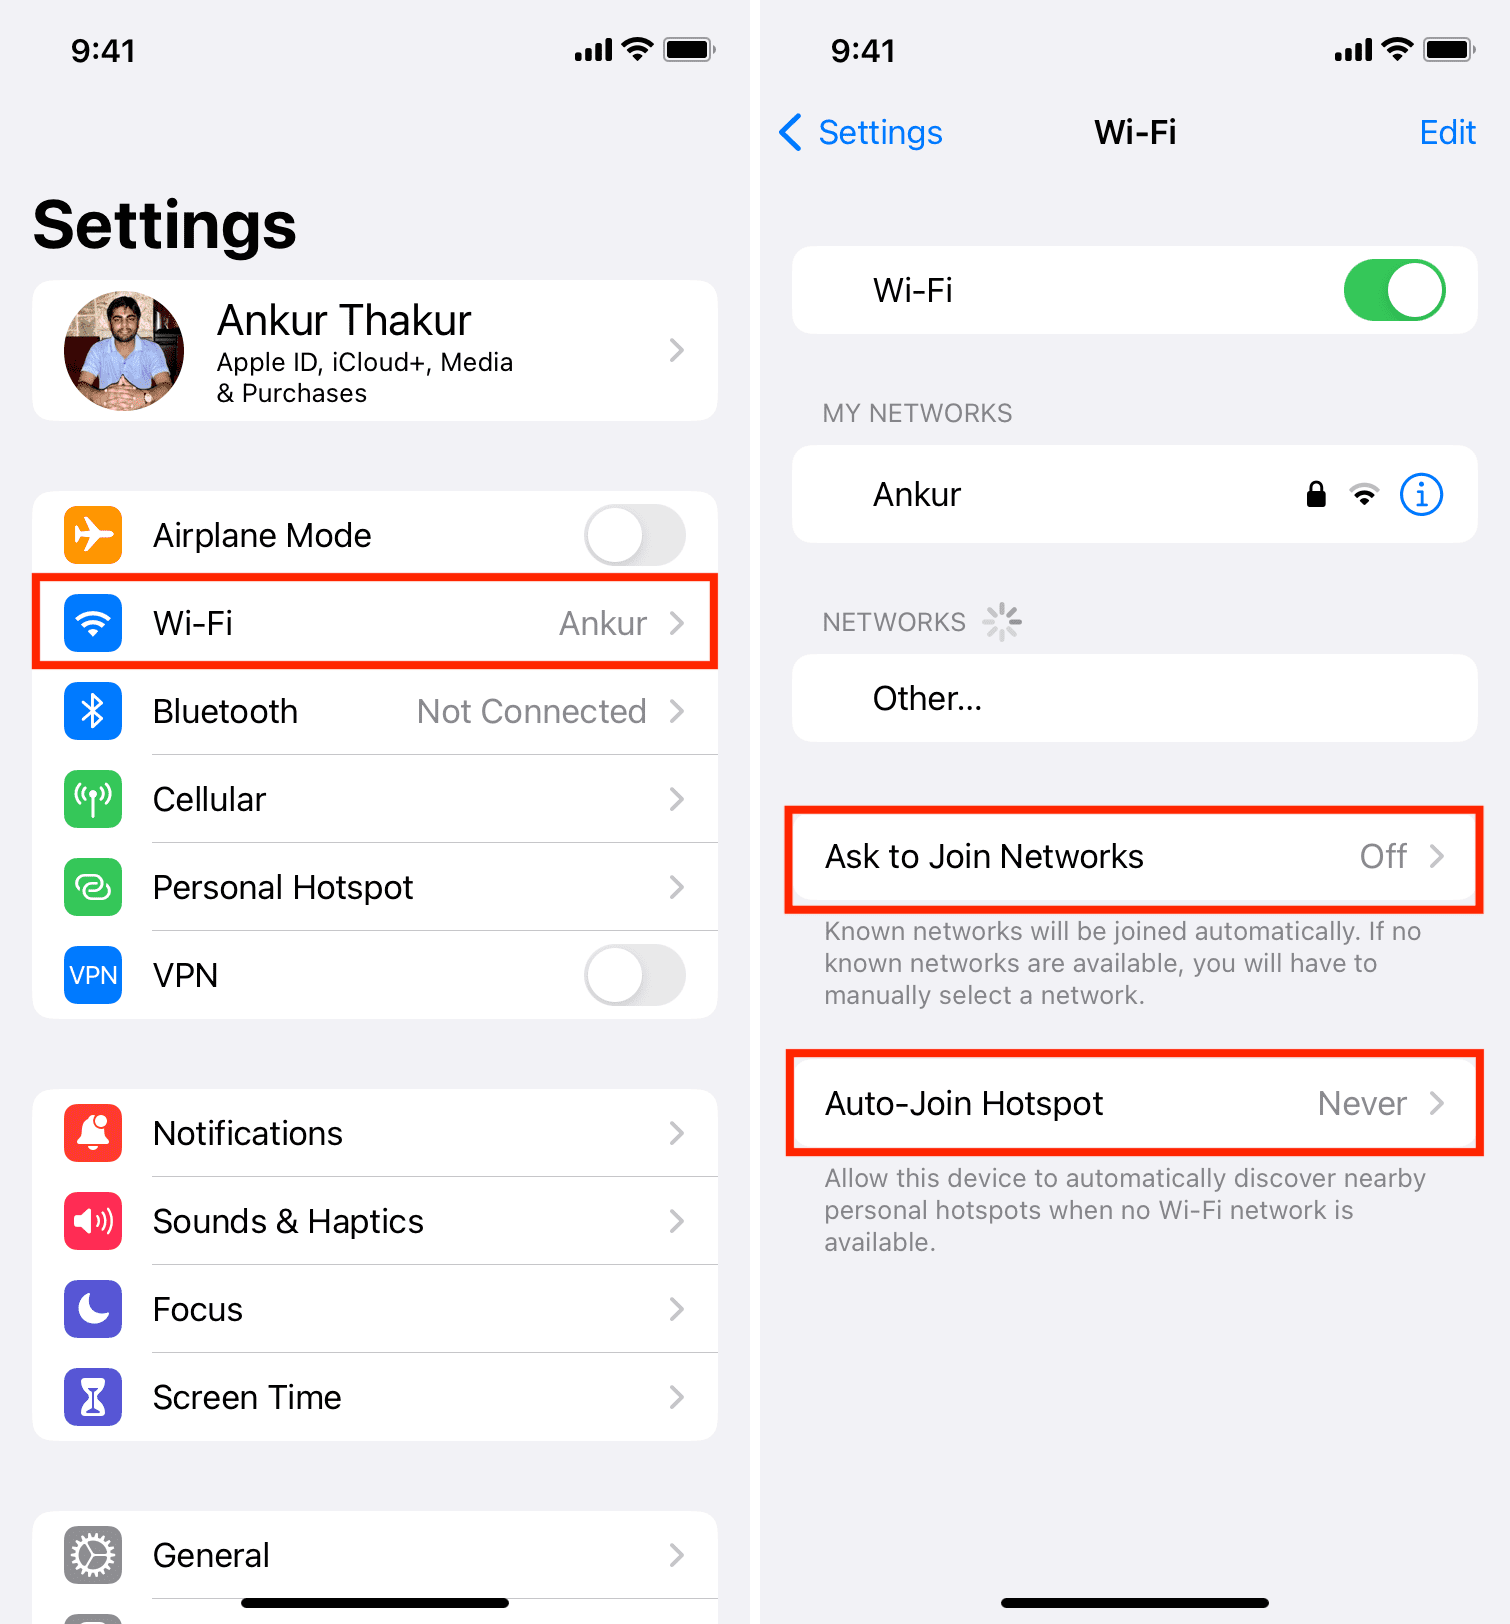
You should also tap the info button ⓘ next to a previously joined network and turn off Auto-Join or tap Forget This Network if you don’t plan on using this Wi-Fi network in the near future.
17. Don’t use a free VPN at all times
Free VPNs have to find a way to make money, and most of the time, it’s with your data. If you must use a VPN, it’s better to research and get the paid version of a reputable VPN. And if you don’t want to do that, make sure you use free VPNs sparingly.
18. Don’t download just about any app, and do your research first
The App Store is well regulated, and Apple has checks and balances in place. Still, there have been ample cases of imposter or unsafe apps making their way to the iOS App Store. Therefore, when you want to download an app for a particular task, do your due diligence and get apps that have seen regular updates, have good ratings & reviews, and so forth.
- Phil Schiller asked ‘is no one minding the store?’ after a rip-off app hit #1 in the App Store
- After an App Store review approved it, a scam Bitcoin app stole one customer’s life savings
And even when you open an app, don’t go about tapping “Allow” on every popup it presents. Read the alert and allow the app to access your location, contacts, microphone, etc., only if you think it is necessary.
These are some essential tips to keep your iPhone and its data safe and secure. If you have additional recommendations, please feel free to put them in the comments below.
On a related note: 10 ways to boost your privacy on iPhone and iPad