Looking to broadcast on YouTube? In this step-by-step tutorial, we’ll show you how you can live stream to YouTube from your iPhone, iPad, Android phone, or computer.
From iPhone and iPad
These are the requirements to create a live stream to YouTube from your iOS, iPadOS, or Android device:
1) You must have at least 50 subscribers on your YouTube channel.
- Important: While it takes just 50 subscribers to get the live streaming feature on YouTube, your stream is restricted and shown only to a limited number of viewers. Plus, after you stop streaming, it will default to private settings. Once you have over 1000 subscribers, the above restrictions will not be there.
- While everyone can create a YouTube channel in a few minutes, gaining subscribers takes time.
2) Your YouTube channel must be verified.
- It means you must go to youtube.com/verify and verify using your phone number and OTP. It’s easy.
- Once you verify your YouTube channel, you can live stream from your mobile. Plus, verifying also allows you to upload videos longer than 15 minutes, add custom thumbnails, and appeal Content ID claims.
3) Your iPhone and iPad must be updated.
4) Your YouTube channel must not have had live-streaming restrictions in the last 90 days.
5) You must enable live streaming on YouTube. And even after enabling live streaming, you may have to wait for 24 hours to start your first YouTube live stream. However, future live streams will be instant with no waiting period. If streaming isn’t enabled for your account, you will be asked to do that while following the initial steps below.
6) For a decent YouTube live stream, you should connect your iPhone or iPad to strong Wi-Fi or cellular data (5G, 4G).
Start YouTube live stream from mobile
Once you meet the minimum requirements, follow these steps to live stream to YouTube from your iPhone, iPad, or Android phone.
1) Open the YouTube app and tap the plus button.
2) Swipe to the Live section and tap Get Started if you see it.

- Important: You can’t live stream from your phone if it says, “Eligibility. Your channel does not meet our updated eligibility requirements for mobile live streaming. You can still stream with your webcam or broadcasting software.”
3) Tap the pencil icon from the bottom and, edit the title and featured image, and make other adjustments as required. You can also adjust the visibility settings and mention whether this stream is made for kids or restrict it to people aged under 18.

4) Now, return to the previous screen and flip the camera if needed. You can also choose to stream horizontally or vertically. One important option here is the curved arrow that lets you copy the link for this live stream and share it with others, like your X (Twitter) and Facebook audience.
5) With everything in order, tap the Go live button to start streaming to YouTube from your mobile. It will start a 3-second timer, and then your live stream will start.

Note that if you did not select the audience in Step 3, you will be asked if this stream is for kids or not. Unless you are creating content for kids, it should be “No, it’s not made for kids.”
6) You have handy options during live streaming, such as the button to trigger flashlight, add filters, start a poll, and more. Use them as needed. Once you are done, tap the X button and hit End to terminate this live stream.

From Mac or PC
You can use the updated version of Google Chrome or Firefox to go live on YouTube using your computer’s webcam and microphone. Follow this official guide if you want to use an encoder to live stream your gameplay or use multiple cameras and microphones.
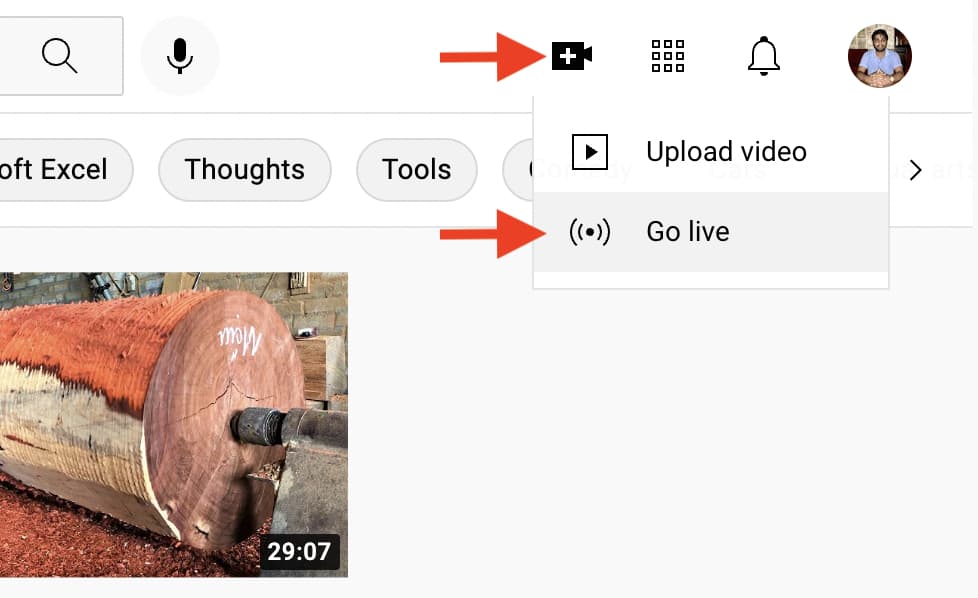
1) Visit YouTube.com and make sure you’re signed in.
2) Click the plus button from the top right and select Go live.
- Important 1: If it says, “Live streaming isn’t available right now,” click Enable. Next, it will say, “Gain access to use this feature. To access live streaming on desktop, first verify your phone number.” Click Verify and complete the phone verification. After that, return to the previous screen, and you will see “Ready in 24 hours. It takes 24 hours to activate your account for live streaming. Once activated, you can go live instantly.” After this waiting period, you can live stream instantly on all future occasions.
- Important 2: If it says, “How you’ll appear, upload picture, create channel,” that means you have not created your YouTube channel. Follow along and do that. After this, you may also have to follow what you see in Important 1 above.
3) Fill in the details of the stream, like title, description, thumbnail, and most importantly, the audience. You can also click Show More to add tags and subtitles and access additional settings. With all that in order, click Next.

4) Now, tailor your stream to your needs by setting who can send replies or react, and so forth. After that, hit the Next button.

5) Set the visibility as public, private, or unlisted. Next, you can schedule it for later or leave the current date and time to go live now and click Done.

6) Take one final look at the stream preview and click Go live to broadcast to YouTube from your computer.

When done, click End Stream > End. After that, you can click Edit in Studio to make further changes.
Apart from this, third-party apps like Live Now – Live Stream allow you to live stream to YouTube and other services.
Make sure you follow YouTube’s community guidelines to keep your account in good standing.
On a related note:
- Live stream from mobile (Google Support page)
- Live stream from computer webcam (Google Support page)
- How to share the specific timestamp link of a YouTube video
- How to not overpay for YouTube Premium