Check out these 7 free and easy tools to compress images on your Mac, saving space without compromising quality in just a few clicks.
As cameras and screen resolutions increase, the photos and screenshots you take can run into several MBs. The large file means it occupies more space (on Mac, iCloud, SSD) and takes longer to send via Messages, email, and so forth. One way to address this is by reducing image file size on Mac.
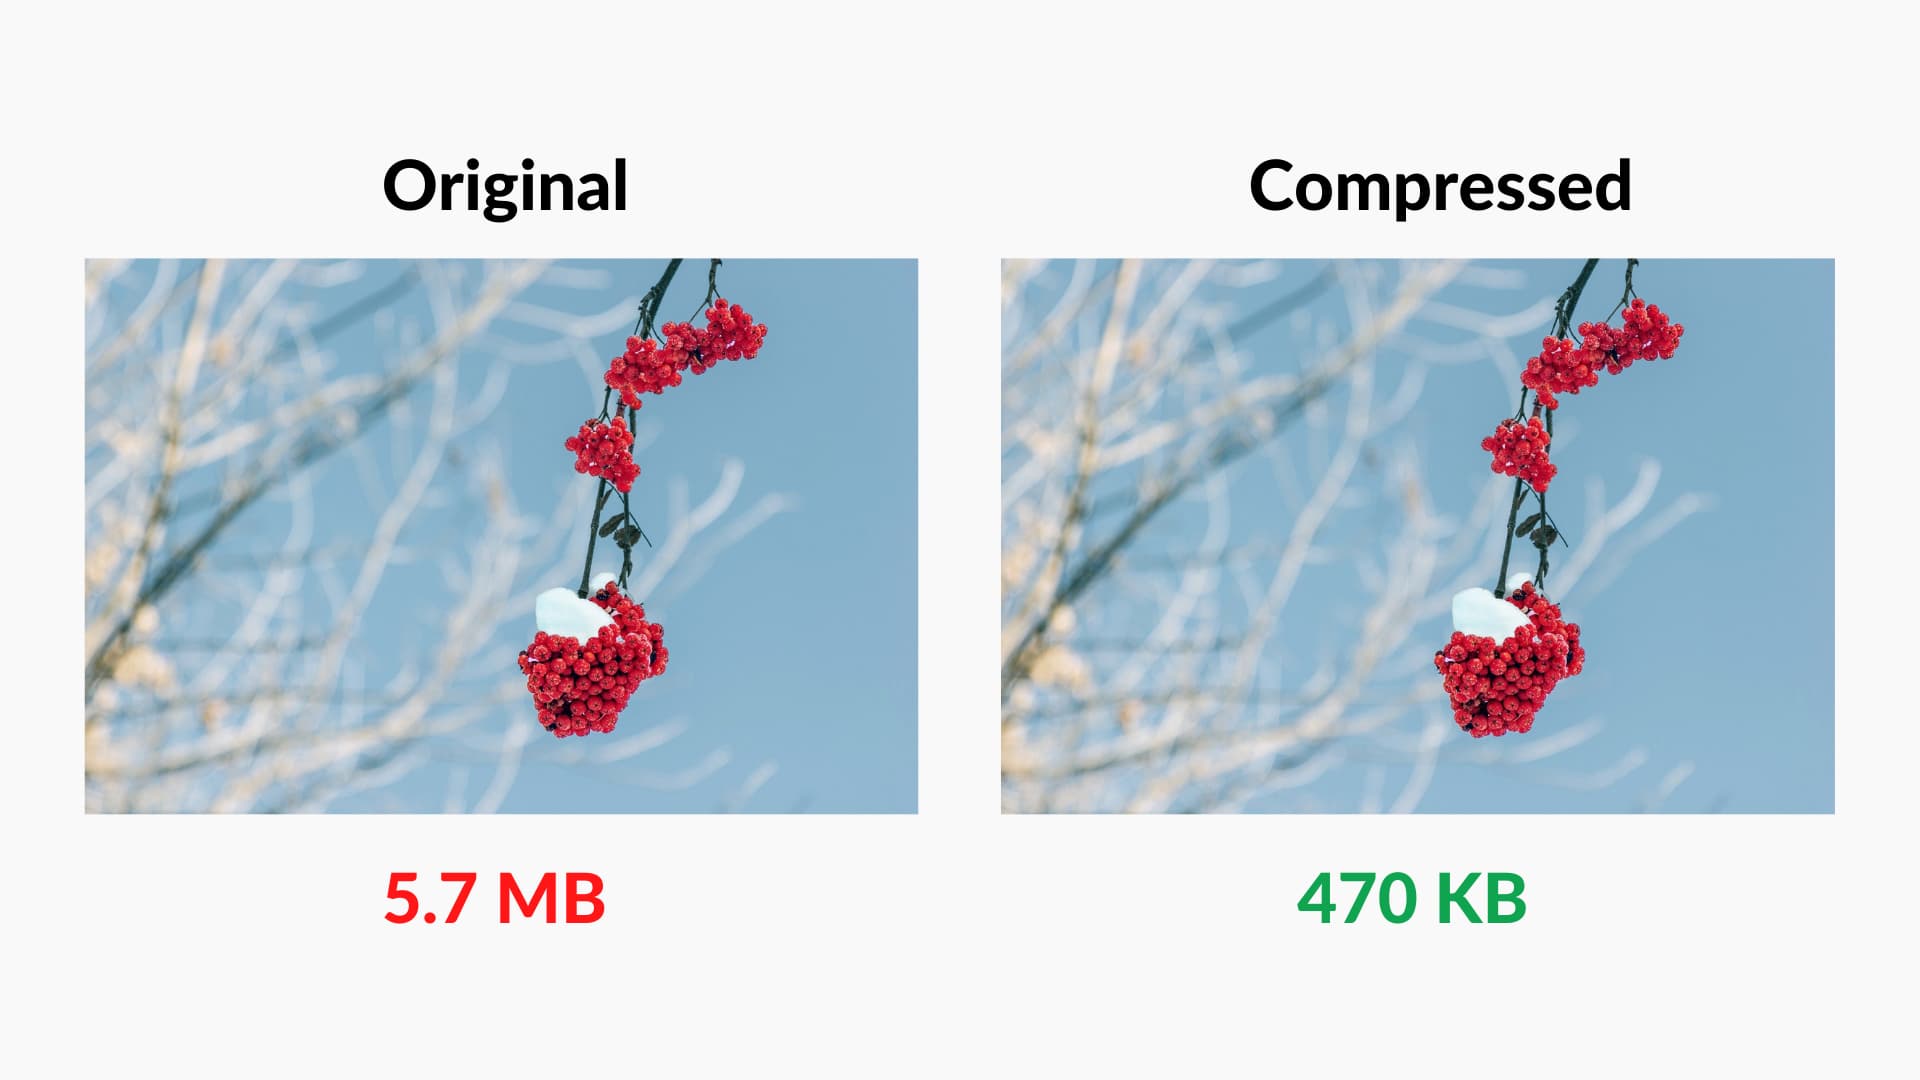
Note that compressing and decreasing the photo size certainly lowers the picture quality a bit. But in most cases, you won’t notice much difference.
Image file sizes depend on these factors
The file size of a photo depends on various things, such as:
- Image dimensions: A 1920 x 1080 image will have a bigger file size than a 720 x 480 image.
- Image format: For most pictures, JPG/JPEG tends to have a smaller file size than PNG. But if your image is mainly text-based, PNG is better.
- Image content and color depth: If there are many black portions in the image instead of white, it can have a smaller file size.
- Camera type: Pictures taken by the front iPhone camera or the MacBook’s webcam will almost always have a smaller file size than the primary camera, which runs into several megapixels.
- Flash: If you use flash while shooting pictures, this will result in an image with increased file size.
- Screen resolution: The screenshot file size of my new retina 13-inch MacBook Pro is far more than that of my non-retina 13-inch MacBook Pro. This is because the sharper screen has more pixels and image dimensions, resulting in bigger screenshots.
Now that you know the basics about image file size, here are some quick ways to convert large images on Mac to smaller sizes.
1. Reduce image file size by changing their format
I take dozens of screenshots on iPhone and Mac every day for my articles. By default, Apple devices take and save screenshots in PNG format.
If the screenshot only has text, I almost always keep it in PNG format. But if the image has graphics (like the screenshot of Mac’s Desktop), I convert it to JPG in 99.9% of cases. This is because JPG offers almost the same picture quality as PNG but significantly reduces file size. At times, the file size reduction is up to 98%!
Other methods listed below will show you how to change the image format. And if you take lots of screenshots, you can use an easy Terminal command to change Mac’s screenshot format to reduce size.
2. Compress file size by resizing the image
If you have a huge image of width and height, like 4000 px and 2800 px, it likely runs into several megabytes. To address this, you can resize and reduce the dimensions to something like 2000 px into 1400 px. This will lower the file size.
You can see the image dimensions by selecting it and pressing Command + I. To make the image file size even smaller, compress the resized image.
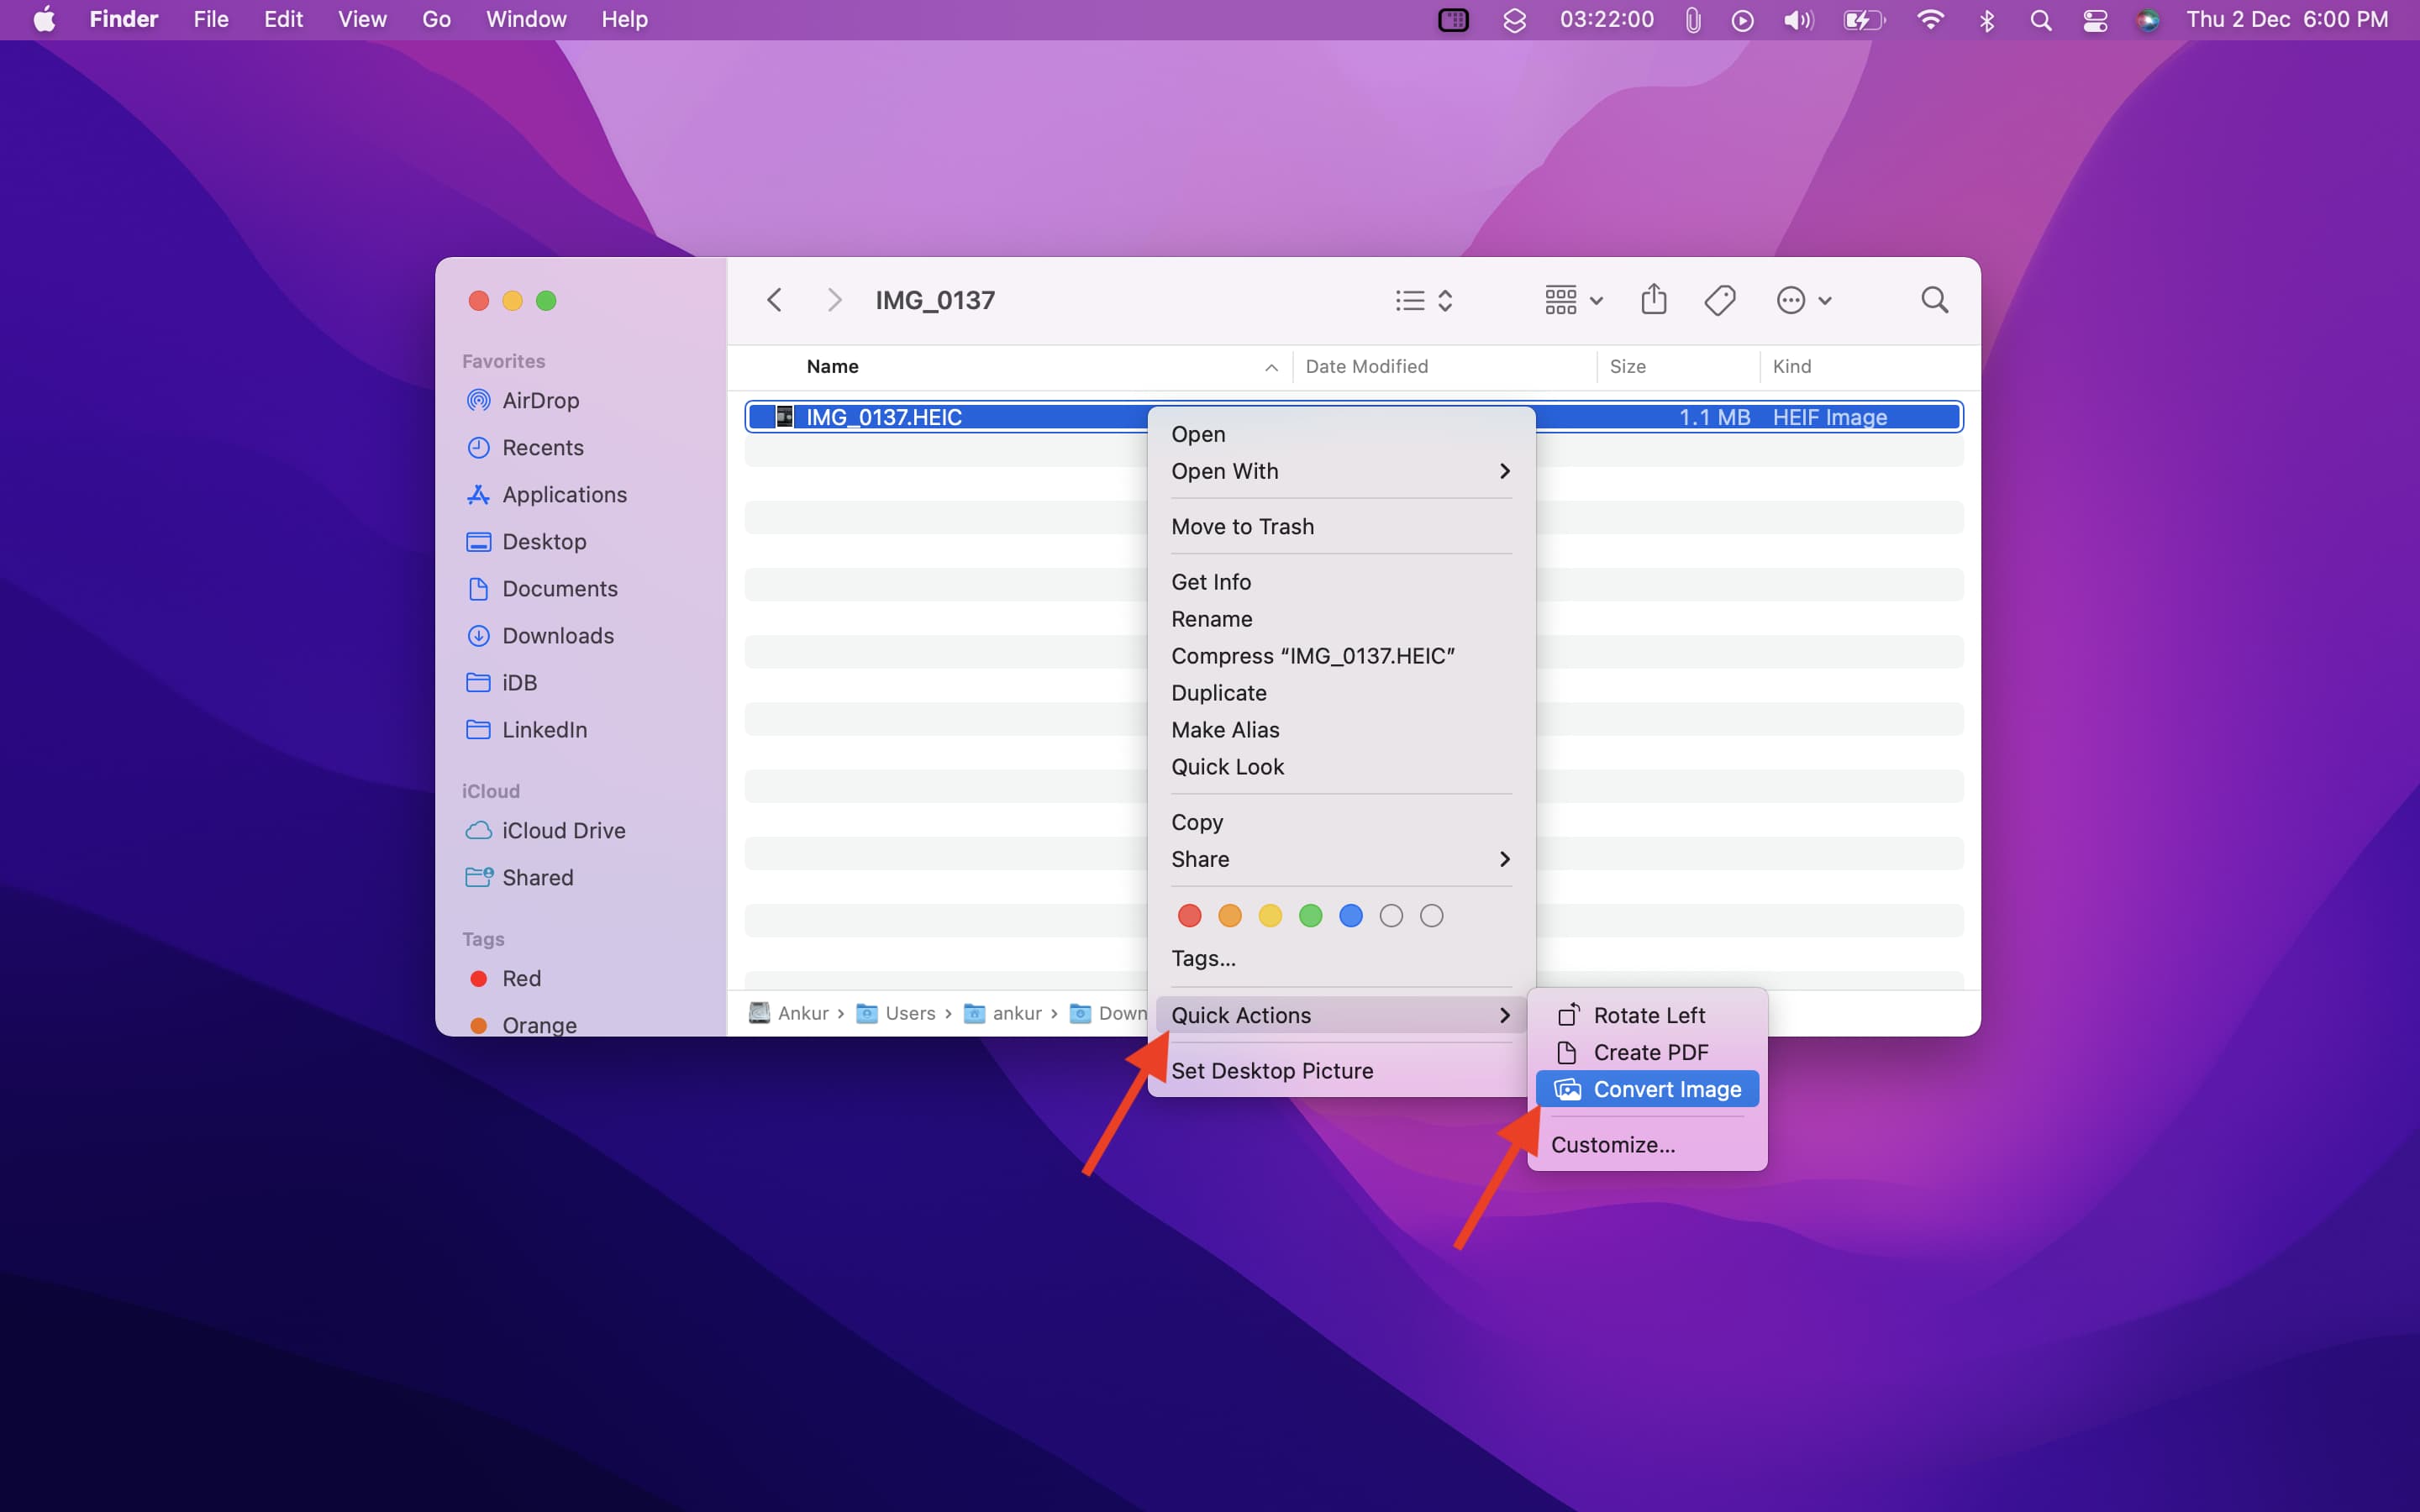
3. Compress photos with a right-click
You can use the handy Finder Quick Actions menu to compress images on Mac running macOS Monterey and later.
1) Select one or more images and right-click or Control-click.
2) Choose Quick Actions > Convert Image.
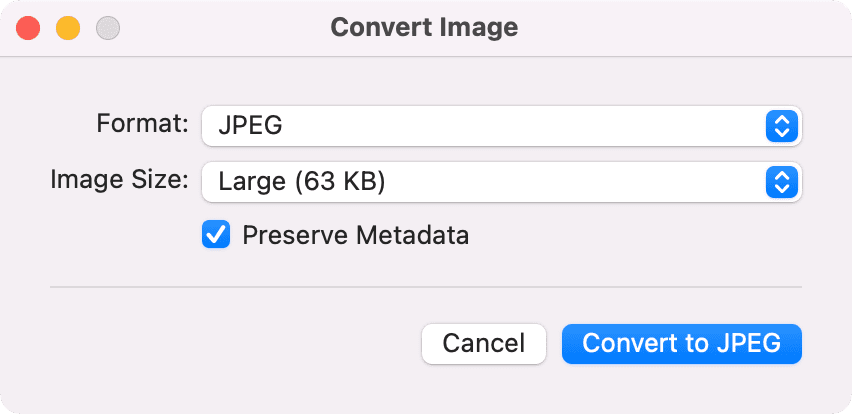
3) JPEG format is suitable unless you wish to change it. Checked “Preserve metadata” means you want to keep the photo details like date, time, location, etc. You can uncheck that if desired.
4) Click the Image Size dropdown menu and choose Small, Medium, Large, or Actual Size. Note that Actual Size may offer significant savings only when you change the format, such as when you’re converting PNG to JPEG. If you stay with the same format, choosing Actual Size won’t reduce the file size by much.
5) Finally, click Convert to [Format Name] to reduce the image file size and save it in the same location as the original files.
Tip: Click “Size” on top of the Finder folder to sort files by their size.
4. Use Preview on Mac to compress pictures
Preview offers the tools to reduce the file size of one or multiple images.
Compress one image
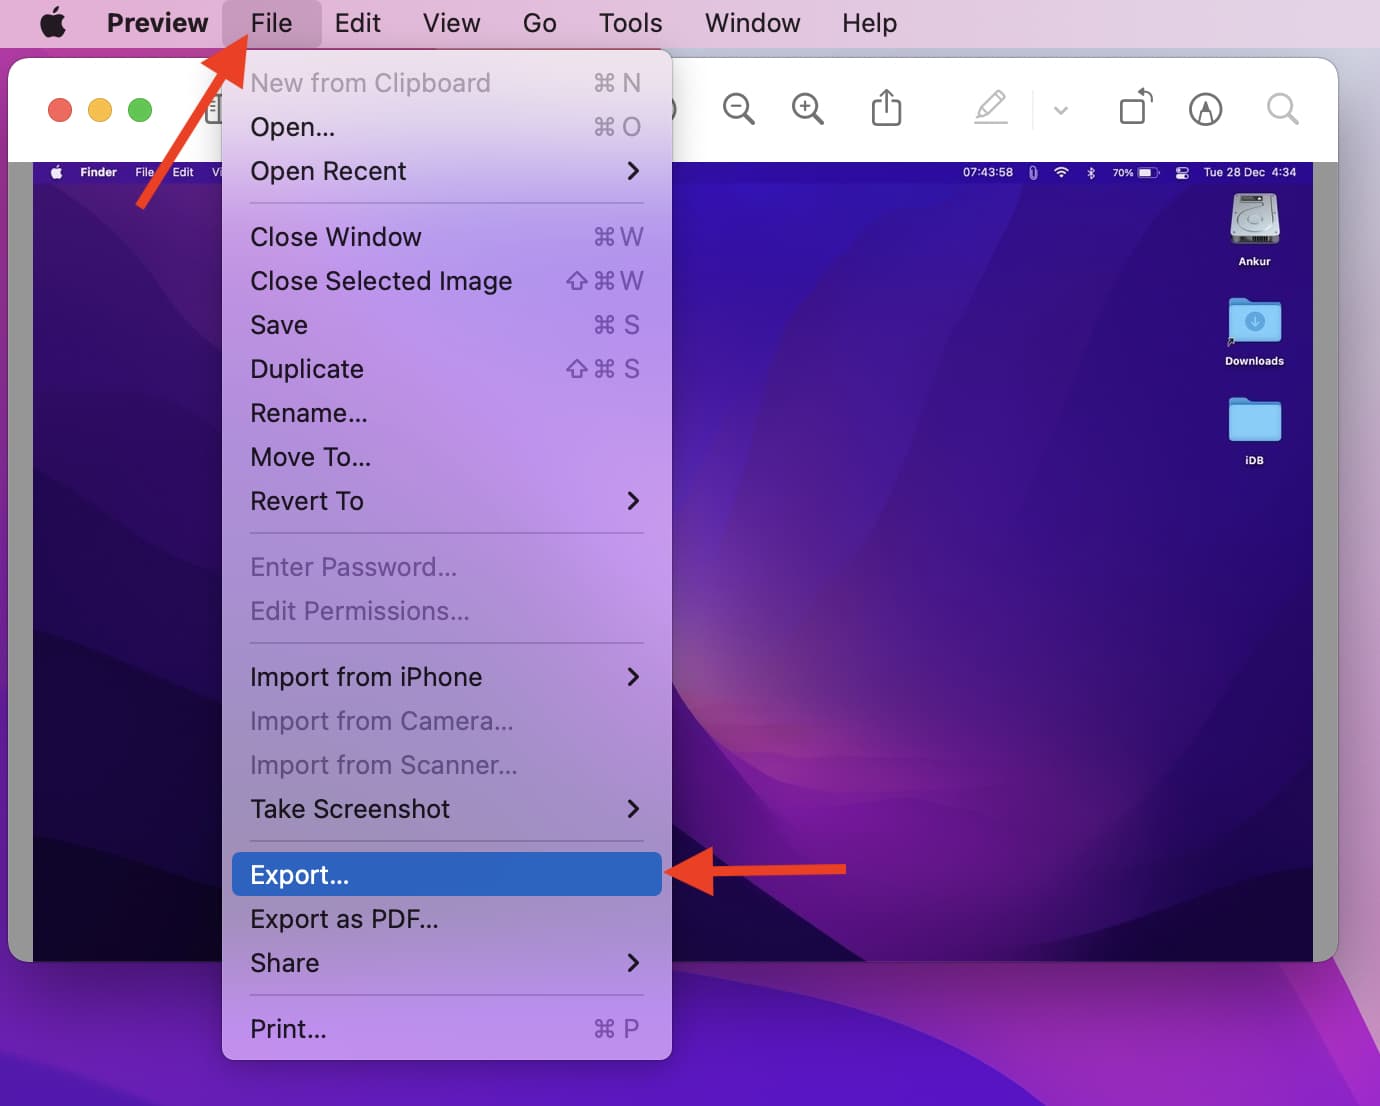
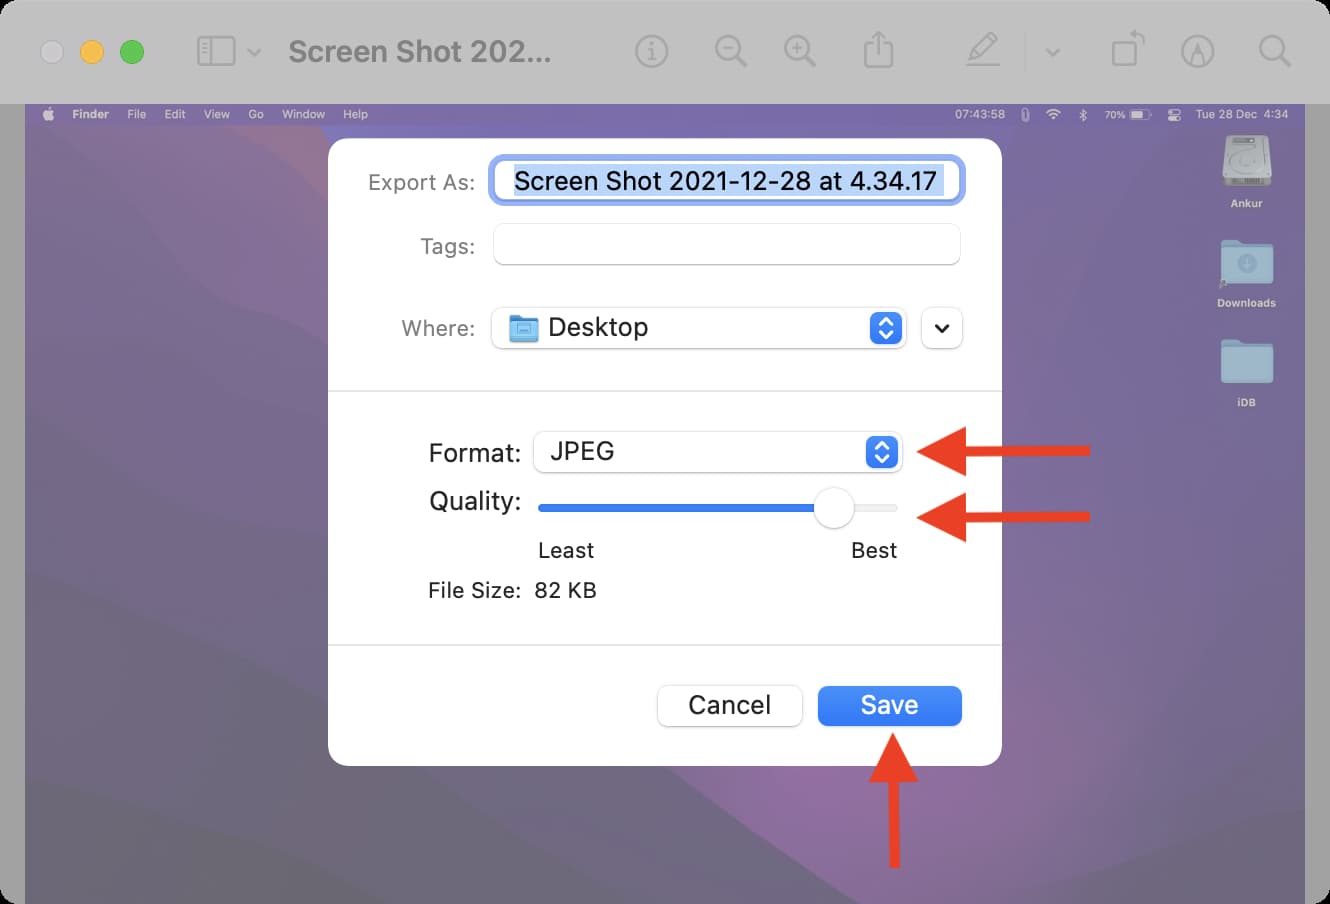
1) Double-click to open the picture in the Preview app.
2) From the top menu bar, click File > Export.
3) Choose the format. HEIC isn’t compatible everywhere but offers a significantly smaller file size. You may also choose JPEG or others as needed.
4) Drag the quality slider to lower it.
5) Once you are satisfied with the file size, click Save.
Tip: After compressing the image, if you feel the quality is unusable, follow the same steps with the original image and go easy on the quality slider.
Compress images in bulk/batch
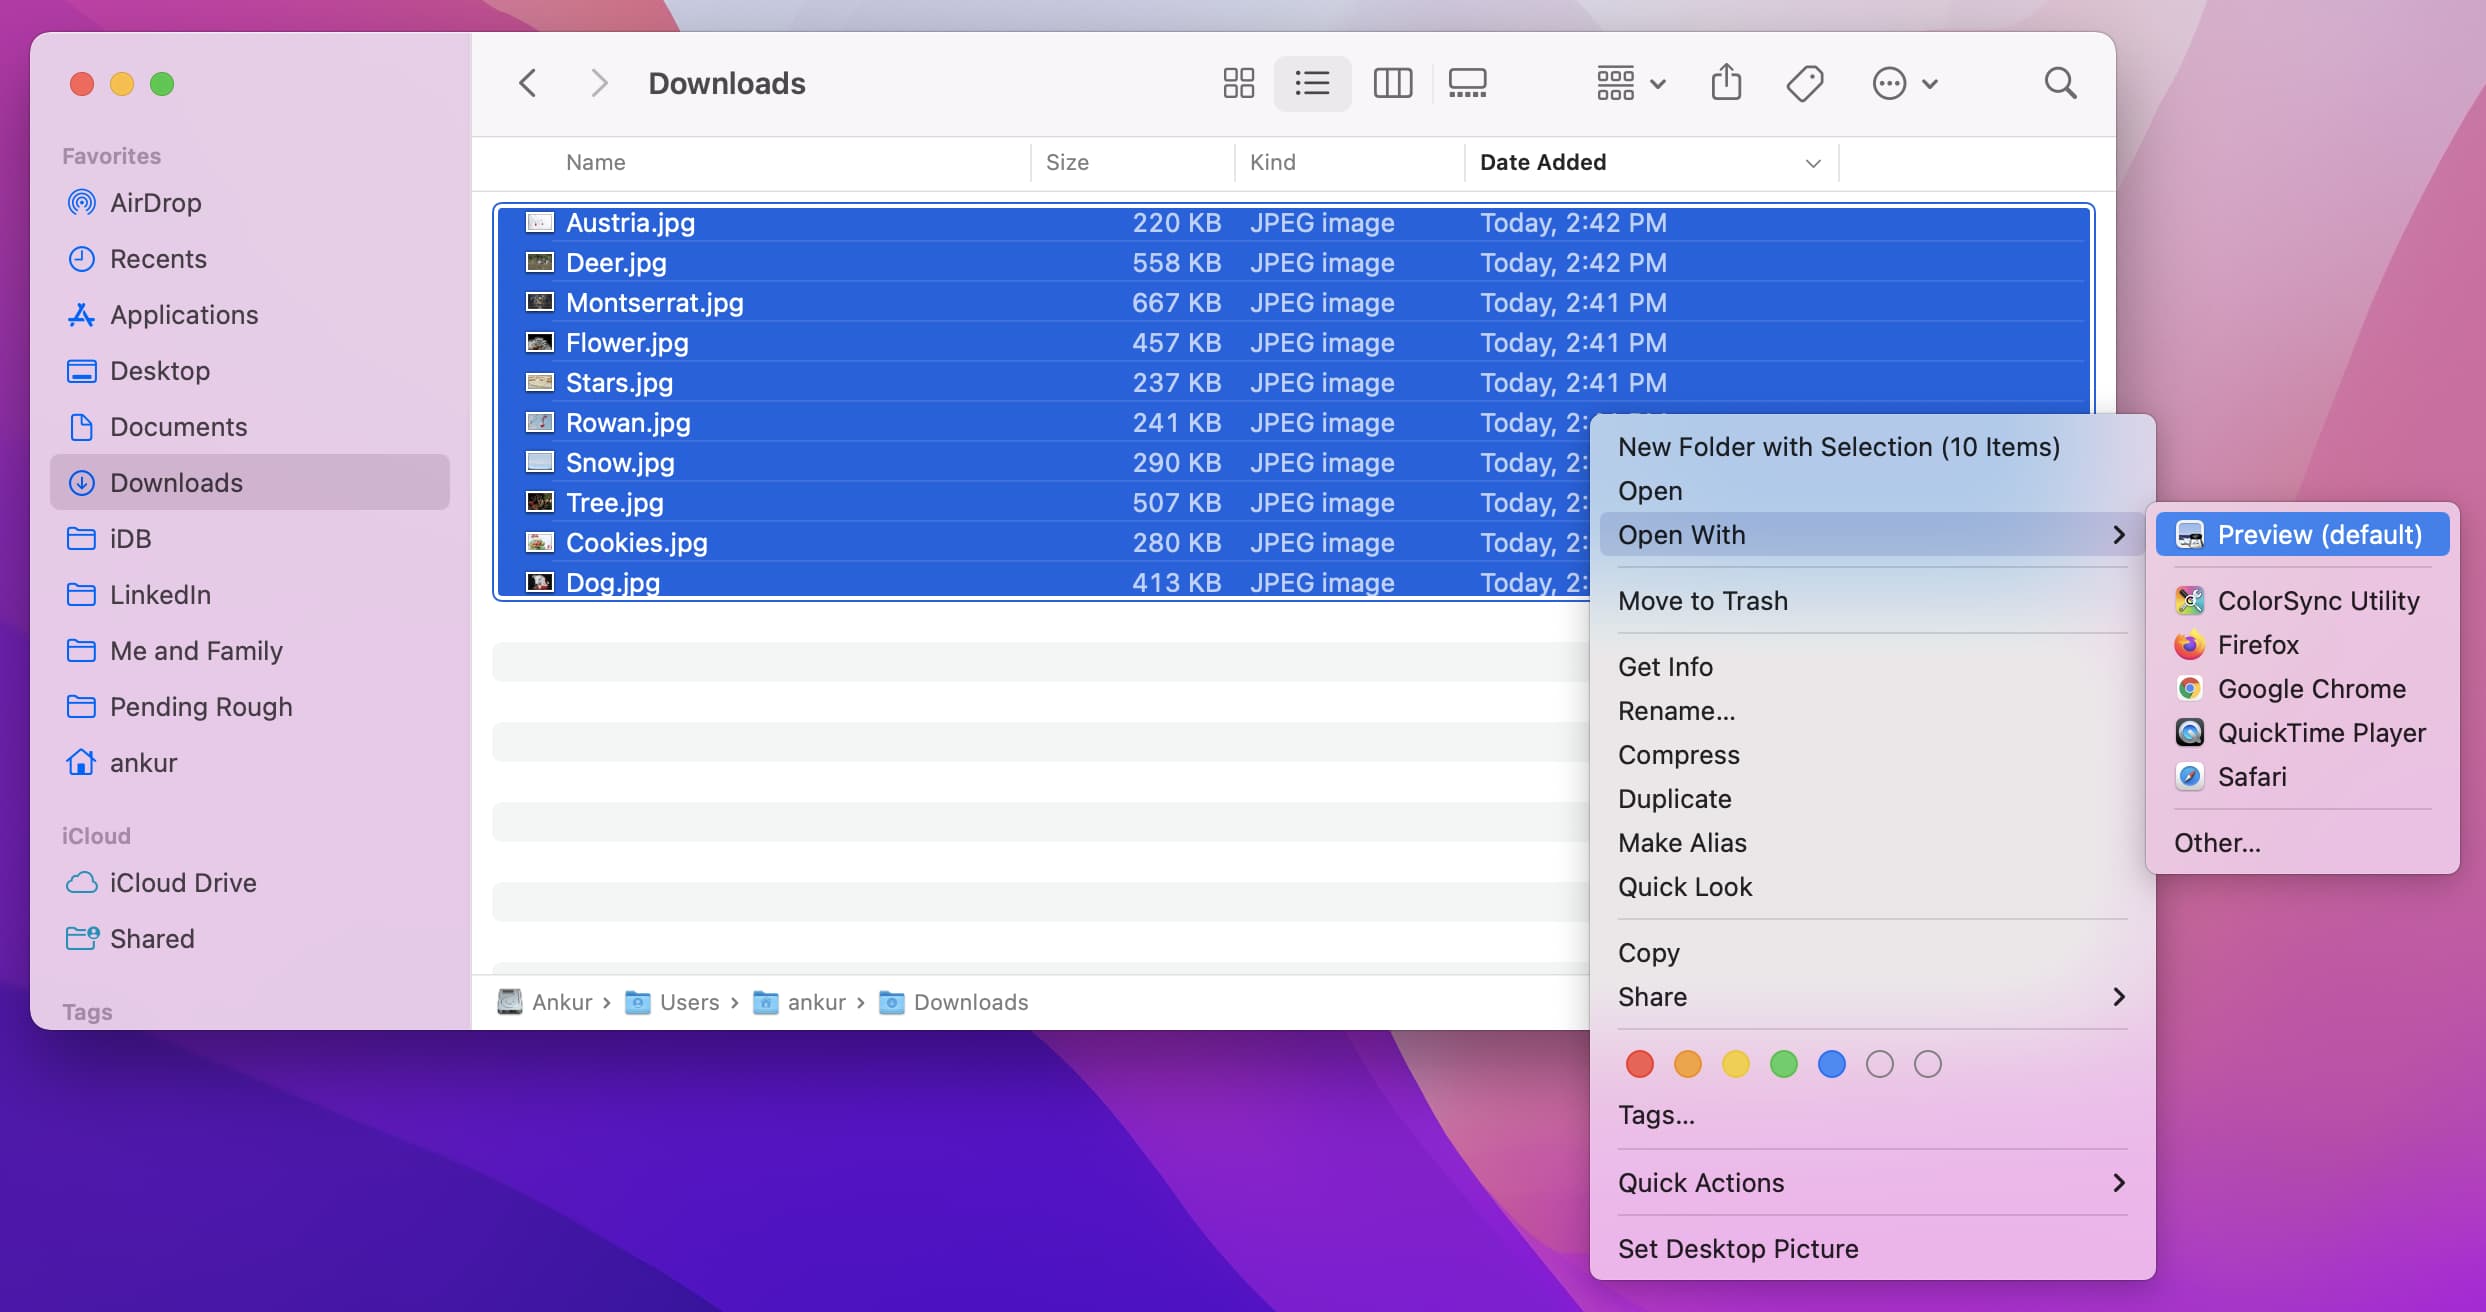
1) Select multiple images in the Finder folder by holding the Command key or pressing Command + A to select all.
2) Right-click and choose Open With > Preview.
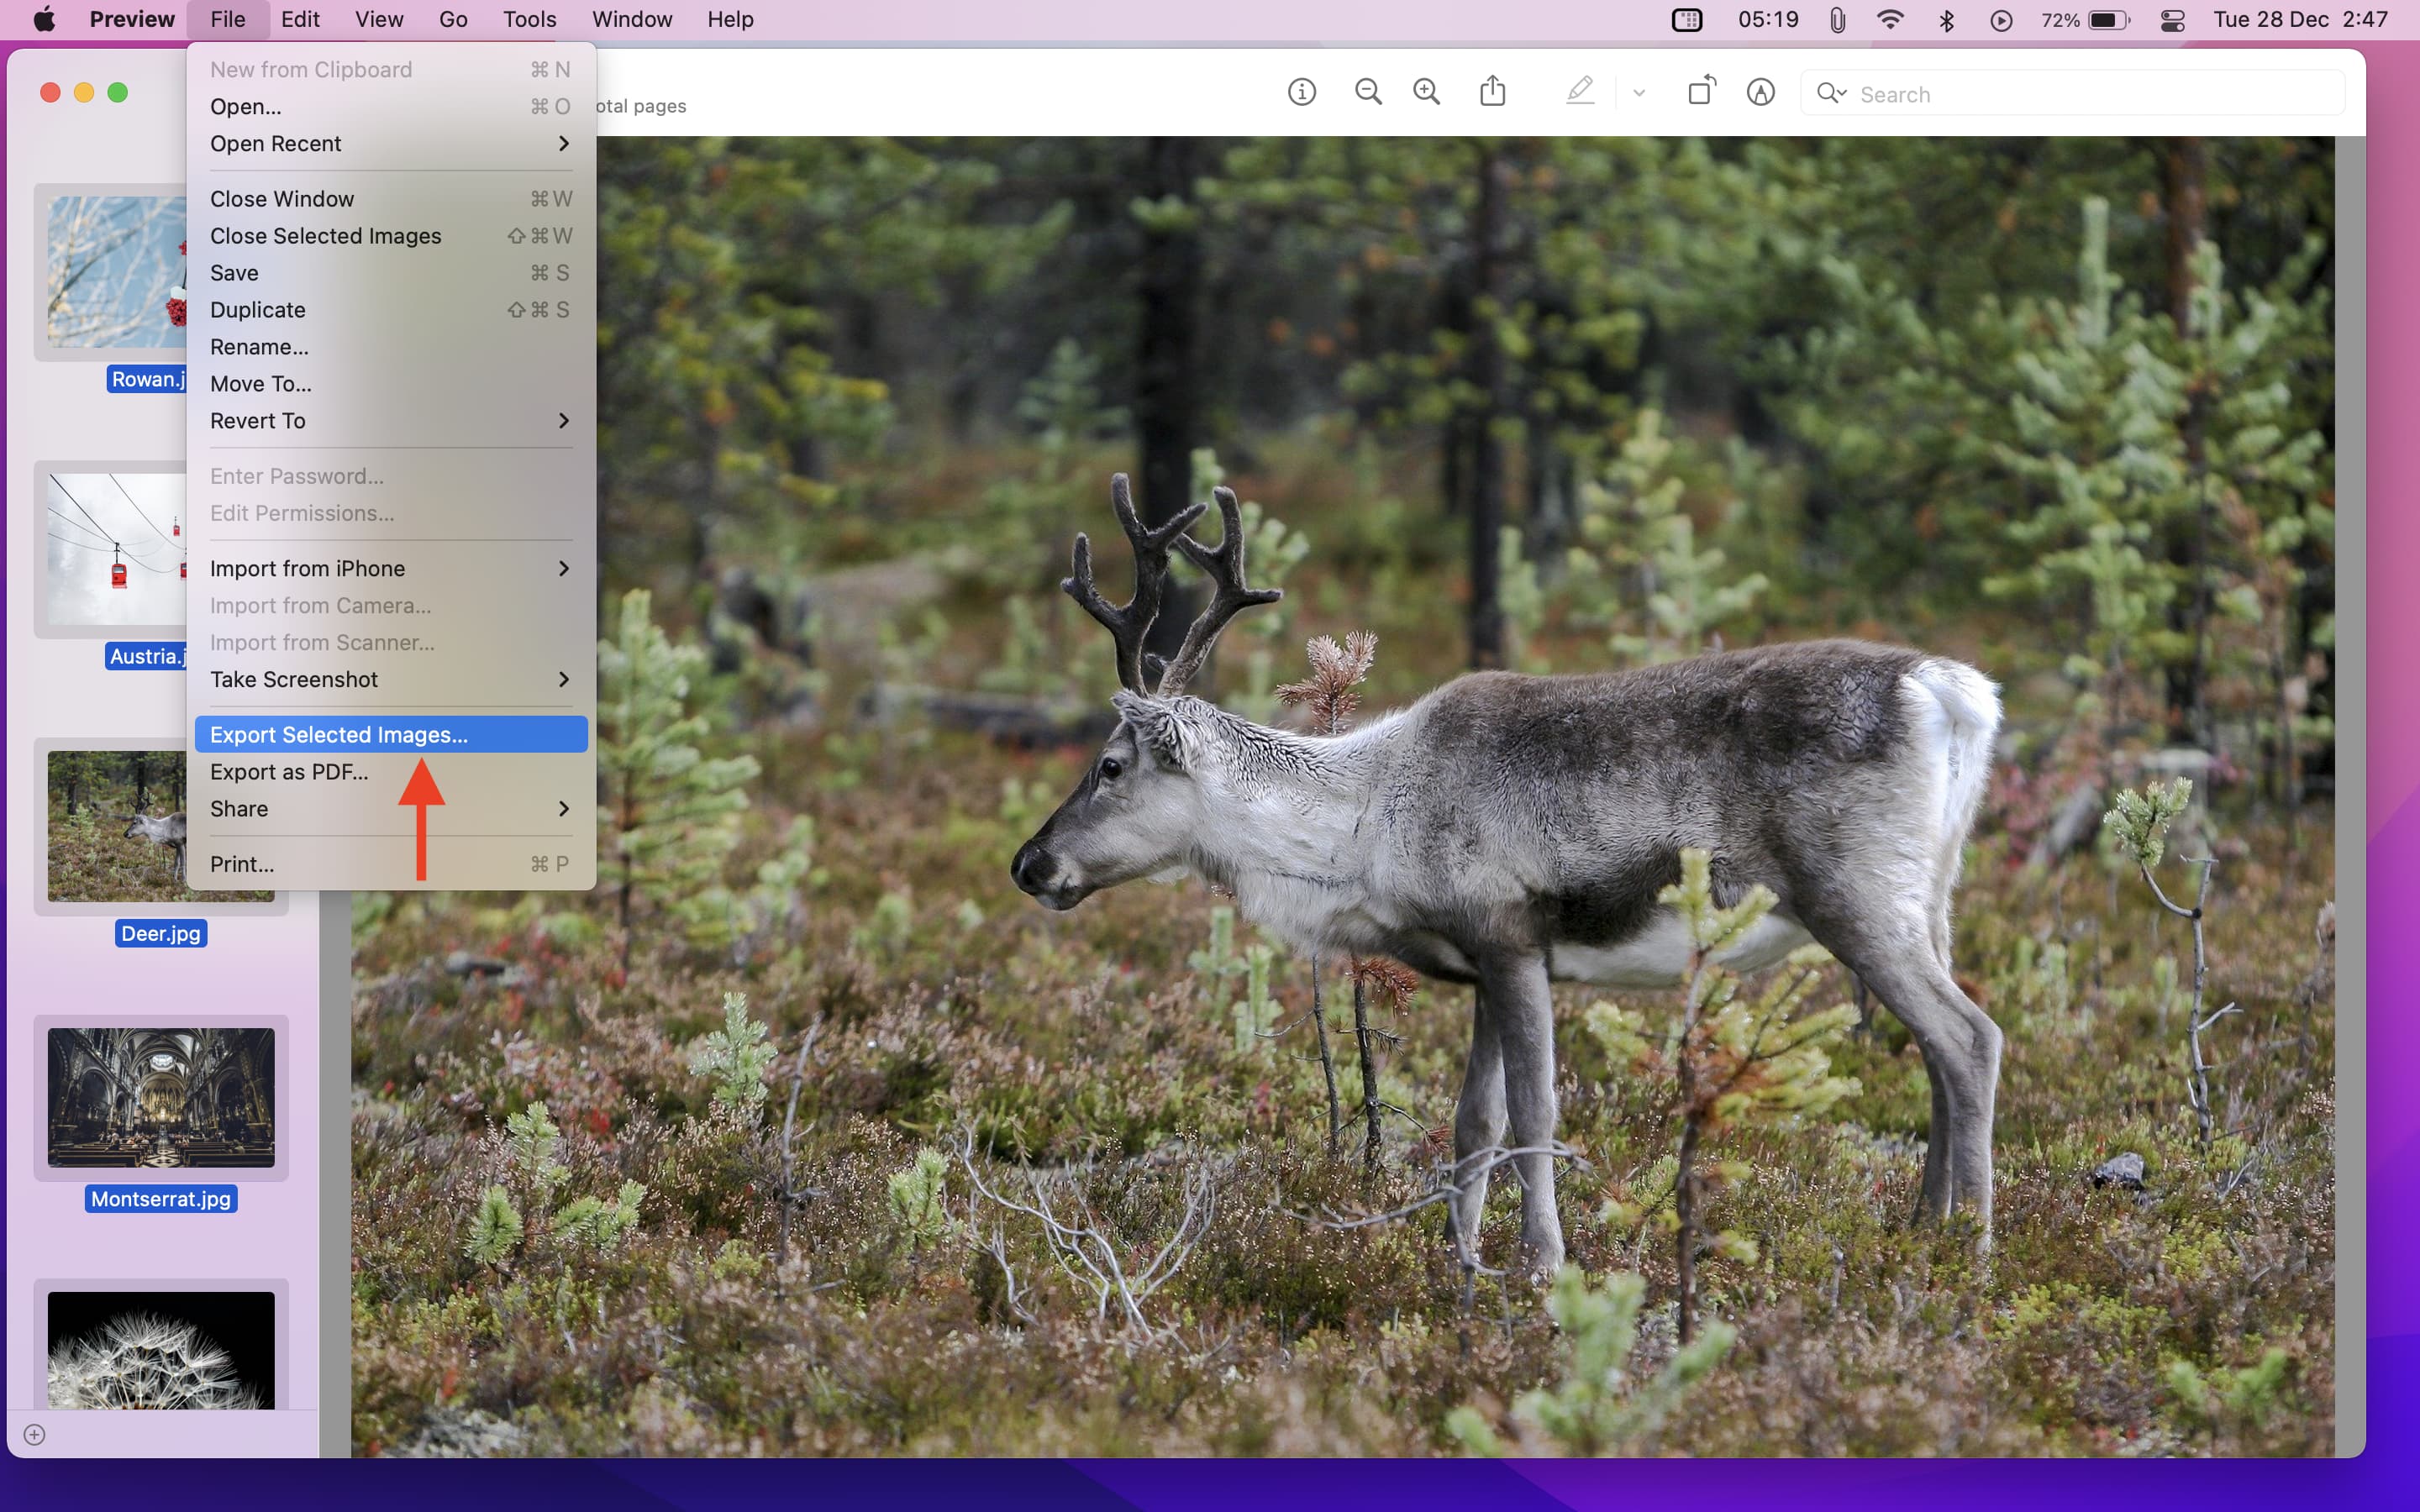
3) Press Command + A and make sure all image thumbnails are selected in the left sidebar of the Preview app.
4) From the top menu bar, click File > Export Selected Images.
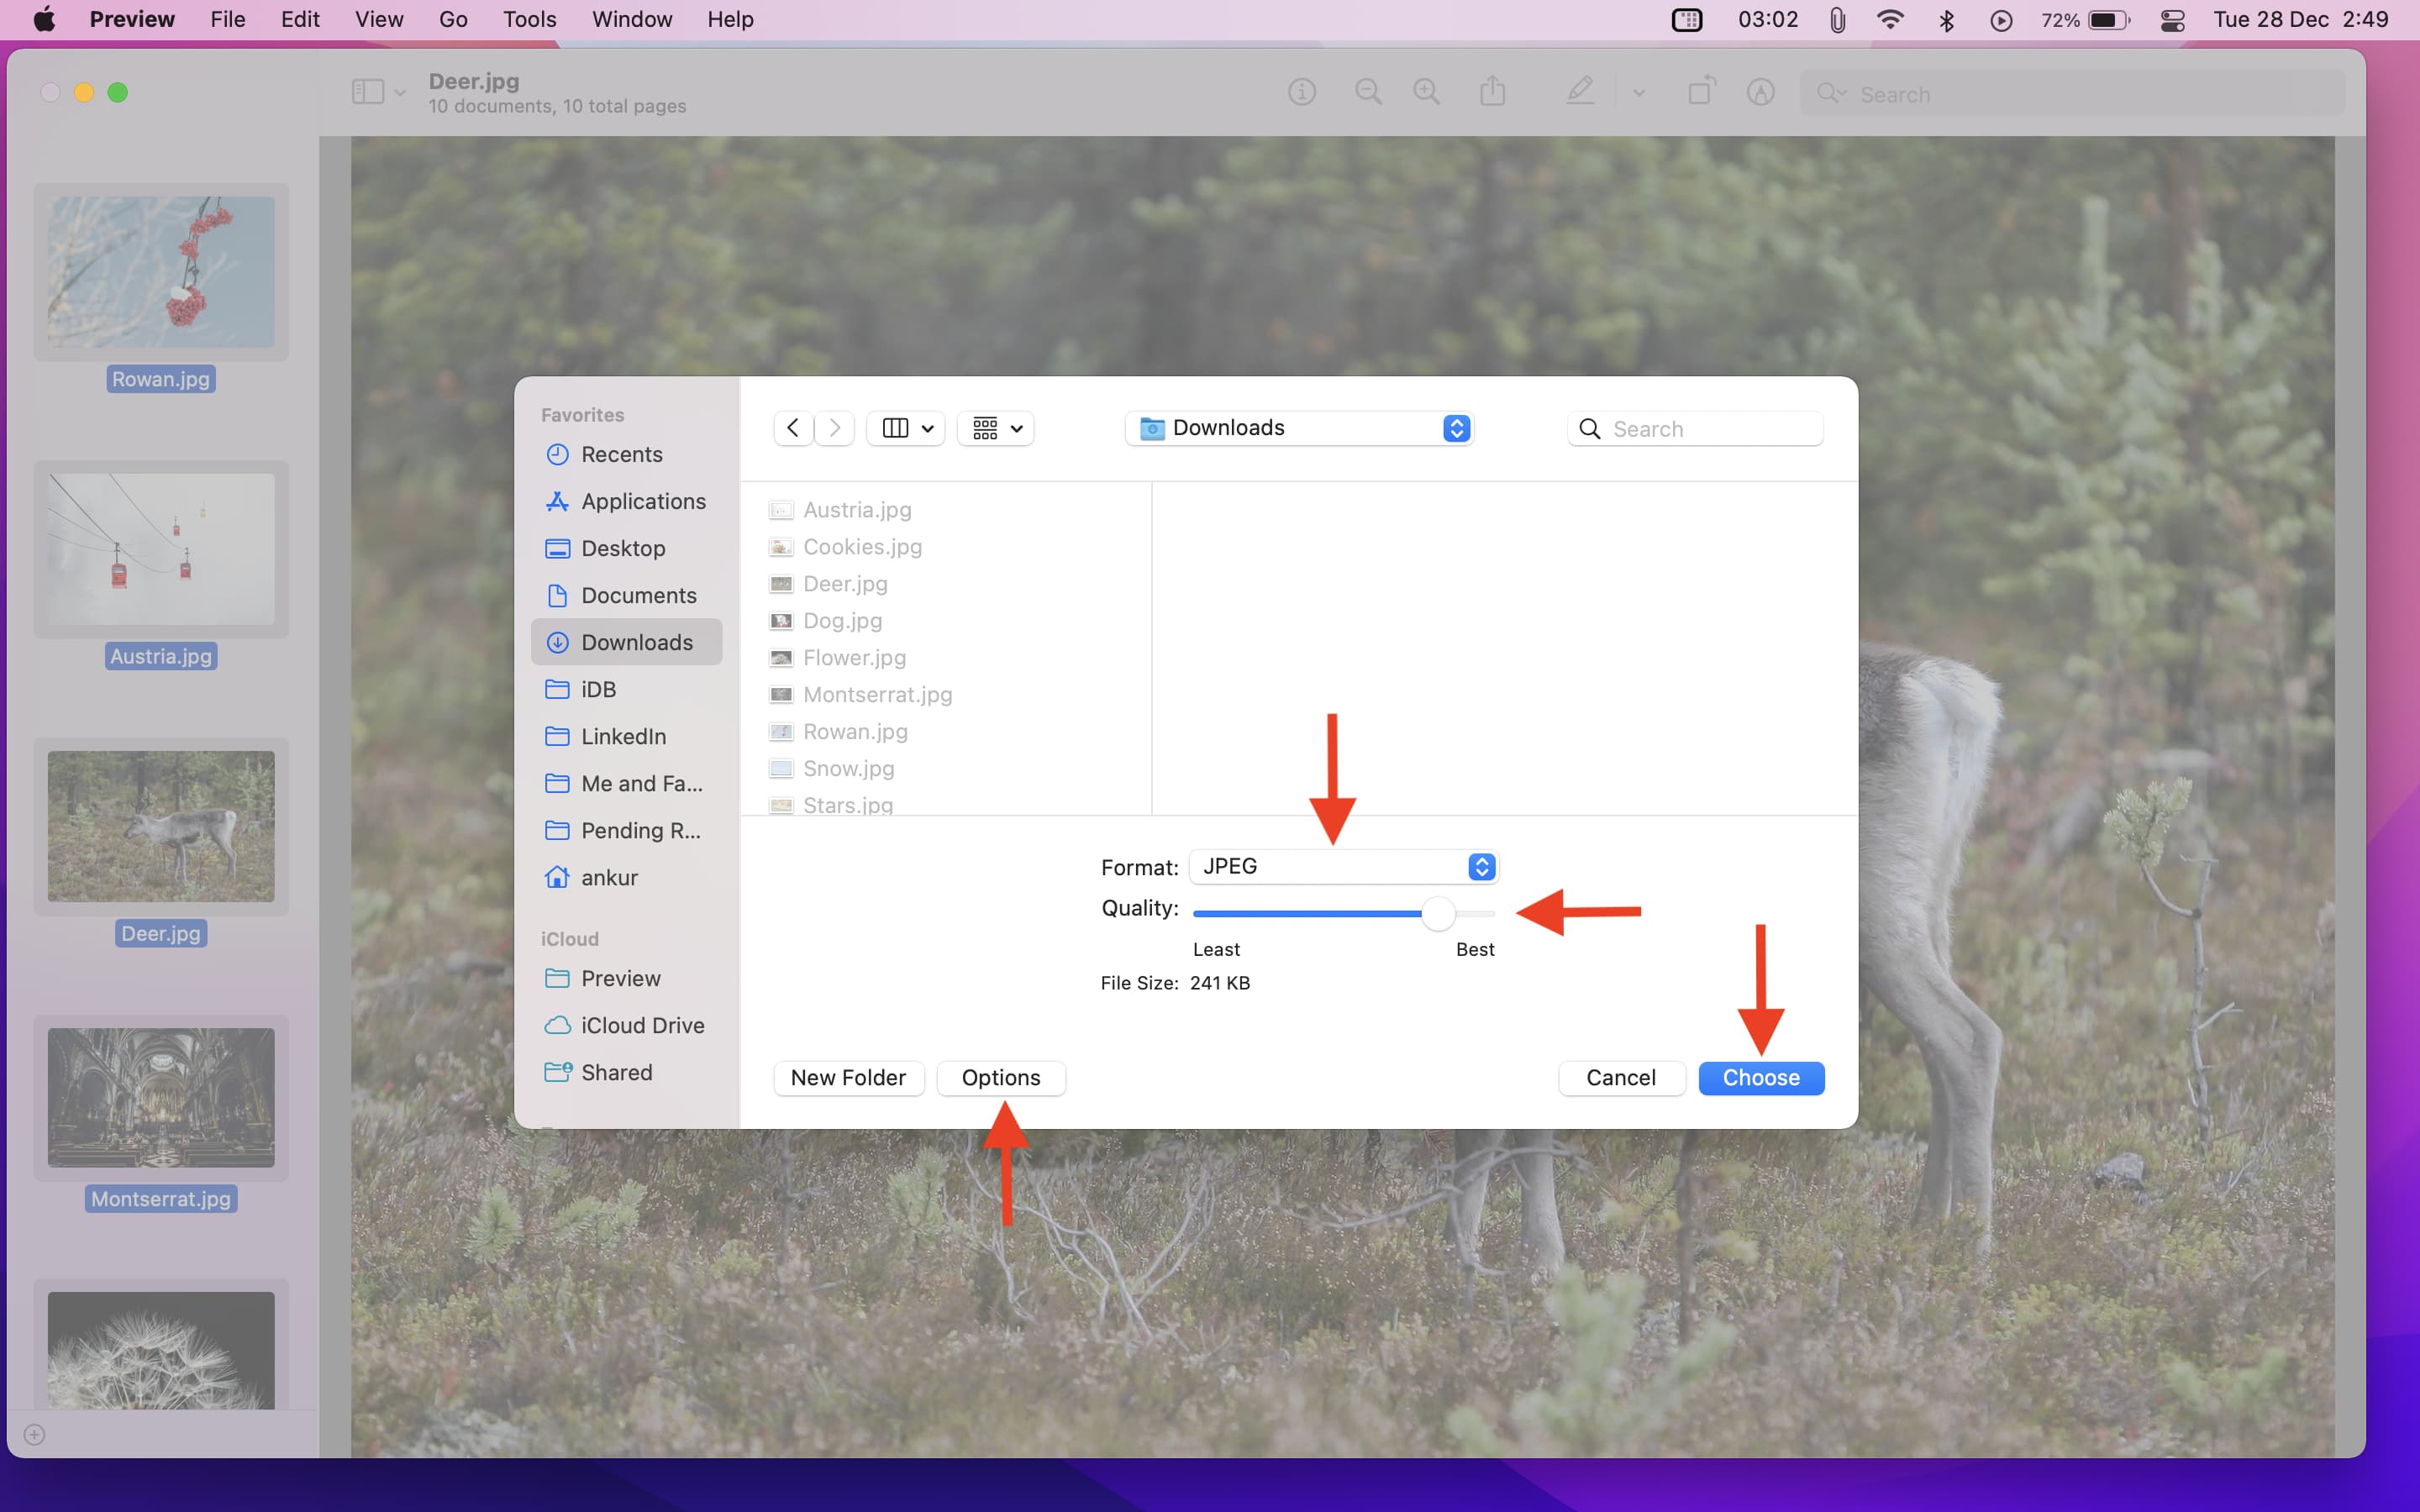
5) Click Show Options or Options from the bottom.
6) Set the format and drag the quality slider to adjust it.
7) Finally, click Choose to compress all images and save them.
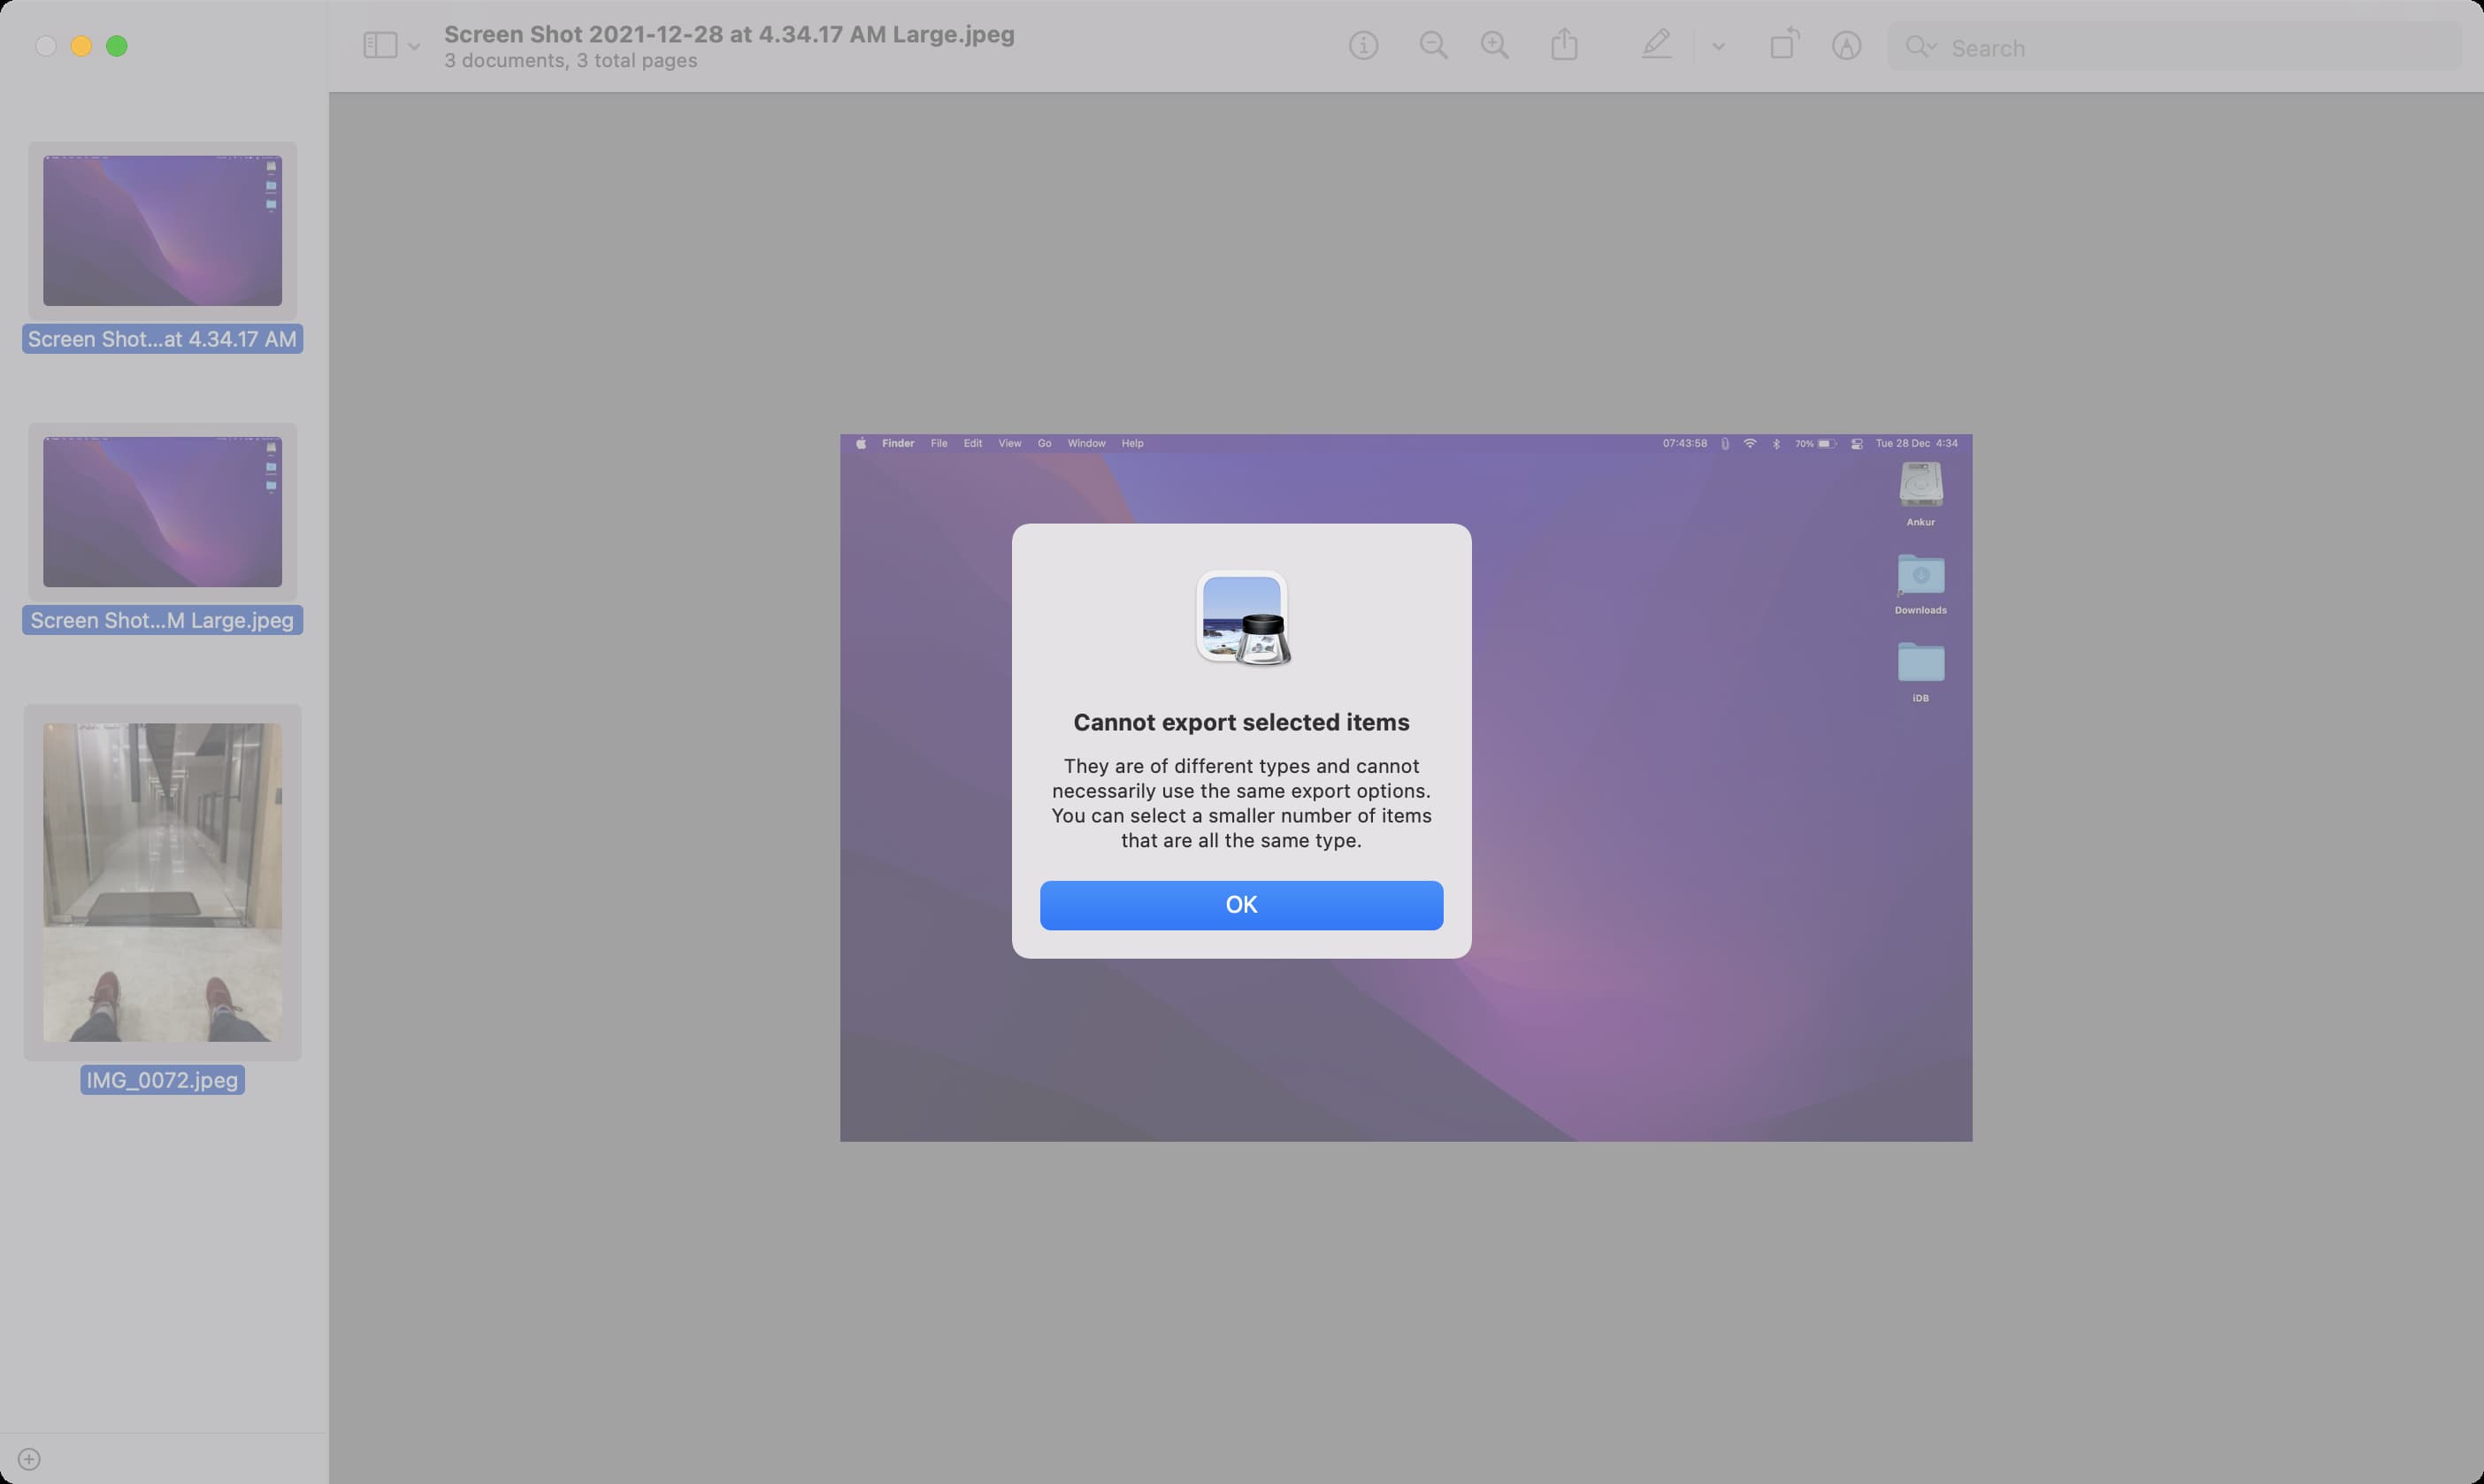
How to fix “Cannot export selected items” in Mac’s Preview app?
If you see a popup saying, “Cannot export selected items,” click Ok. Now, hold the Command key and unselect images of different formats from the left sidebar of the Preview app. After this, follow the above steps to compress images.
In case this doesn’t work, go back to the Finder folder and click Kind to sort your images by format. Now, select only the pictures of a particular format (JPEG, PNG, etc.) and open them in Preview to compress.
5. Compress images using Mac’s Photos app
Like the Preview app, you can reduce image file size using the macOS Photos app.
1) Select one or more pictures in the Photos app.
2) Press Command + Shift + E or from the top menu bar, click File > Export > Export Photos.
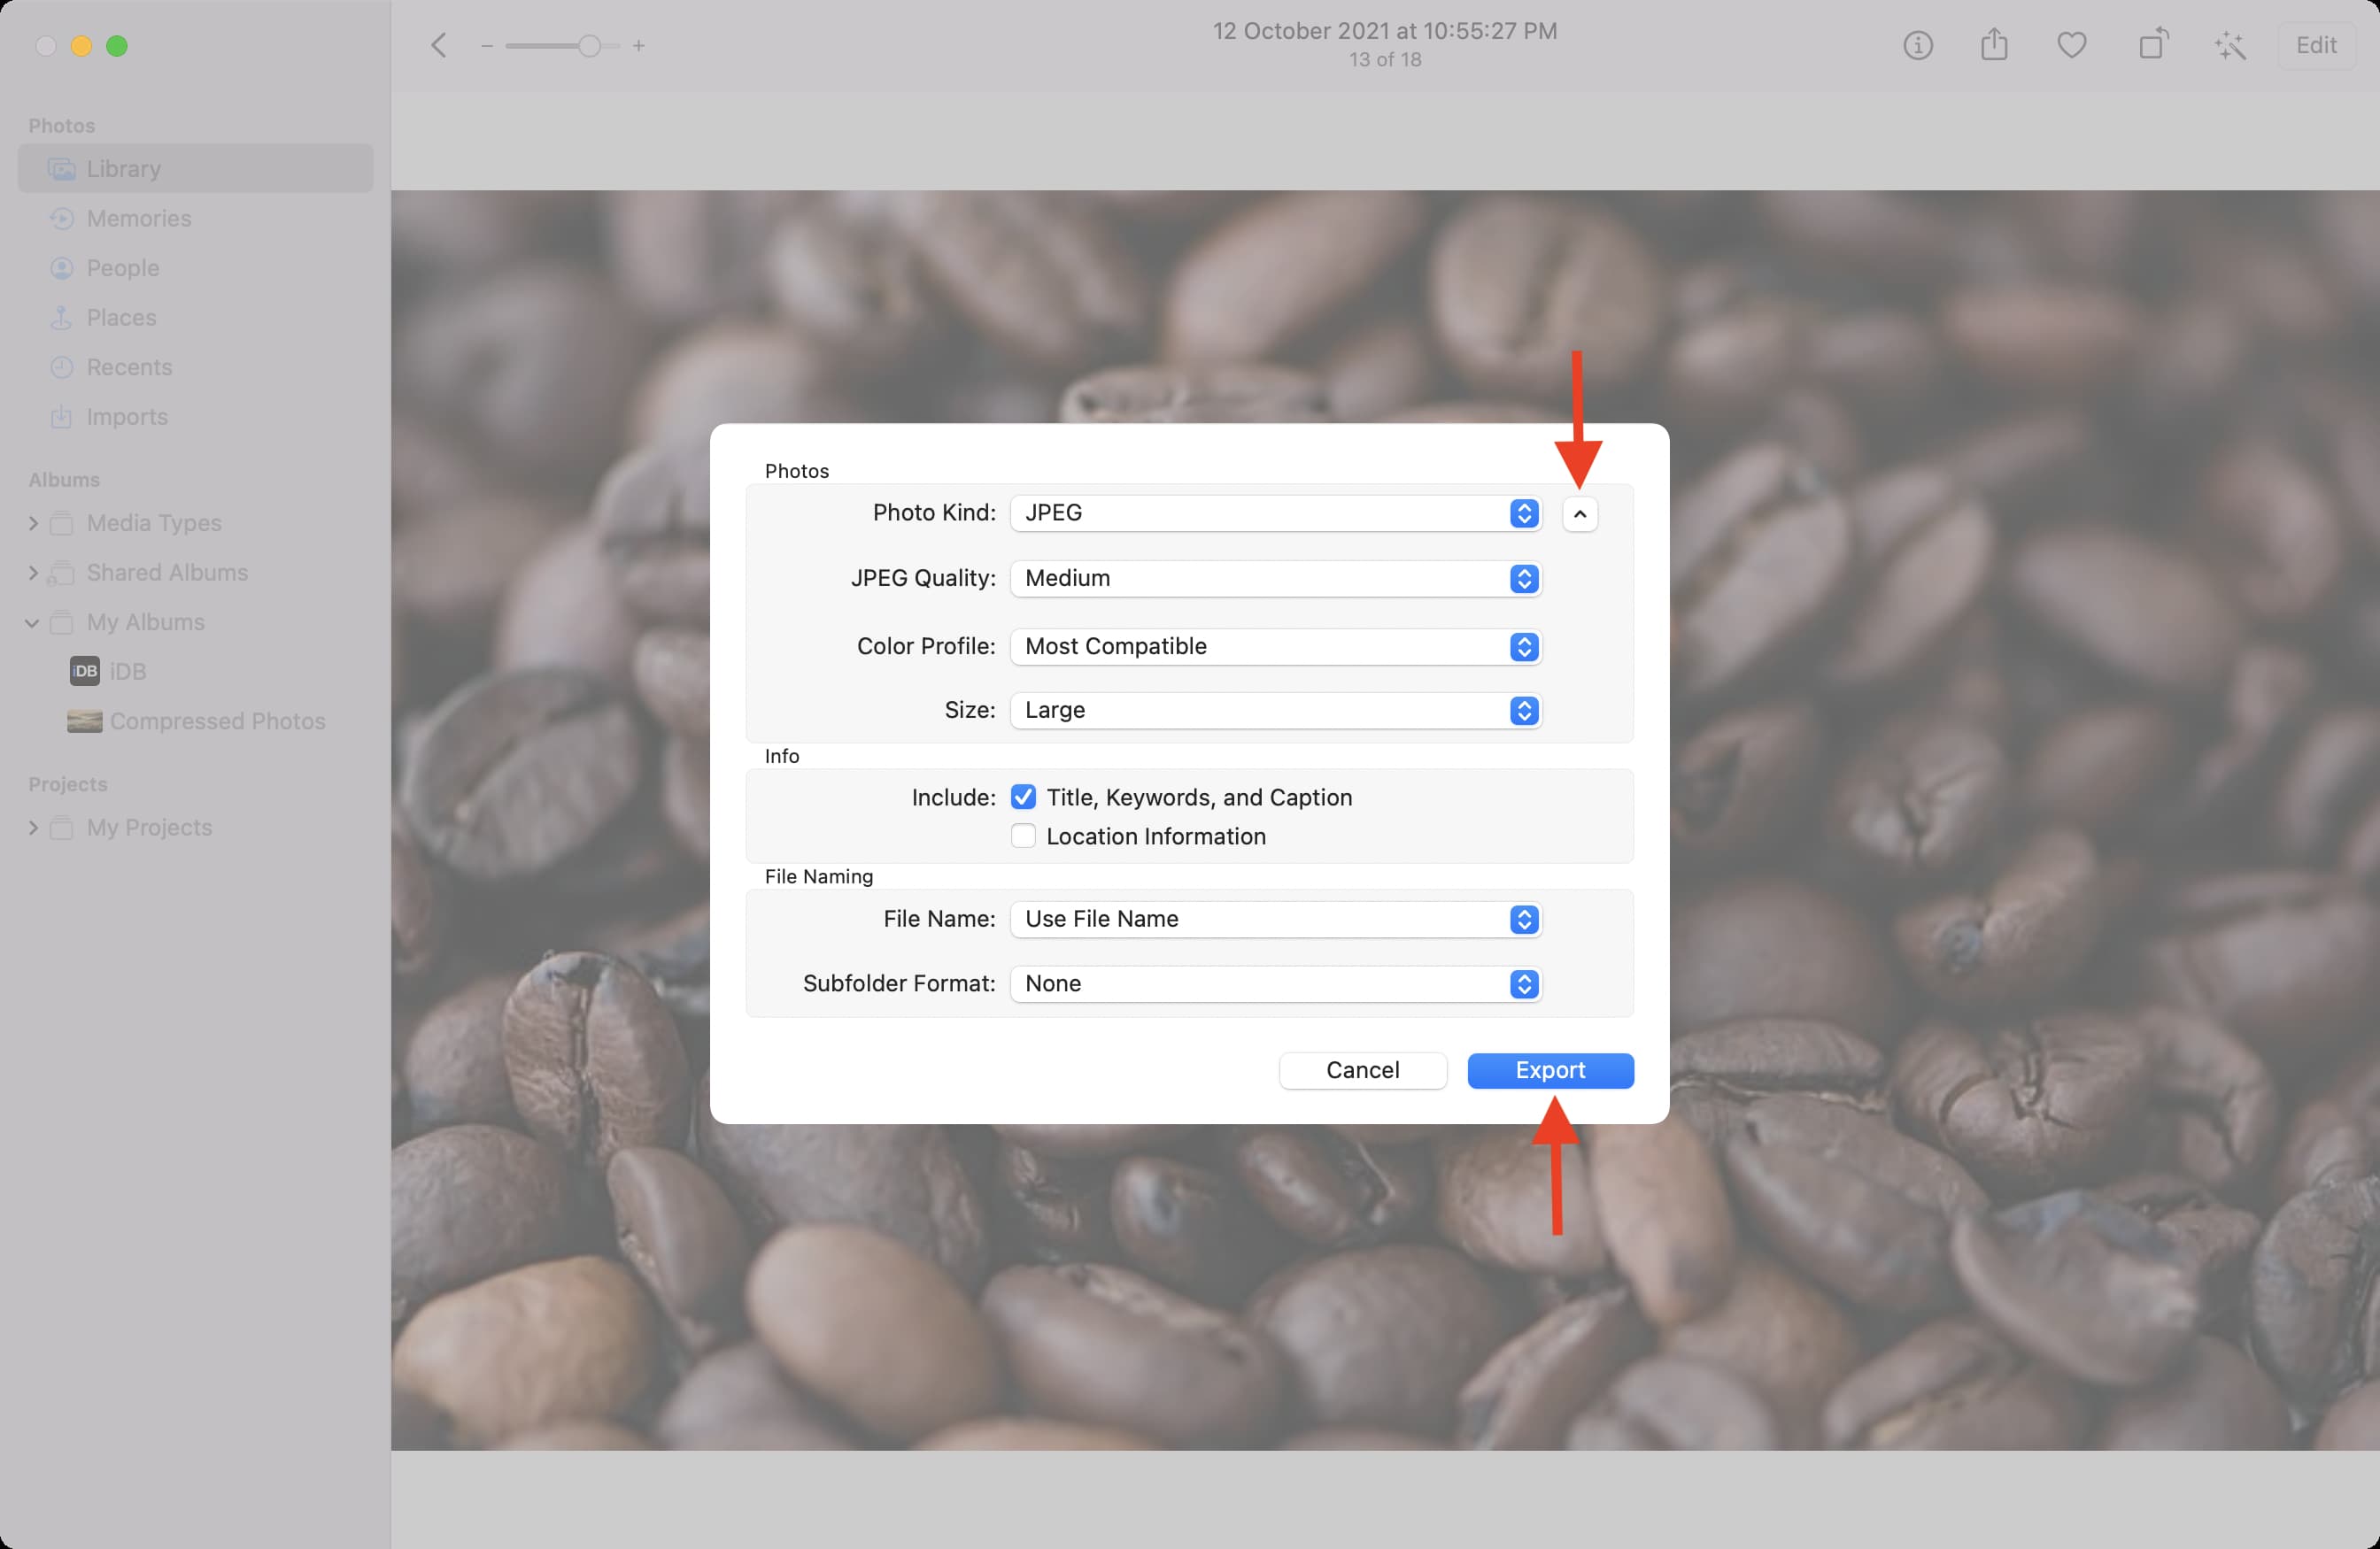
3) Click the tiny arrow next to Photo Kind to see more options.
4) Accordingly, set the Photo Kind, Quality, and Size to compress the images.
5) Click Export > choose a location > Export.
6. Use photo compression apps
The Mac App Store has several apps that let you compress images. Search for something like “compress images” in the App Store.
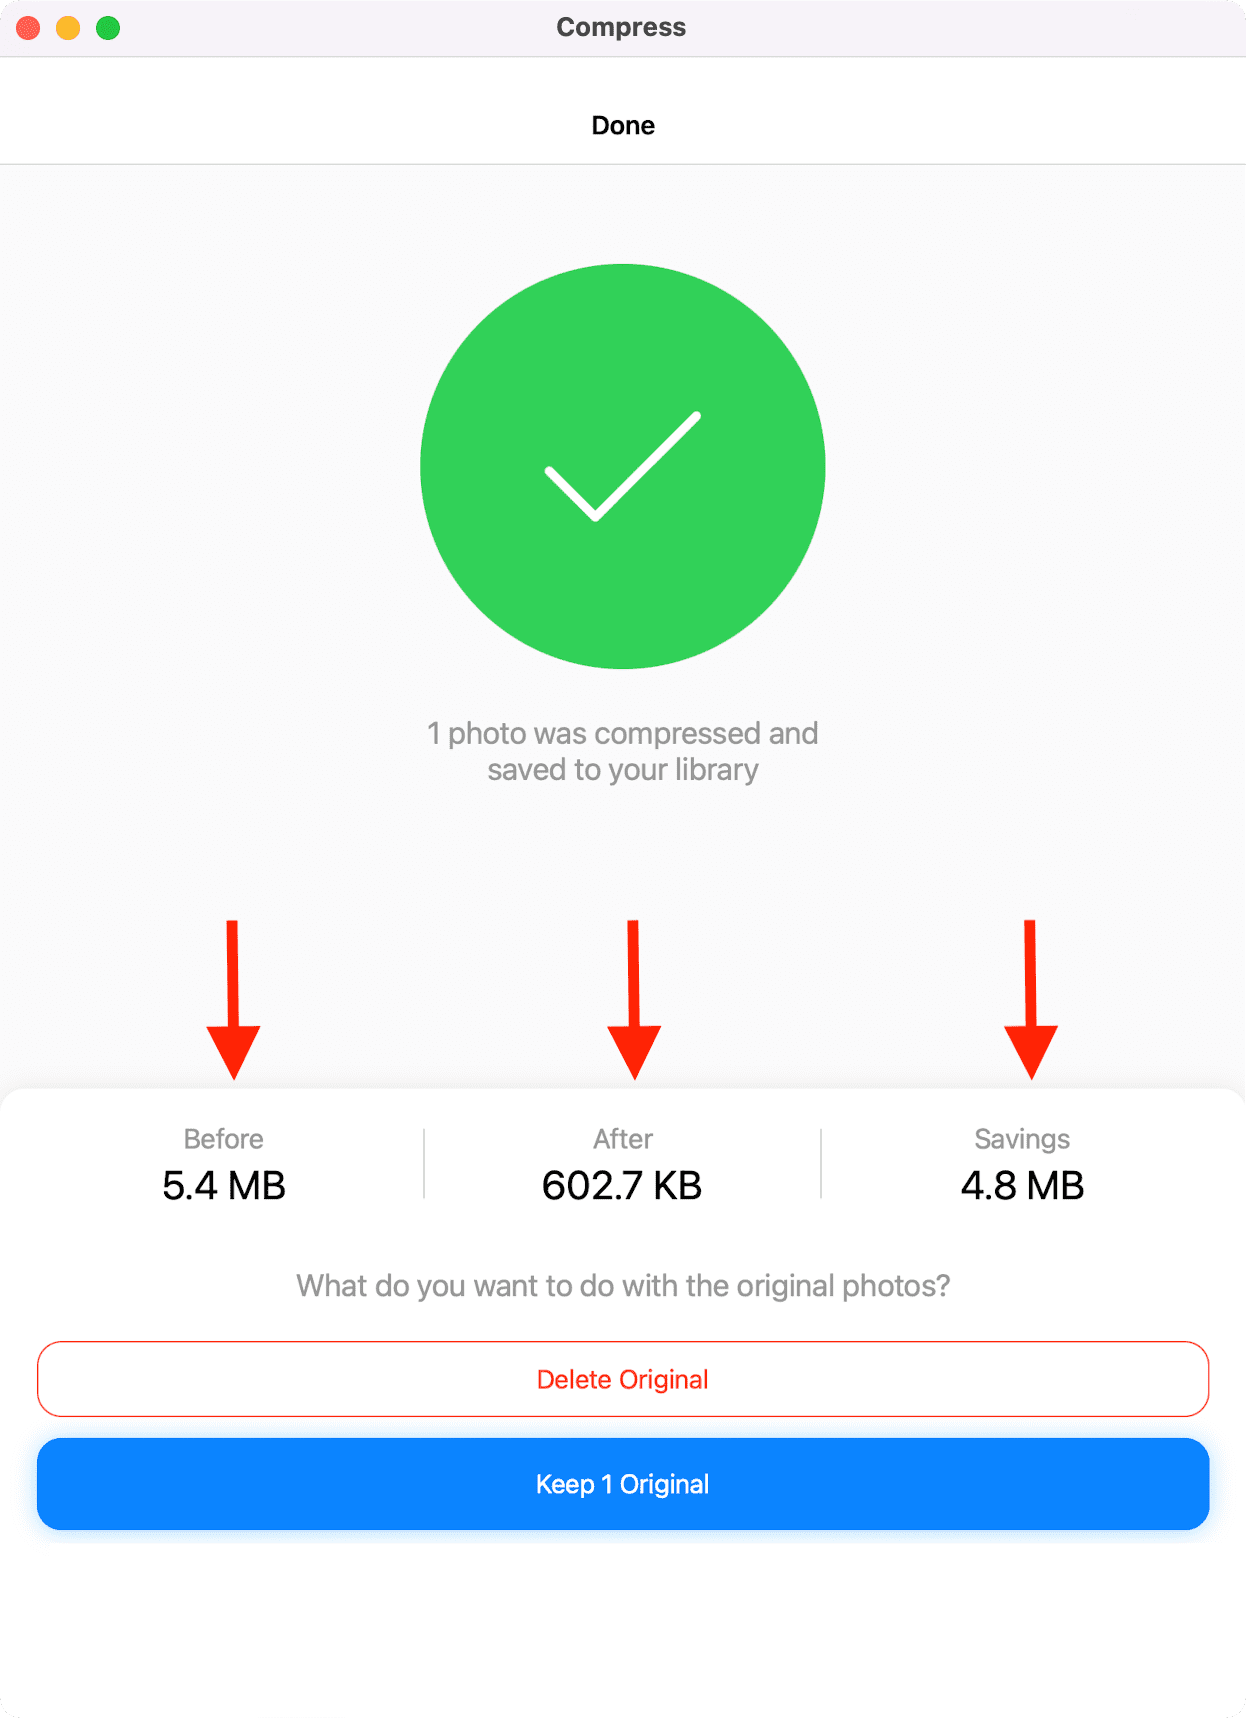
On my Mac, I use Compress Photos & Pictures, which is an app for iPhone and iPad developed by iDB. But since I use a MacBook with Apple Silicon, I can install this app on my Mac, and it works as flawlessly as it works on iPhone.
Use the above link or search for “Compress Photos” in the Mac App Store and click “iPhone & iPad Apps” from the top to get this app.
Once you have Compress Photos & Pictures on your Mac, the steps are effortless. You can add photos from the Photos app and save the compressed images back to the Photos app.
7. Use online sites to compress images
Finally, one more method I use daily to compress images for iDB posts is via online services.
One web search for “compress images” will list hundreds of such sites. Three that I like and have been using for many years are:
Feel free to give them a try. But you must know that you will be uploading the images to the site’s servers. Since I compress screenshots with non-personal or non-sensitive information, I see no harm in using these. But for compressing images of identity cards, driving licenses, personal photos, etc., I use the offline methods mentioned above.
Furthermore, changing PNG to JPG using Finder or Preview may add black borders to your iPhone. However, iLoveIMG.com does not do that.
On a related note: