Learn how to create and manage Shared Albums in the Photos app on your iPhone, iPad, or Mac to easily share pictures and videos with your family members and friends.

While you can easily share one photo at a time, if you want to share multiple photos in an album with friends or family, Apple’s Shared Albums feature (earlier called iCloud Photo Sharing) is for you.
Shared Albums are ideal for sharing vacation photos with family, honeymoon photos with your spouse, or a night out with pals. Every Shared Album can have up to 5,000 photos and videos. Plus, you don’t need to use iCloud Photos for this, nor do the shared photos count against your allocated iCloud storage limit.
We’ll walk you through the entire process.
You should turn on this feature before you get to share your photos with others.
1) Open the Settings app and select iCloud > Photos. Alternatively, you can scroll down and tap Apps > Photos.
2) Turn on the toggle for Shared Albums.

1) Open the Photos app and scroll down to the Shared Albums section.
2) Tap Create if you have not created a Shared Album or subscribed to one from another person. If you do see some albums here, tap the “Shared Albums” heading and hit Create from the top of the Shared tab.

3) Give a name to your album.
4) Tap the plus sign to invite people. Now, type their name and select them from your contacts. Make sure to add those contacts who also have an iPhone, iPad, or Mac. Their phone number or email address will appear in blue color instead of green. After adding one or more people, tap Done to return to the previous screen.
Note: You can also create a Shared Album without adding people. This way, the album and all its photos are stored in iCloud but are visible only to you.
5) If you do not want to add the images now, you can tap Done. If you have pictures to add, tap the plus button, select the photo and videos, hit Add, and then tap Done.

In addition to the above steps, you can also select one or more photos in your photo library and then tap the share button, followed by Add to Shared Album > Shared Album > New Shared Album to create a Shared Album.

If the photos you want to share are already in an existing album, you can select all images in this album and then follow the earlier method to add them to a new or existing Shared Album.

3. Ask your friend or family to accept the invitation
After you have added your friends or family members, ask them to accept your invitation. They can do this by tapping the Photos app notification on their iPhone and hitting Accept. You will receive a notification when they accept your invitation.

If they did not get your invite, ask them to go to their iPhone Settings > Notifications > Photos and make sure Allow Notifications is turned on. Next, send the invitation again (explained below under heading 7).
You have a few easy ways to add photos to a Shared Album.
- Touch and hold the photo, select Share, choose Add to Shared Album, pick the album, and tap Post.
- Open the photo, tap the Share button, choose Add to Shared Album, pick the album, and tap Post.
- Go inside the Shared Album, tap the plus button, select the photos, tap Add, and then Post.

To like or comment on a photo that’s in a Shared Album, tap to open the photo. At the bottom of the picture, tap the like button or Add a Comment.

You can see all the social activities like comments, likes, new photo additions, and more by tapping the Activity button next to the Shared Albums heading in the Photos app. Additionally, these activities may also appear as tiles in the Photos app interface.
To remove a photo from a Shared Album, open the photo in the album, tap the trash can icon, and confirm by tapping Delete Photo.

Remember, deleting a photo from a Shared Album only removes the photo from the album. It does not delete the photo from your library.
Plus, if you delete a photo, it’s deleted from that Shared Album on all your Apple devices as well as from the subscriber’s devices. However, if they choose to save an image or download a video from the Shared Album to their device, then that isn’t removed when you delete a photo.
Besides that, please note that added people/subscribers can only delete those photos that they added. They can’t delete photos in the shared library posted by someone else.
1) Open the Shared Album in Photos app on your iPhone.
2) Tap the three dots icon and choose Shared Album Details.

3) Now, you can do the following:
- Rename the album.
- Allow or block participants from adding photos to your Shared Album.
- Choose to get notified of activity in this Shared Album.
- Turn this album into a Public Website.
- Invite more people.
- Tap the name of an invited person and resend the invitation or remove them as a subscriber.
- Delete the Shared Album.
4) Once you finish, tap the Done button to save the changes.
You can also create and manage Shared Albums comfortably from your Mac’s big screen.
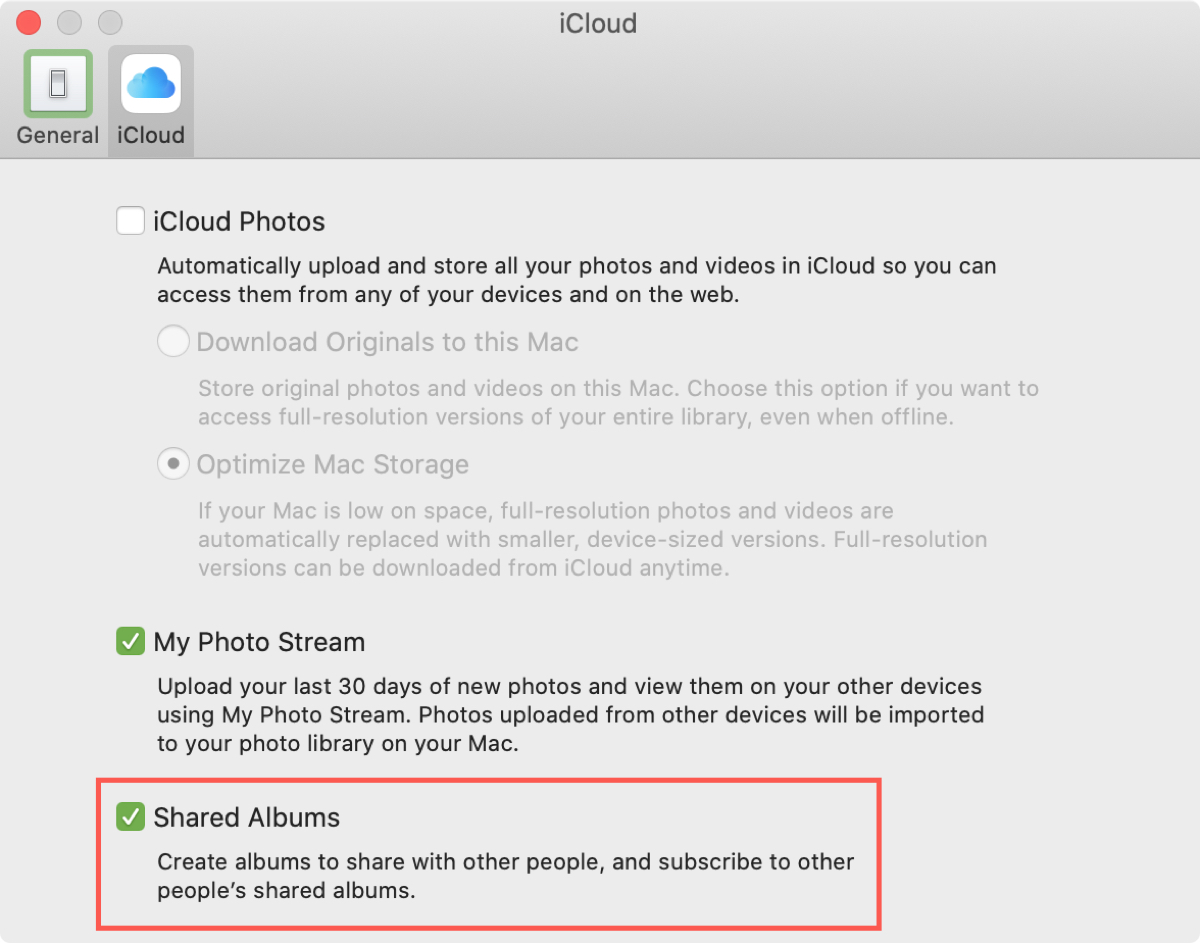
1) Open Photos and click Photos > Settings or Preferences from the top menu bar.
2) Go to the iCloud tab and check the box for Shared Albums.
1) Bring your attention to the left sidebar of the Photos app on your Mac and click the plus sign next to Shared Albums.
2) In the pop-up that appears, give your album a name, optionally add a comment, and click the plus sign in the Invite People section to invite contacts.
3) Click Create.

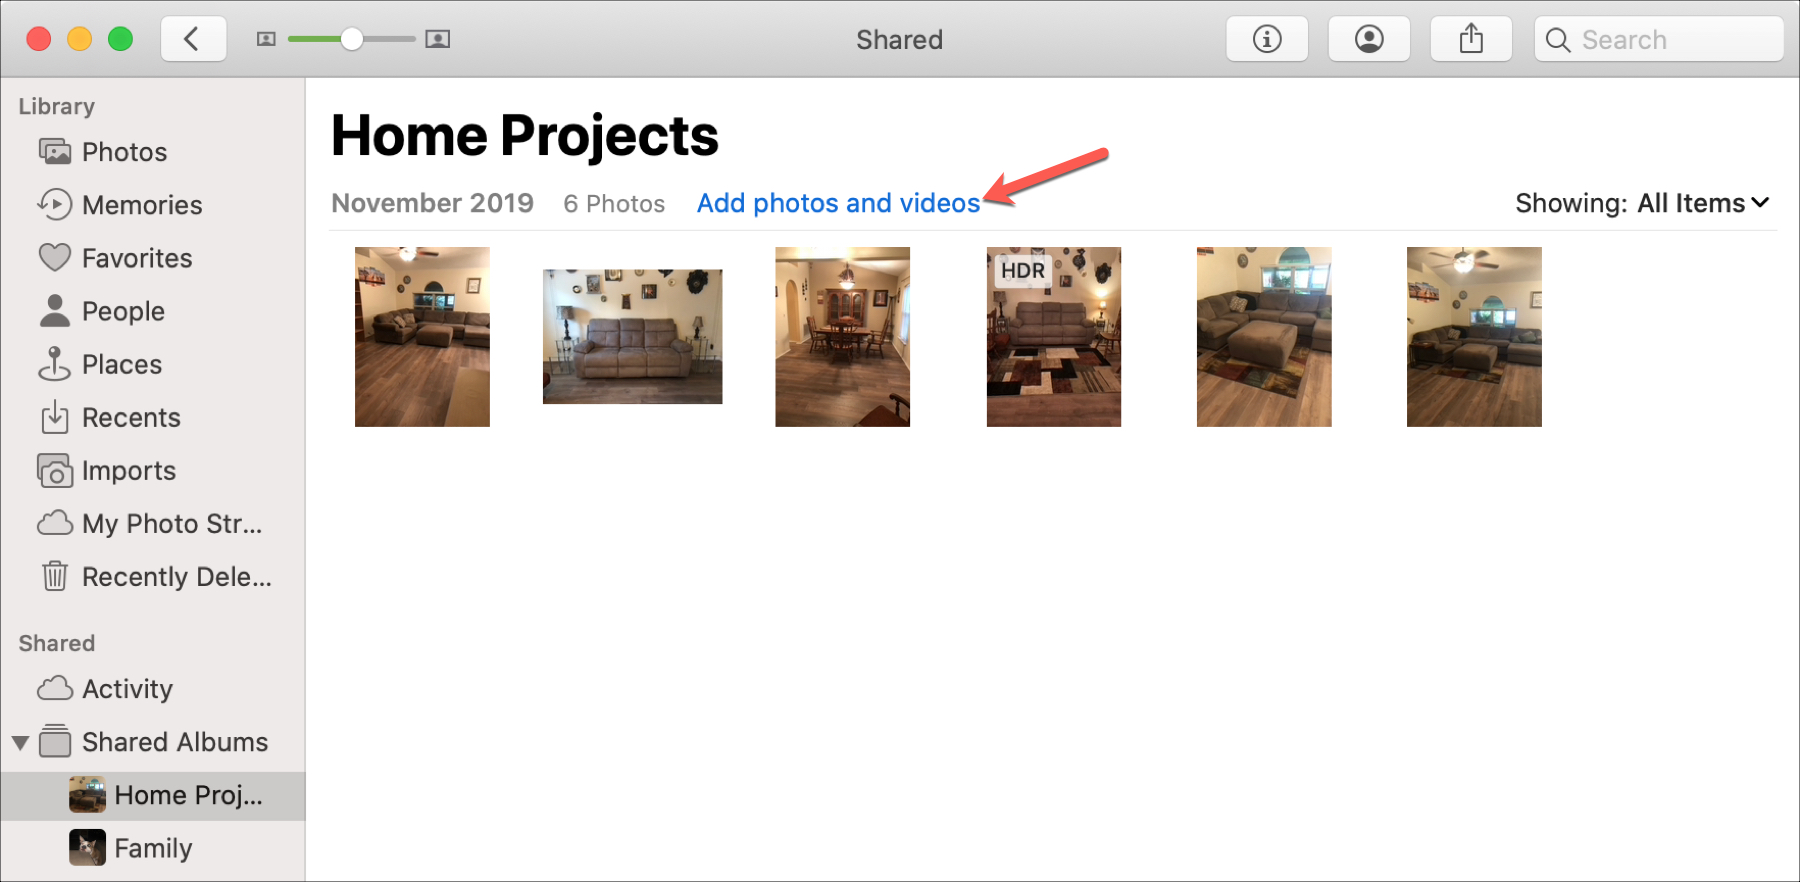
4) Now your Shared Album is ready and waiting for some photos! Go inside the Shared Album you just created and click Add photos and videos. Select the pictures and videos and click Add.

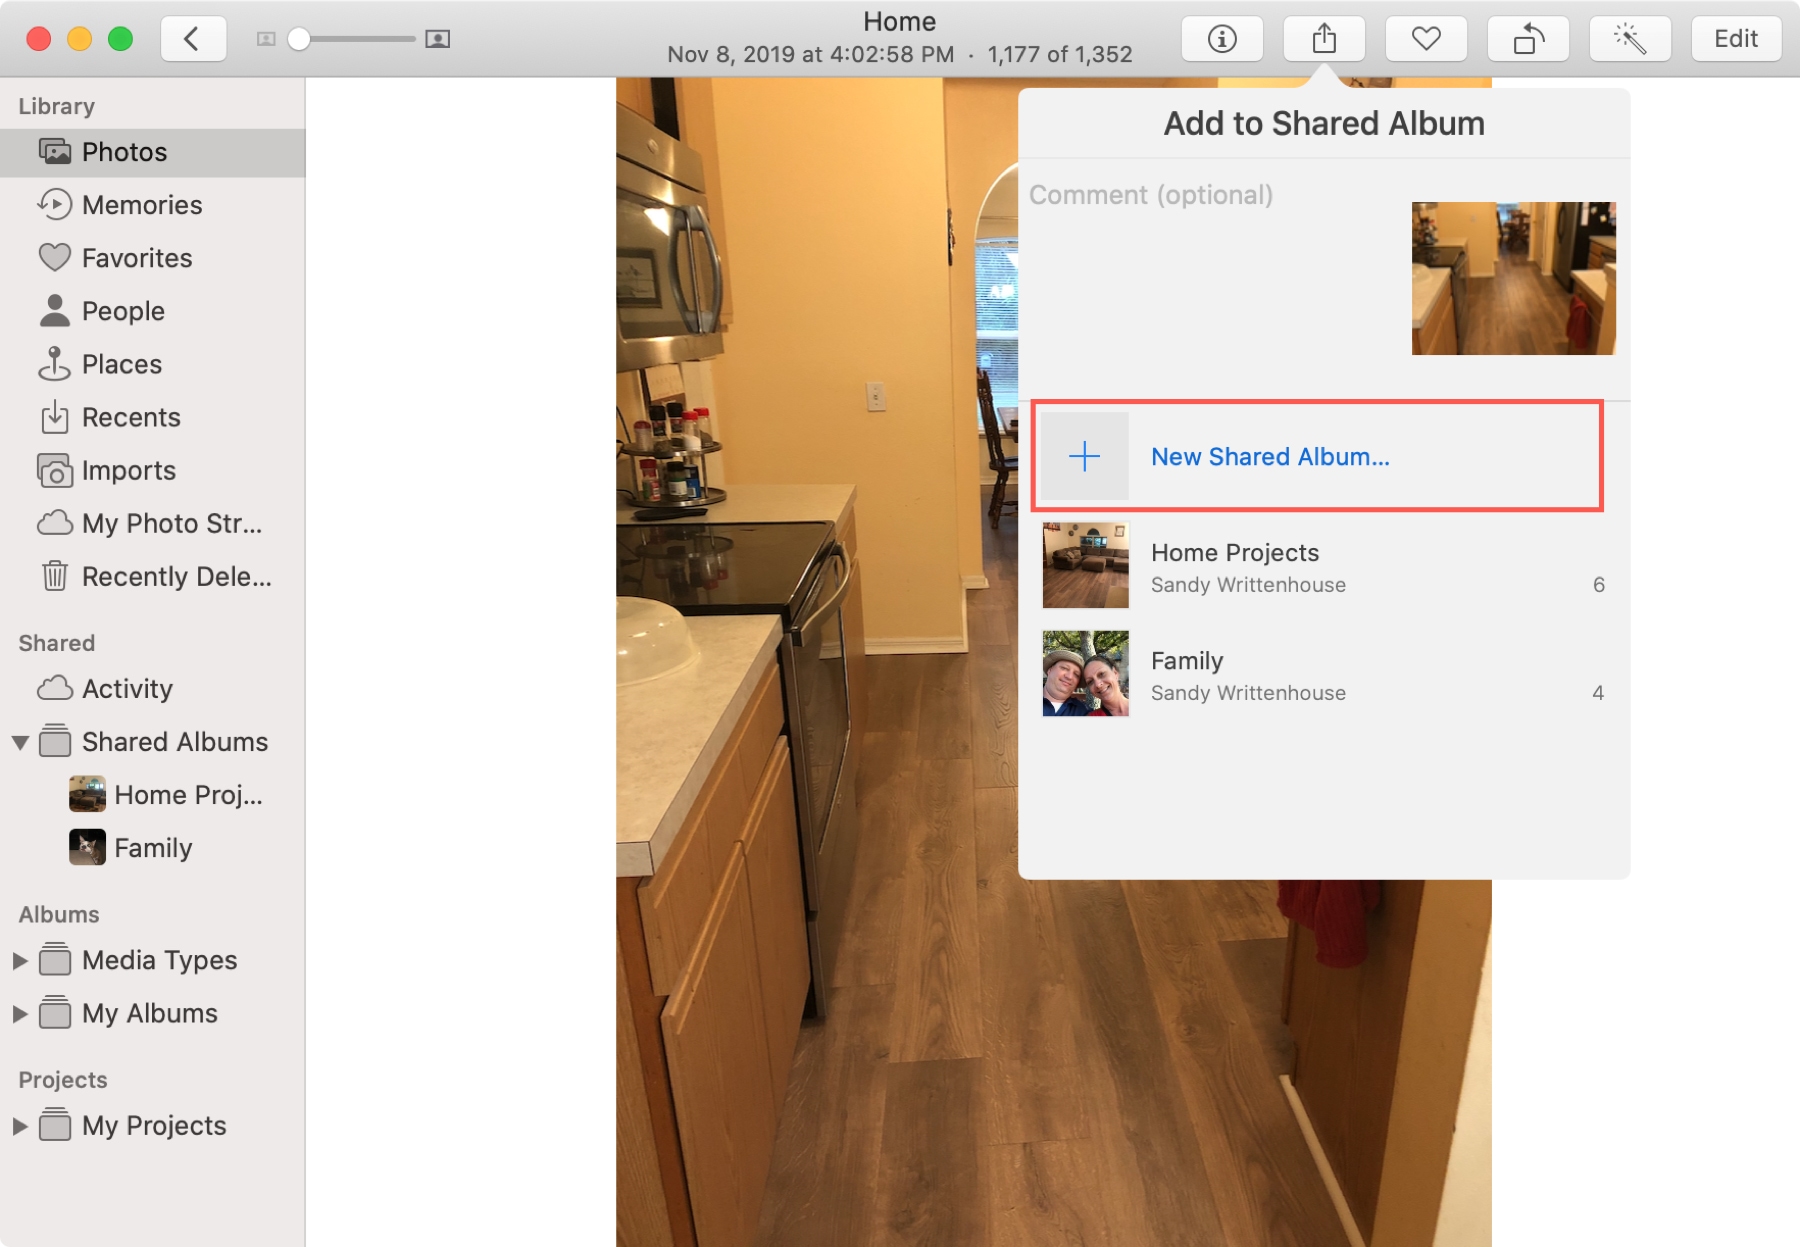
In addition to the above steps, you can also open a photo and click the share button to add it to a new or existing Shared Album.
You have a few handy ways to add photos to a Shared Album that you create.
- Select a photo, and then click the Share button in the toolbar, File > Share from the menu bar, or right-click the photo and go to Share. Choose Shared Albums and pick the album from the list.
- Drag and drop photos and videos from the Photos window into the album in the sidebar.
- Open the album by selecting it in the sidebar on the left. At the top, click Add photos and videos. Select the ones you want to add and click Add when you finish.
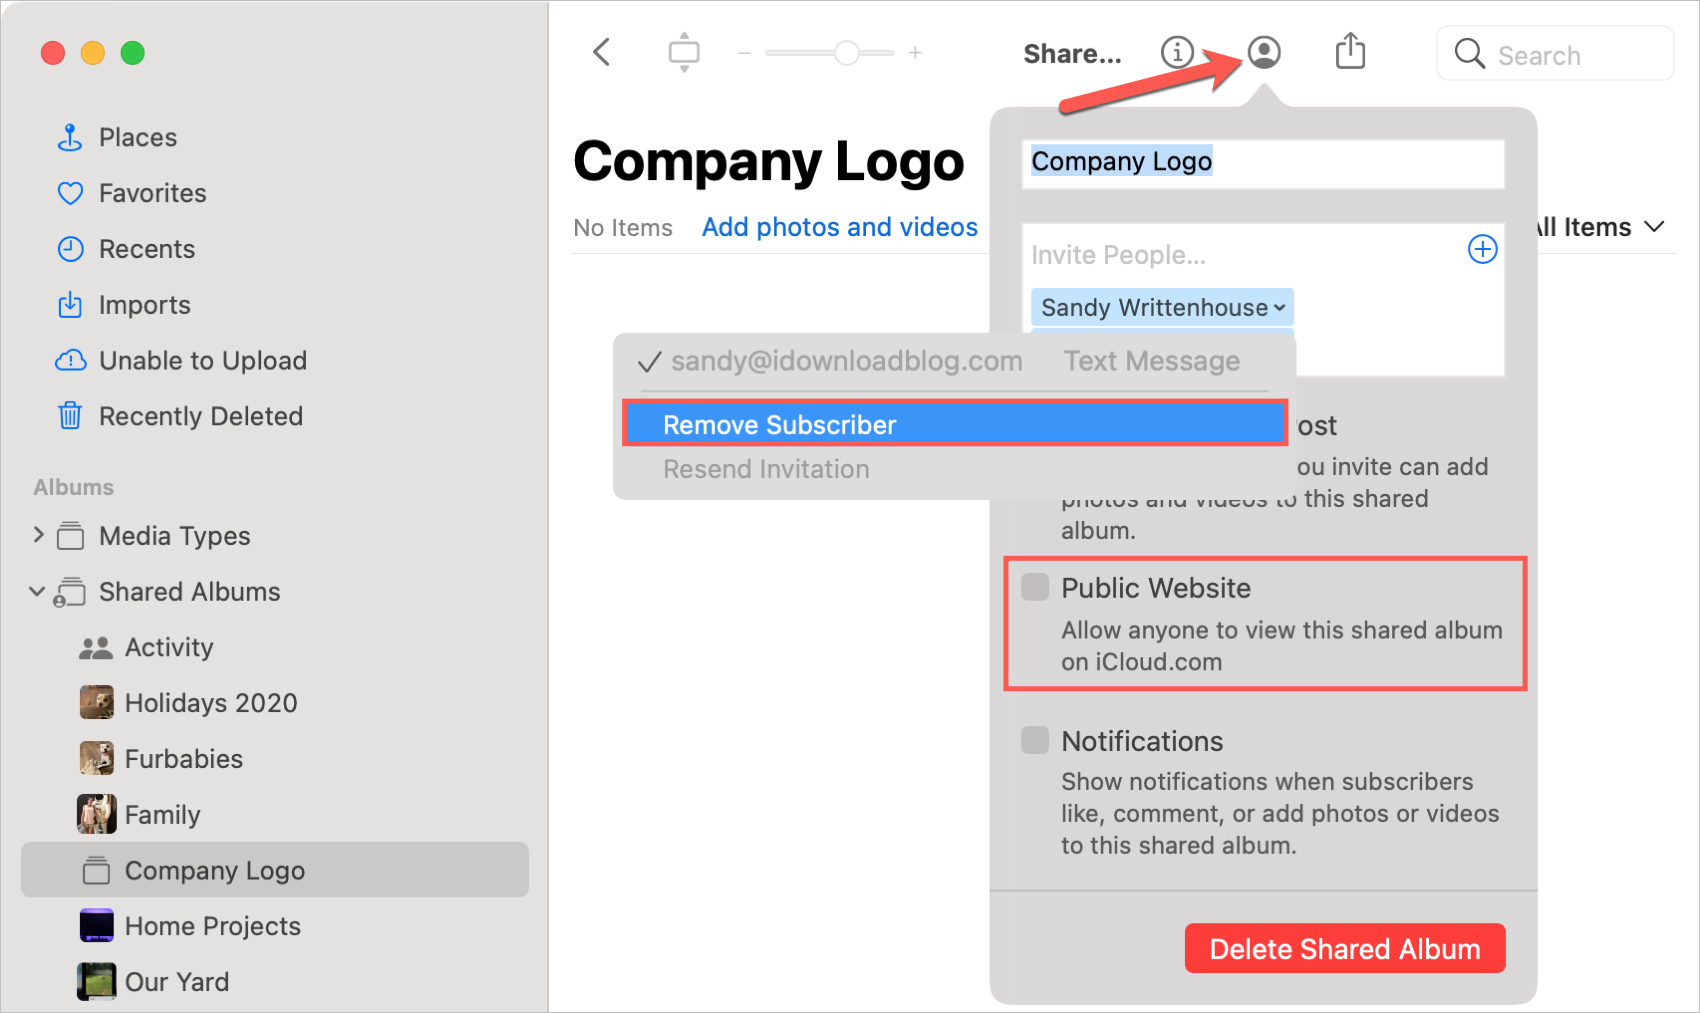
You can invite more people to your Shared Album, remove them, or make it public so anyone can view it. You can also enable others to add photos to the album and receive notifications when they do. And, of course, you can delete a Shared Album if you need to. All of this can be done in one spot in Photos on Mac.
Open the album by selecting it in the sidebar and clicking the People button in the toolbar.
You’ll see all of these options in one convenient spot. While there, you can also change the name of the album if you like.
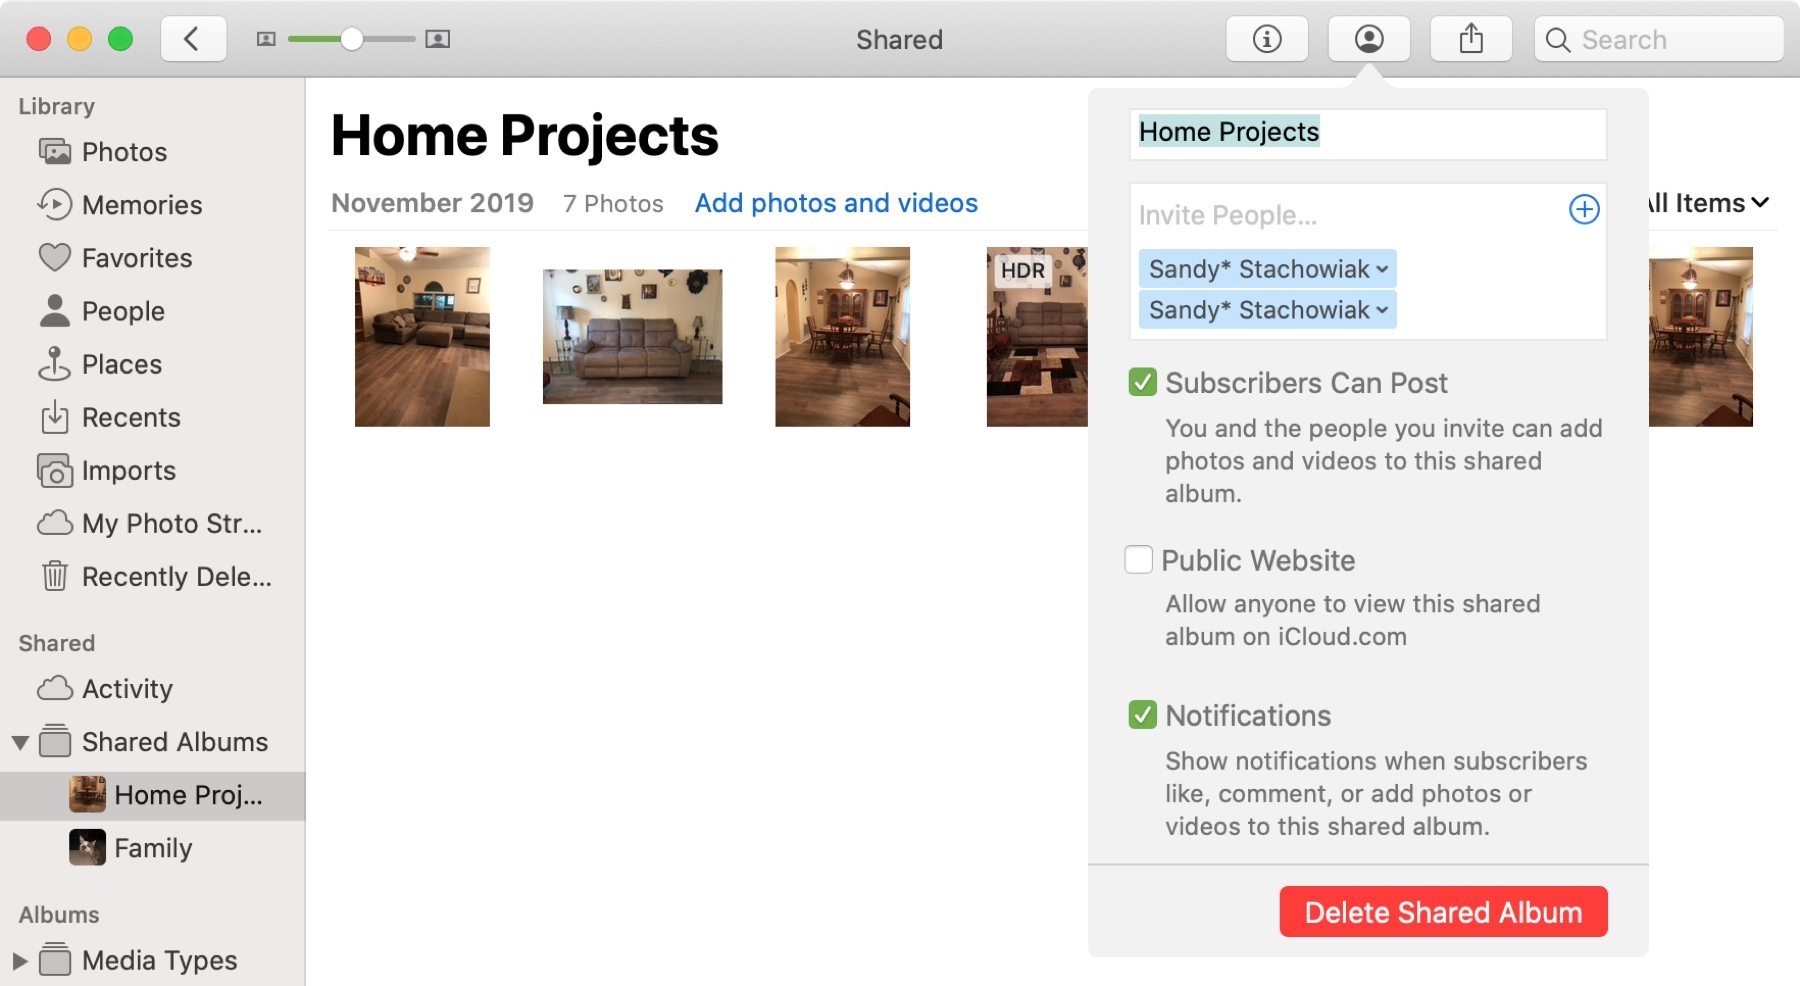
If you want to stop sharing an album with a person, click their name and then choose Remove Subscriber.
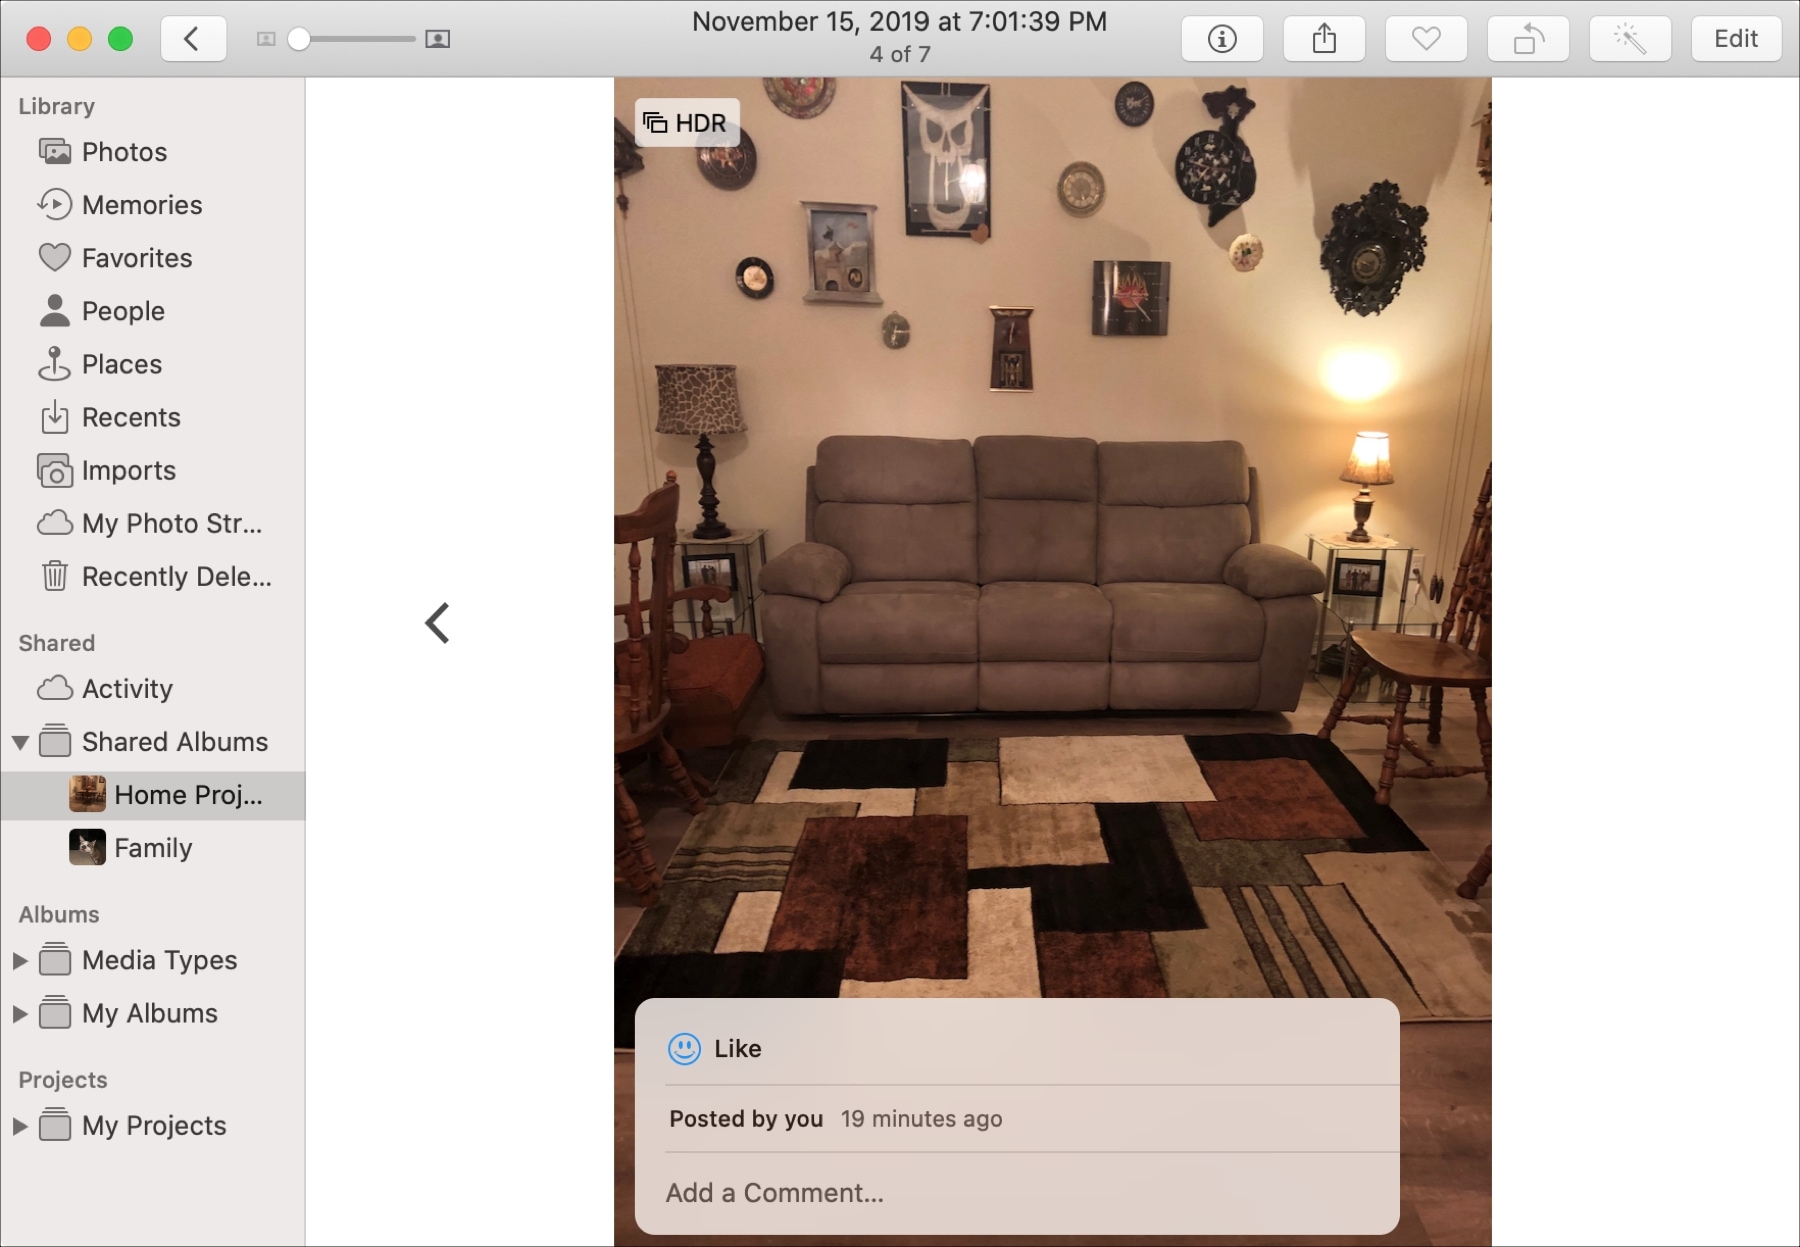
You and others you invite can click to Like or make a Comment on a photo that’s in a Shared Album. To do this yourself, open the album and double-click on a photo.
At the bottom of the picture, you’ll see a speech bubble. Go ahead and click it.
Next, click Like to like it or Add a Comment to type a note.
To remove a photo from a Shared Album, simply right-click and pick Delete from Shared Album. You’ll then need to confirm this action by clicking Delete.
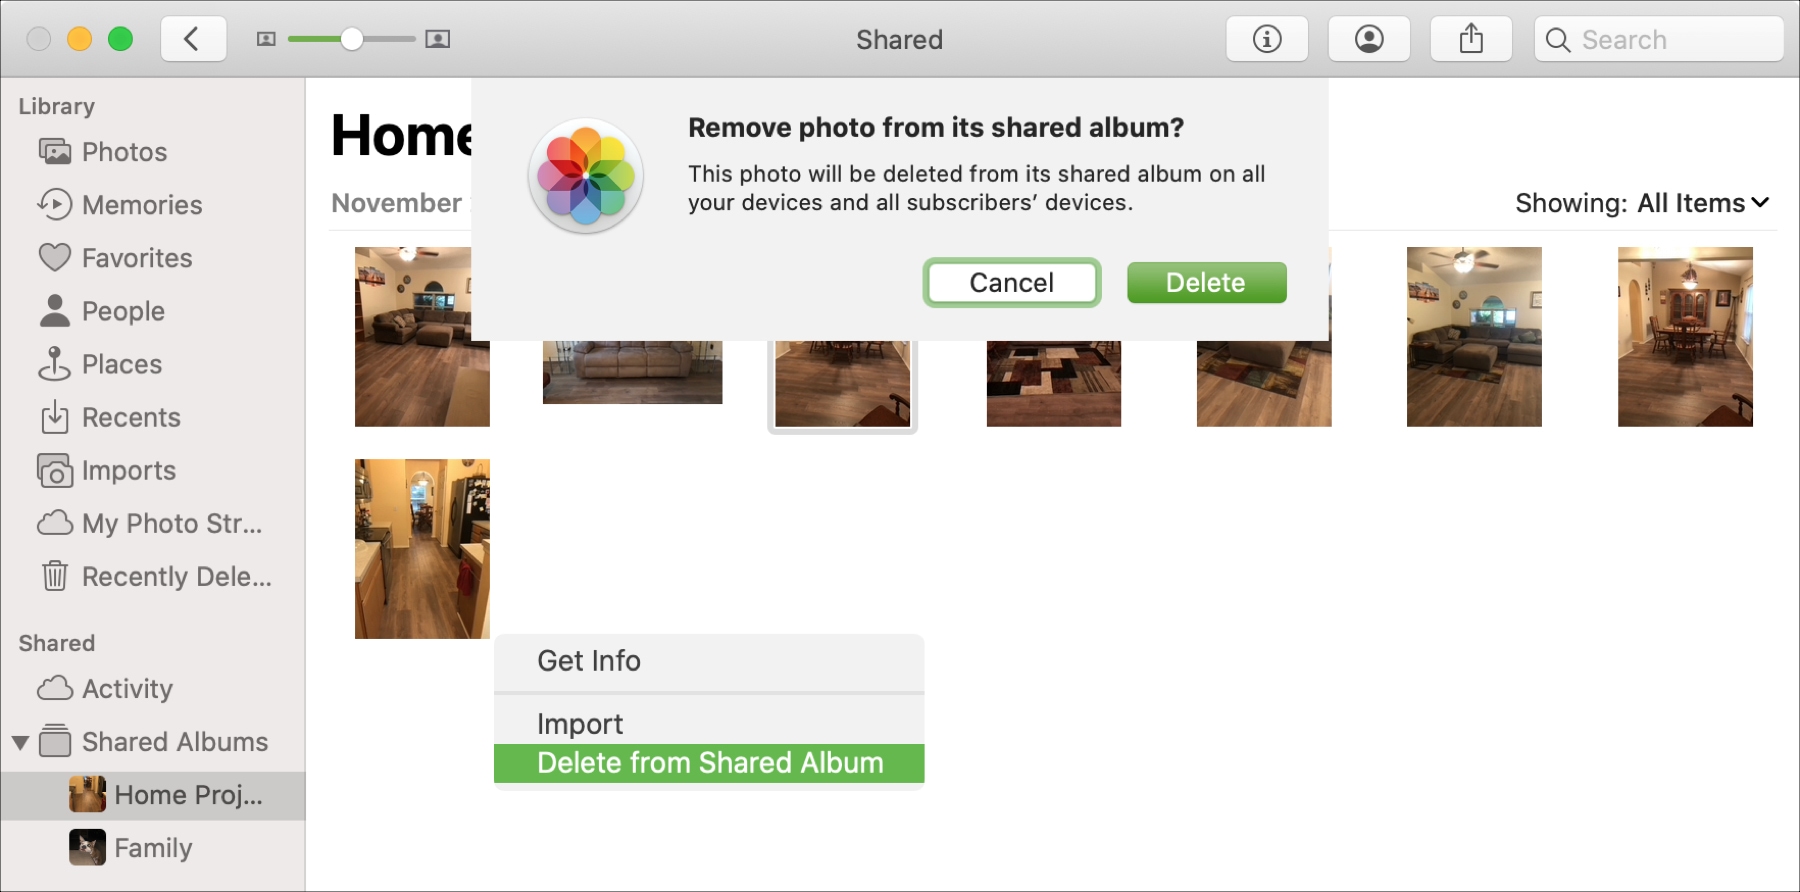
Deleting a photo from a Shared Album only removes the photo from the album. It does not delete the photo completely.
Check out next: How to quickly share iPhone photos with a link