Learn how to create, edit, and delete Smart Mailbox and Smart Mailbox folders in the Apple Mail app on Mac to collect and better organize your emails.
When it comes to organizing your inbox in the Apple Mail app on Mac, you definitely have options. One is to set up rules that let you do almost anything with your emails, from moving to flagging to forwarding to deleting. But there’s another option, Smart Mailboxes.
Smart Mailboxes are similar to rules in that you set up conditions for incoming messages to fall into a specific mailbox. What makes this feature nice is that you don’t have to head to specific folders for the emails you need. Plus, messages remain in their original inbox but are collected in another mailbox for quick access.
If you’re new to Smart Mailboxes in Mail on Mac, this tutorial walks you through how to use them.
Create a Smart Mailbox in the Mail app
Creating one is easy. Let’s use an example. Say you’re starting a special project for your company and will be working with a certain team of people. You want all of the emails in one mailbox. Just follow these steps to create a Smart Mailbox that collects all emails from your team members in one spot.
1) Open the Mail app and click Mailbox > New Smart Mailbox from the top menu bar.

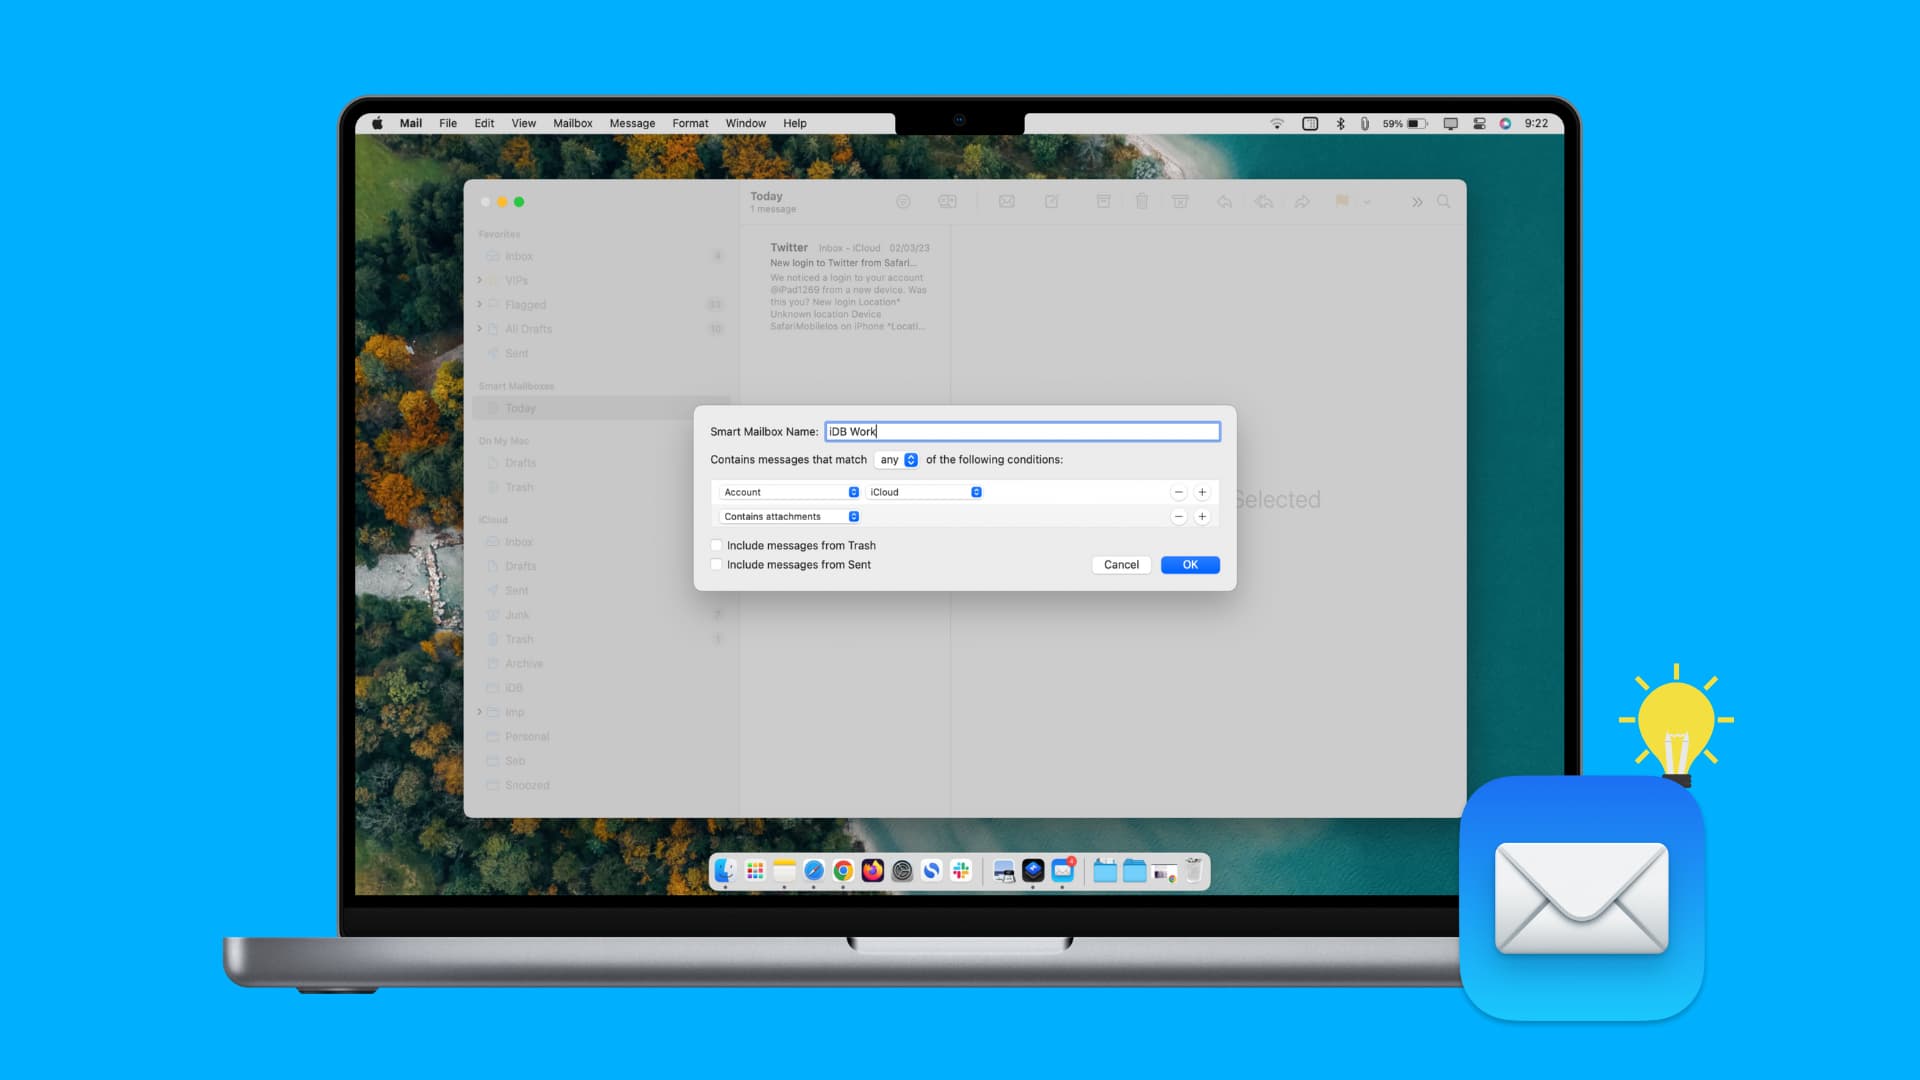
2) You’ll then get a pop-up window for you to enter the details for your Smart Mailbox. Start by giving it a name.
3) Next, select either Any or All in the drop-down box for “Contains messages that match (any or all) of the following conditions.” If you have more than one condition, any means that any condition can apply for the message to be included. Whereas all means that all conditions must apply for the email to be included.
4) Now, set up your conditions. In the first drop-down box, pick how the email should be recognized. You have many options, like subject, message is flagged, or contains attachments, etc.
5) The second drop-down box will have options depending on what you choose in the first drop-down. So, make your selection and enter any text next to it if needed.
We’re going to use “Sender is a member of group” in the first box. This lets us pick the project team we’ve set up in our Contacts list in the second box. So, any emails from iDB group will go into our Smart Mailbox.
6) Optionally, you can check the boxes for Include messages from Trash and Sent if you like.
7) If you’re finished, you can click OK, and you’re ready to go. If you’d like to add more conditions, click the plus sign and follow the previous steps to add your criteria.

Edit or Delete a Smart Mailbox
After creating your Smart Mailbox, you may discover that you’d like to make a change. Maybe you want to add more conditions or remove one. Or, maybe your project is over, and you no longer need the mailbox.
To edit or delete a Smart Mailbox, do one of the following:
- Right-click on the Smart Mailbox in the Mail sidebar and pick Edit or Delete Mailbox.
- Select the Smart Mailbox and click Mailbox > Edit or Delete (Smart) Mailbox from the top menu bar.

If you decide to edit the mailbox, you’ll see the same pop-up box for the Smart Mailbox that you did when you created it. Make your changes and click OK when you finish.
If you decide to delete the mailbox, you’ll receive a pop-up confirming the action. Click Delete to remove the mailbox.
Use Smart Mailbox folders
The Mail app allows you to create Smart Mailbox folders to further organize your Smart Mailboxes. Using our Project X example from above, let’s say you created additional Smart Mailboxes for Project Y and Project Z. You can create a Smart Mailbox folder to hold all three of those mailboxes for a cleaner sidebar view.
1) Click Mailbox > New Smart Mailbox Folder from the menu bar.

2) Give the folder a name and click OK.

3) In the Mail sidebar, click and drag the Smart Mailboxes that you want to move into the folder. Now you’ve a nice and neat Mail sidebar with an expandable folder for your related Smart Mailboxes.

Notes on Smart Mailboxes
- Emails that enter your Smart Mailbox will still remain in their originating inbox.
- If you take an action on an email in your Smart Mailbox, that action will apply to that message in its originating inbox.
- If you use iCloud Drive, Smart Mailboxes are available on your other Macs.
Check out next: Tips for the Mail app on your iPhone, iPad, and Mac