Find out how to clear the DNS cache on your iPhone, iPad, Mac, Google Chrome, Firefox, and Opera to speed up your web browsing experience and troubleshoot related issues.

Is stale DNS cache making your web browsing experience excruciatingly slow? If so, you may have thought about speeding things up by switching to an alternate domain name server on your device. In that case, you’ll need to clear the DNS cache on your device.
The problem
If you can’t connect to some websites, a web page won’t load at all, or your network slows down randomly for no apparent reason, chances are your device’s DNS cache has become corrupted due to technical glitches, administrative accidents, etc.
Aside from other reasons, the DNS cache may become polluted when unauthorized domain names or IP addresses are inserted via a network attack or malware/virus.
But worry not; resetting the DNS cache should help resolve those problems.
What is a DNS cache?
DNS or Domain Name System, has been the staple of the Internet’s functionality since 1985.
In short, DNS is a decentralized naming system for devices connected to the Internet or a private network (VPN). The system assigns domain names to each of the devices while translating human-readable domain names like iDownloadBlog.com to the numerical IP addresses that identify services and devices with the underlying network protocols.
A DNS cache, also known as a DNS resolver cache, is a temporary database, a phone book of sorts, which helps speed up DNS lookups by storing records of all the recent network requests. Rather than having to memorize numerical IP addresses for your favorite websites, your device can tap into a cached table of recent DNS lookups to know how to load a web resource.
In other words, a DNS cache is just a memory of recent DNS lookups that your computer can quickly refer to when it’s trying to figure out how to load a website. A DNS cache is maintained by the operating system, but some browsers may keep their own DNS cache.
All caches can become corrupt over time, and that’s especially true with DNS caches. A corrupt DNS cache may lead to intermittent problems with loading websites. Therefore, clearing the DNS cache so it doesn’t hold invalid items is usually the best way to solve any such woes.
It is very important to stress that clearing the DNS cache won’t remove your browsing history, website data, saved passwords, or other temporary Internet files that get saved to your device to speed up web page load times.
When and why should you clear DNS caches?
Here are a few common scenarios in which clearing the DNS cache may help.
Prevent DNS hijacking: This practice subverts the resolution of DNS queries, which can be achieved via malware or by modifying the behavior of a trusted DNS server to the point it no longer complies with Internet standards. Flushing your DNS cache minimizes the risk of DNS hijacking, which is a significant problem in China.
Resolve page-loading problems: Starting fresh is the best way of addressing situations when some websites won’t load or web pages load slowly.
Server entries have changed: If an entry on the web server is changed or a new entry is added, you might need to flush the DNS cache immediately to prevent interruptions. Keep in mind that if you’re waiting for server-side DNS changes to propagate, adjusting your device’s DNS settings may not have the desired effect before the changes have carried over between servers around the world.
Using Google DNS or Open DNS servers: Before setting your device to use Google DNS or Open DNS servers as its DNS, which speeds up web browsing when on Wi-Fi, you’re advised to flush out the DHCP assignments by clearing out DNS caches.
Enforce network settings change: If you’ve made changes to your device’s network settings, like adding a custom DNS as part of your VPN service, clearing out the DNS cache will make these changes take effect immediately without any further action.
Protect from malware: A computer virus or malware may change your DNS settings in the background or fool you into changing them manually in order to redirect you to a page full of ads or a phishing page that mimics a legitimate website. Clearing out the DNS cache deletes all the entries, including invalid or rogue records.
Even if you’re not having any problems loading web pages whatsoever, clearing out a stale DNS cache won’t just make your web browsing experience hassle-free but will also clean up the valuable storage space in your device.
Your router also has a DNS cache, meaning that any DNS troubleshooting steps should include flushing the DNS cache on both the computer and the router.
Clear DNS cache on iPhone and iPad
On iOS, you have three different ways of clearing the DNS cache. Firstly, you can toggle Airplane Mode on and then back off, which has the side effect of flushing the DNS cache. Secondly, you can simply reboot your device to achieve the same effect as the Airplane Mode method. And thirdly, dumping your network settings will also do the trick.
Use Airplane Mode
Toggling Airplane Mode is the quickest way to flush your DNS cache because doing so instantly turns off the wireless features on your device and shuts down cellular radios so that you comply with airline regulations. If you need to clear DNS caches multiple times a day, this is the method you’ll want to use (it works with cellular iPads as well).
Go to iOS Control Center or the Settings app to turn Airplane Mode on or off.

Reboot your iPhone or iPad
Restarting your device is another quick and easy way to flush the DNS cache. So do that using physical buttons or one of the other methods mentioned here.

Note: Concerned about DNS hijacking? If so, this isn’t the safest method of flushing the DNS cache because the hijacking may occur immediately after the device reboots, before you even have the chance to connect to a VPN.
Network settings dump
Clearing the network settings on your device will also flush the system’s DNS cache. Go to iPhone or iPad Settings > General > Transfer or Reset > Reset > Reset Network Settings. Type in your passcode, if asked, then confirm that you want to clear out all network settings and return them to factory defaults.
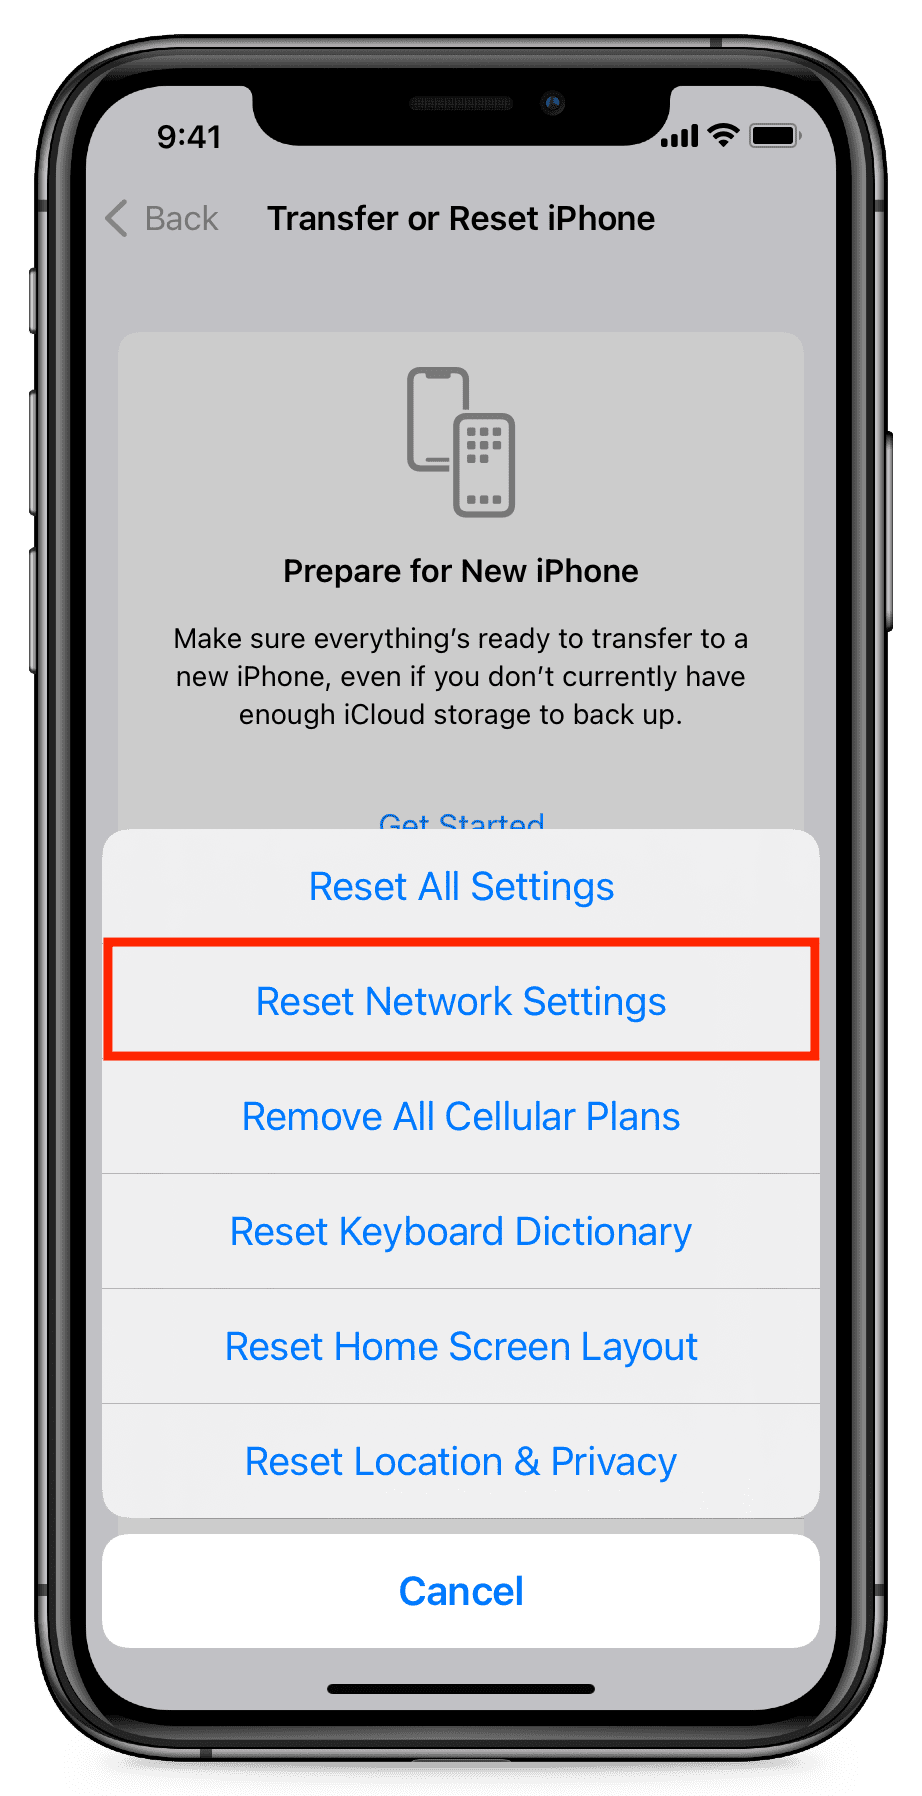
This may not be the best method because resetting your network settings won’t just restart the device (which clears the caches anyway) but also clear passwords for all the Wi-Fi networks you’ve joined. Worse, cellular data settings from your wireless provider will be cleared out, too, and all your other network settings will be lost, so you’ll need to set them up again.
Clear DNS caches on your Mac
On macOS, the flushing of DNS caches is performed through Terminal commands that have changed over the years, but don’t you worry a thing, as iDownloadBlog has you covered.
1) Open Terminal on your Mac.
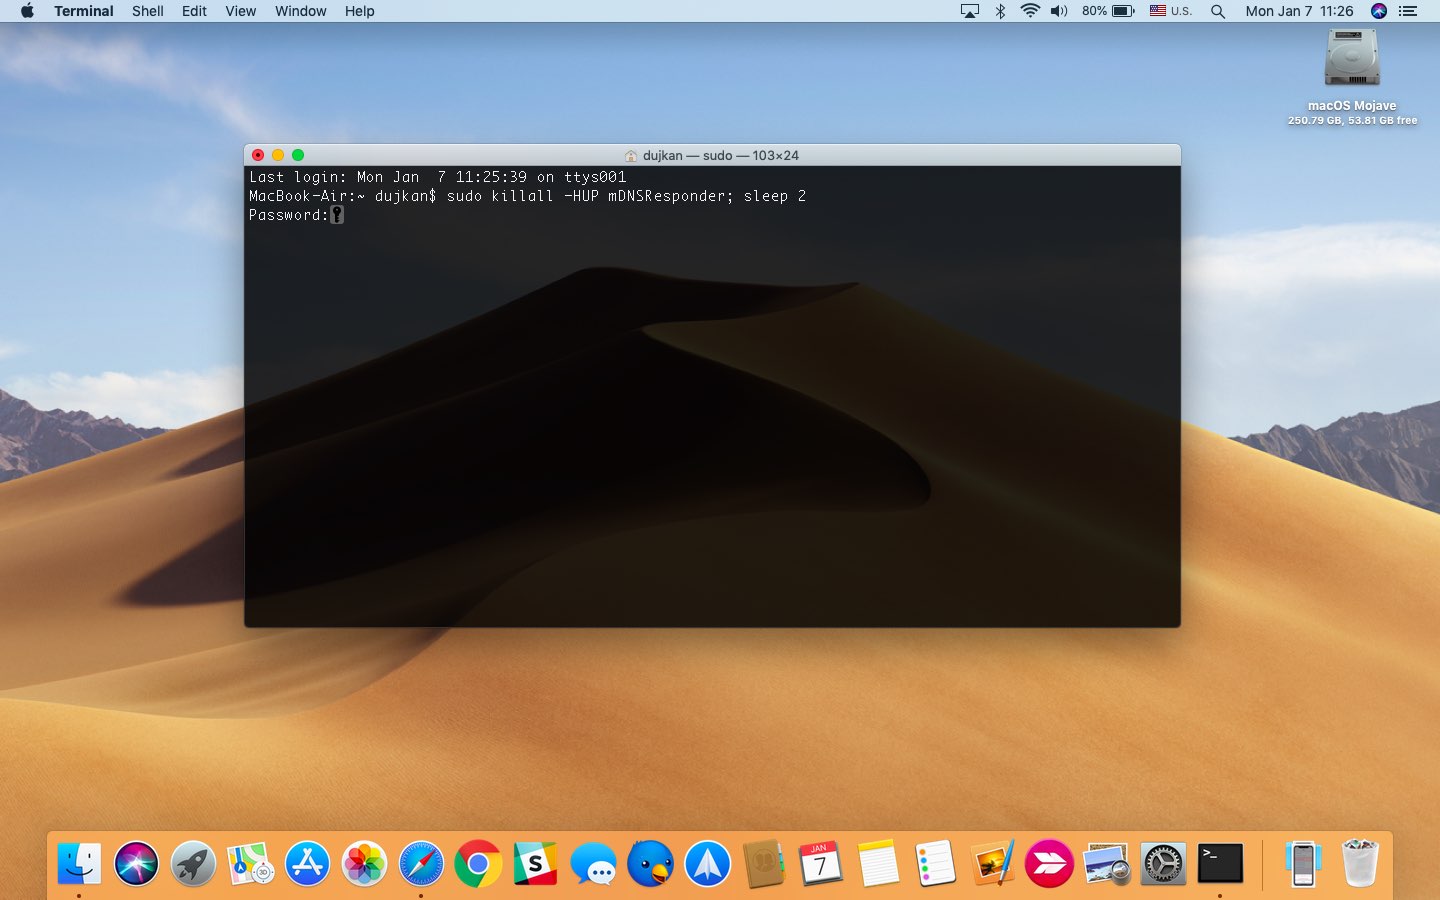
2) Type the command corresponding to your Mac operating system version, then press Enter.
- macOS Monterey or later
sudo dscacheutil -flushcache; sudo killall -HUP mDNSResponder
- macOS Sierra, High Sierra, Mojave, and Catalina (10.12, 10.13, 10.14, and 10.15)
sudo killall -HUP mDNSResponder; sleep 2
- OS X Yosemite 10.10.4+ and El Capitan (10.11)
sudo dscacheutil -flushcache; sudo killall -HUP mDNSResponder
- OS X Yosemite (10.10.0-10.10.3)
sudo discoveryutil mdnsflushcache; sudo discoveryutil udnsflushcaches
- OS X Mavericks (10.9)
dscacheutil -flushcache; sudo killall -HUP mDNSResponder
- OS X Lion and Mountain Lion (10.7 and 10.8)
sudo killall -HUP mDNSResponder
- OS X Leopard and Snow Leopard (10.5 and 10.6)
sudo dscacheutil -flushcache
If, for some reason, the Terminal command for macOS Sierra and newer won’t work properly, feel free to use the following syntax instead:
sudo killall -HUP mDNSResponder; sudo killall mDNSResponderHelper; sudo dscacheutil -flushcache
You’ll need administrative privileges to execute these commands.
Bonus: Mac-cleaning software
If all of the above sounds too complicated, especially the Terminal method, consider a third-party solution such as MacPaw’s CleanMyMac, which is a much simpler alternative to clearing your DNS caches that works on all versions of the Mac operating system.

Clear DNS caches in popular browsers
In addition to the system’s own DNS cache, most browsers (barring Internet Explorer) also keep a cached copy of the DNS records. This internal browser DNS cache may get corrupt over time and slow down lookups. Your browser automatically clears its cache when it’s restarted, but you can also do it manually without having to reopen the app.
Safari
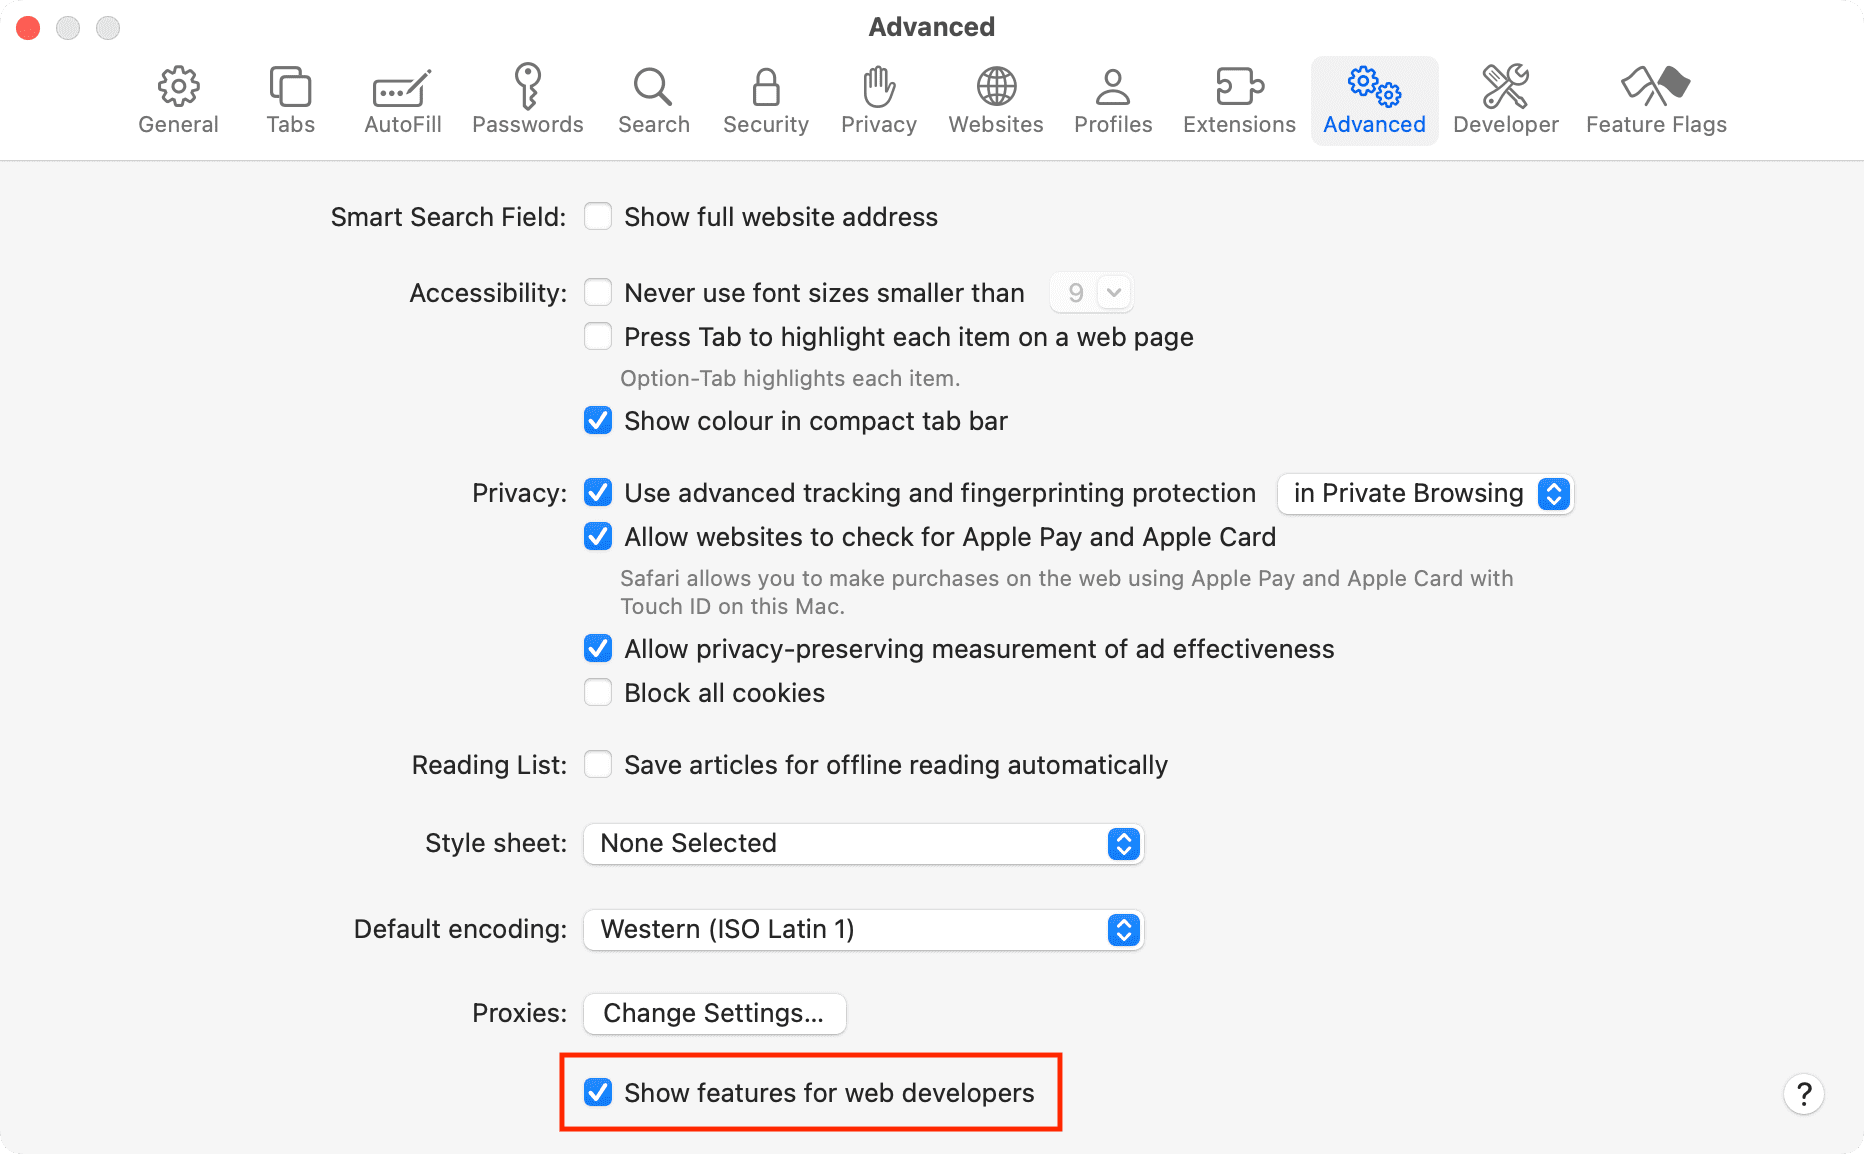
1) Launch Safari on your Mac and enable its hidden Developer menu by going to its app settings.
2) Click the Develop menu, then choose the Empty Caches or Empty Caches for All Profiles option.
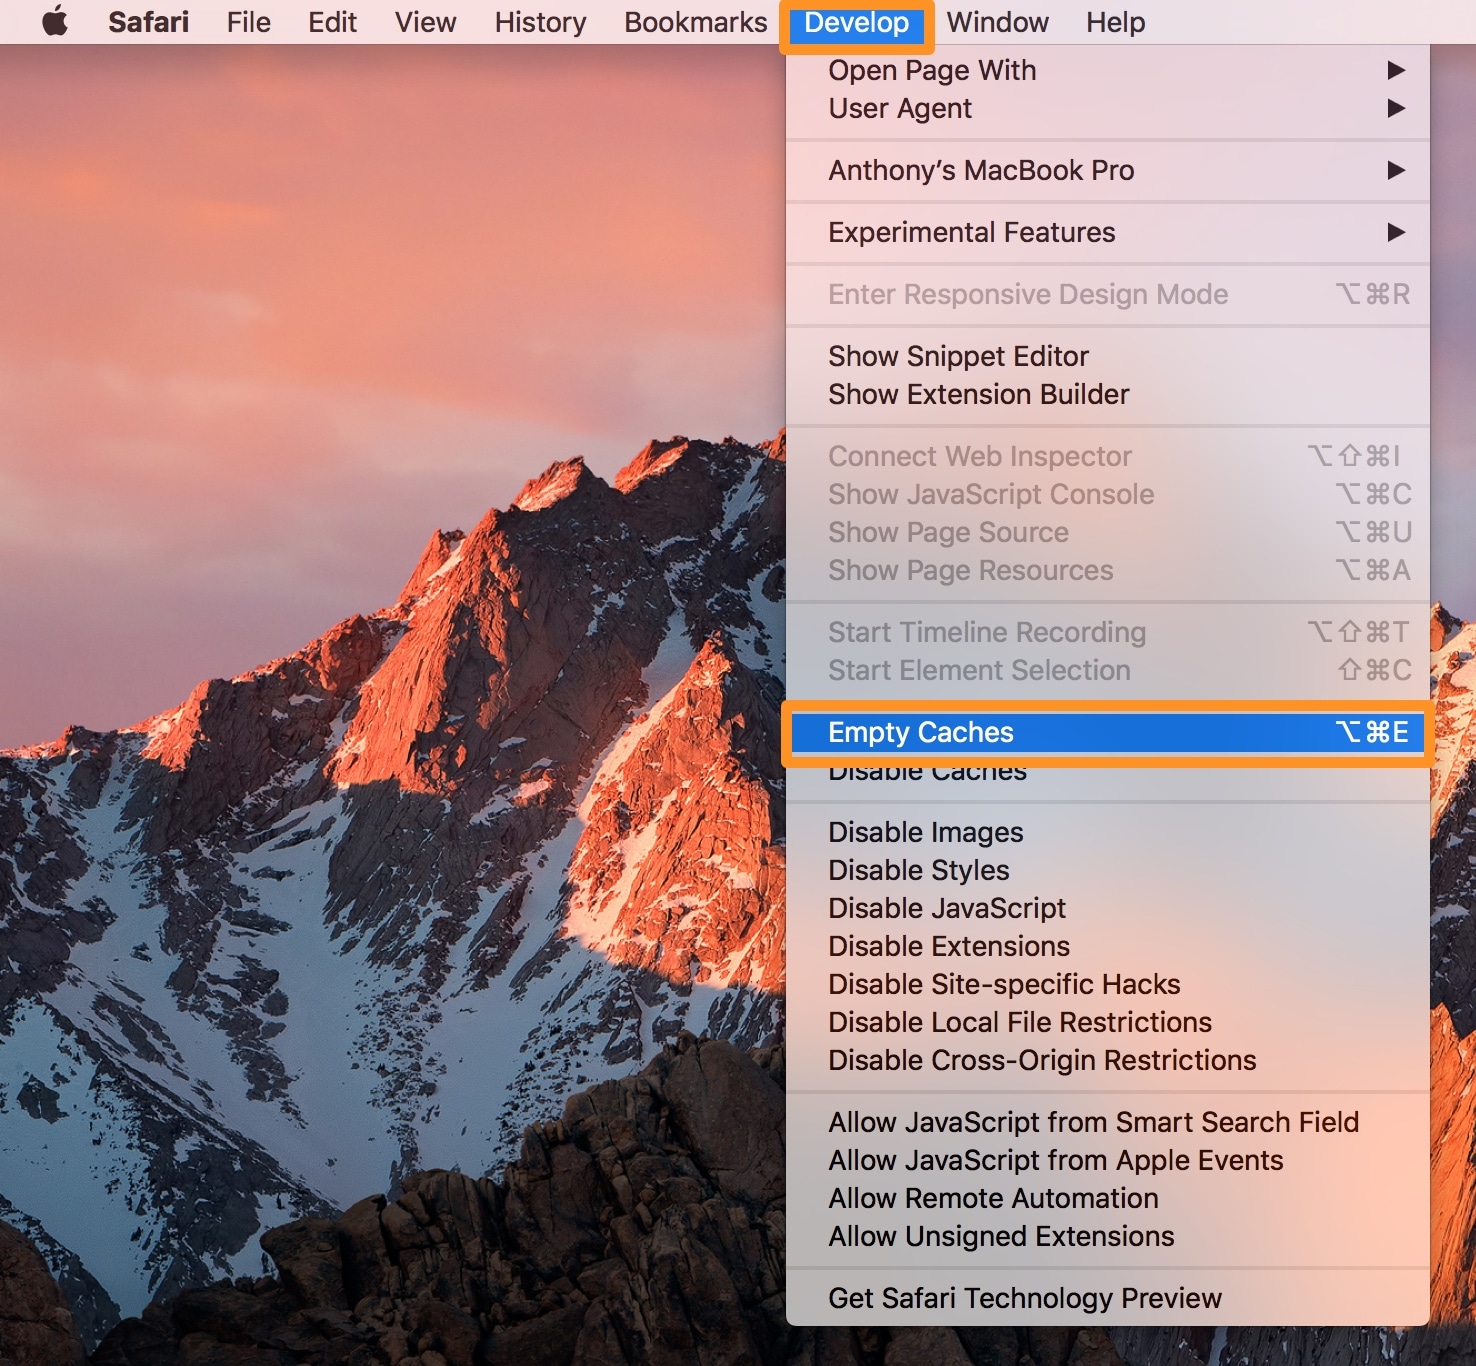
3) After clearing your browsing cache, be sure to quit and re-launch Safari for the best results.
Chrome
1) Launch Chrome on your Mac
2) Type chrome://net-internals/#dns in the address bar, then press Enter.
3) You’ll be taken to the DNS section of Chrome’s internal settings page. Click DNS in the left-hand column (if not already selected), then click the button labeled Clear host cache to flush the DNS cache.
4) Open a new tab, then type in the address chrome://net-internals/#sockets and press Enter.
5) You’ll be taken to the section of Chrome’s internal settings page for cached socket pools. Click Sockets in the left-hand column, then click the button labeled Flush socket pools.
Now, quit and reopen Chrome for the changes to take effect.

Opera
1) Launch Opera on your Mac
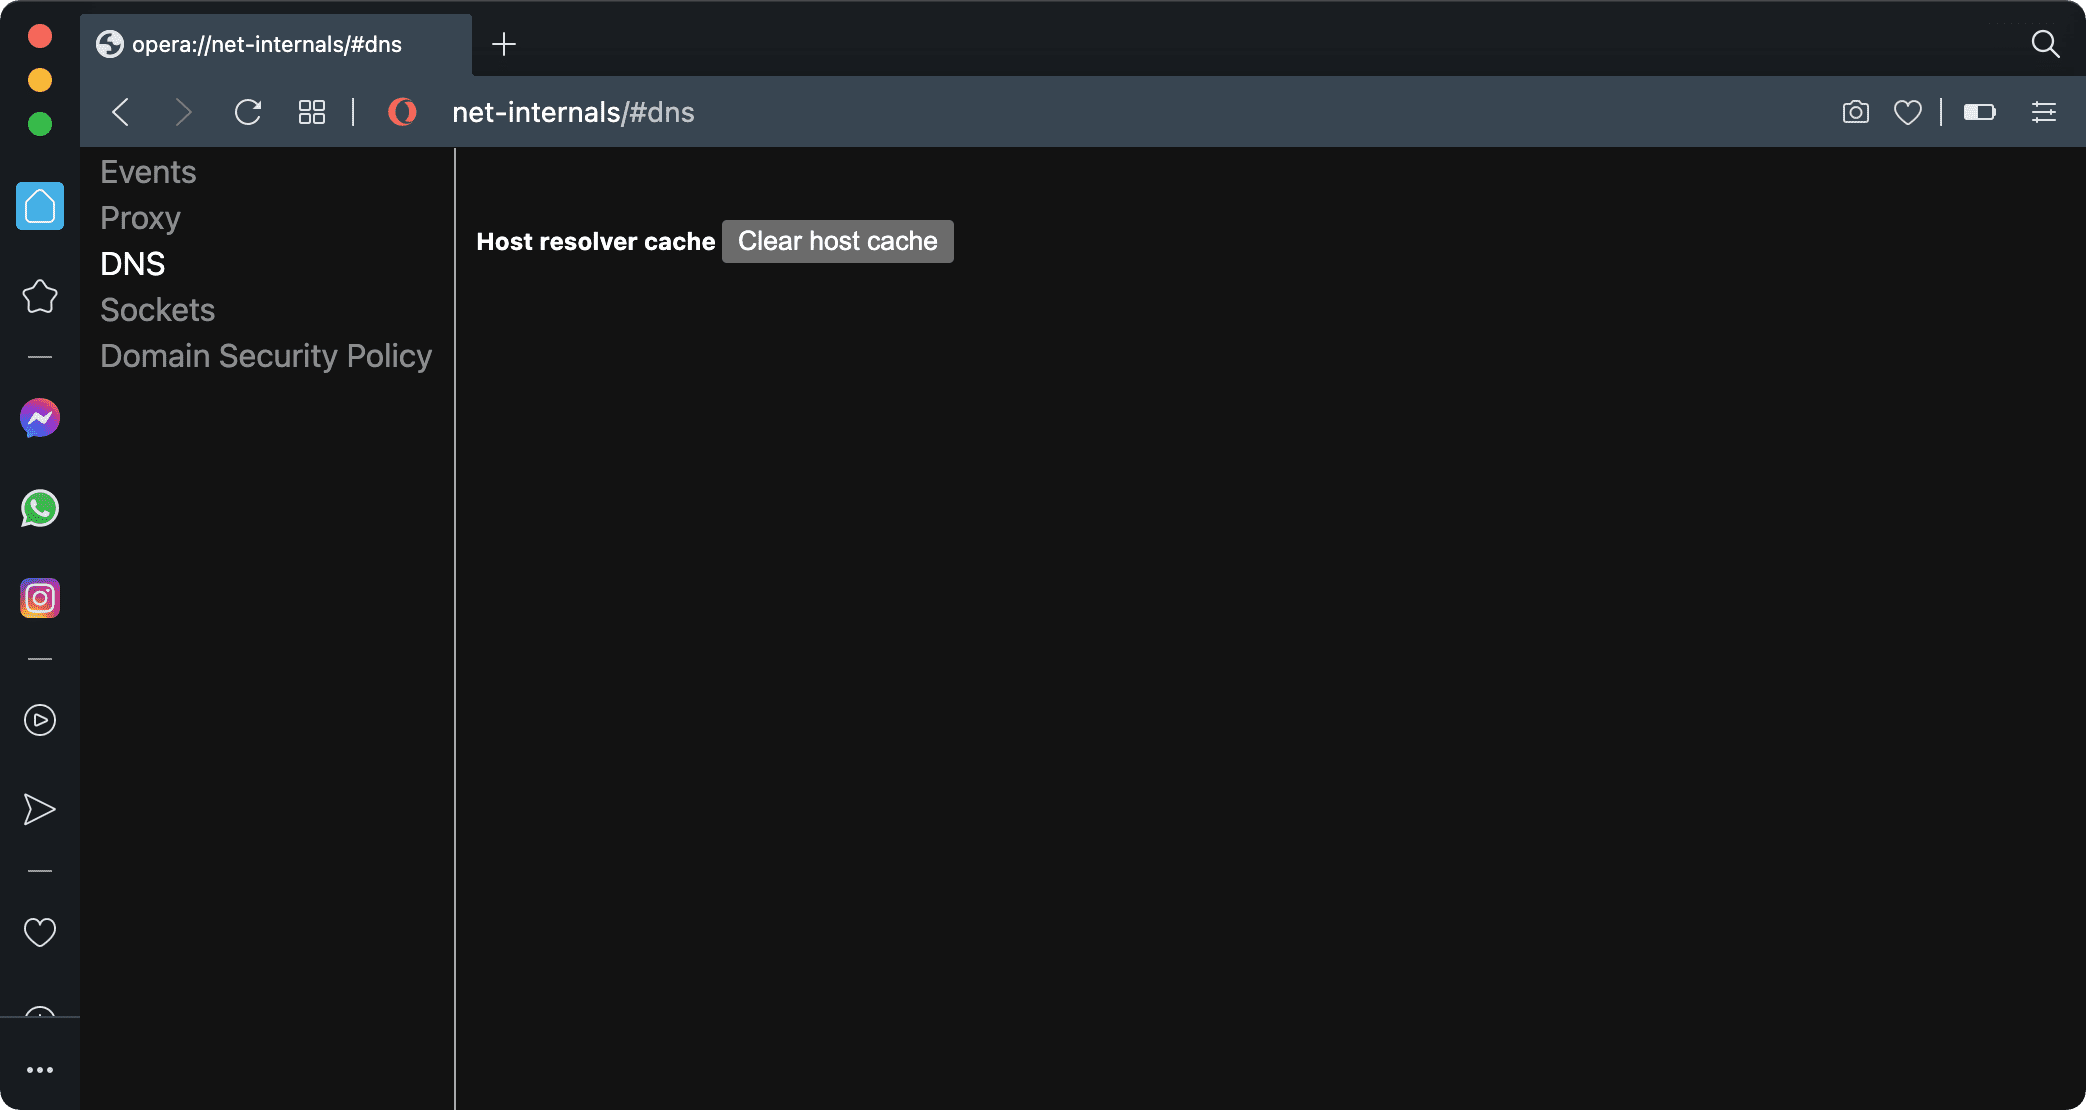
2) Type opera://net-internals/#dns in the address bar, then press Enter.
3) You’ll be taken to the DNS section of Opera’s internal settings page. Click the button labeled Clear host cache to flush the DNS cache.
4) Open a new tab, then type in the address opera://net-internals/#sockets and press Enter.
5) You’ll be taken to the section of Opera’s internal settings page for cached socket pools. Now, click the button labeled Flush socket pools.
Now, restart Opera for the best results.
Firefox
1) Launch Firefox on your Mac.
2) In the address bar, type about:config and press the enter key.
3) Click Accept the Risk and Continue on a warning page.
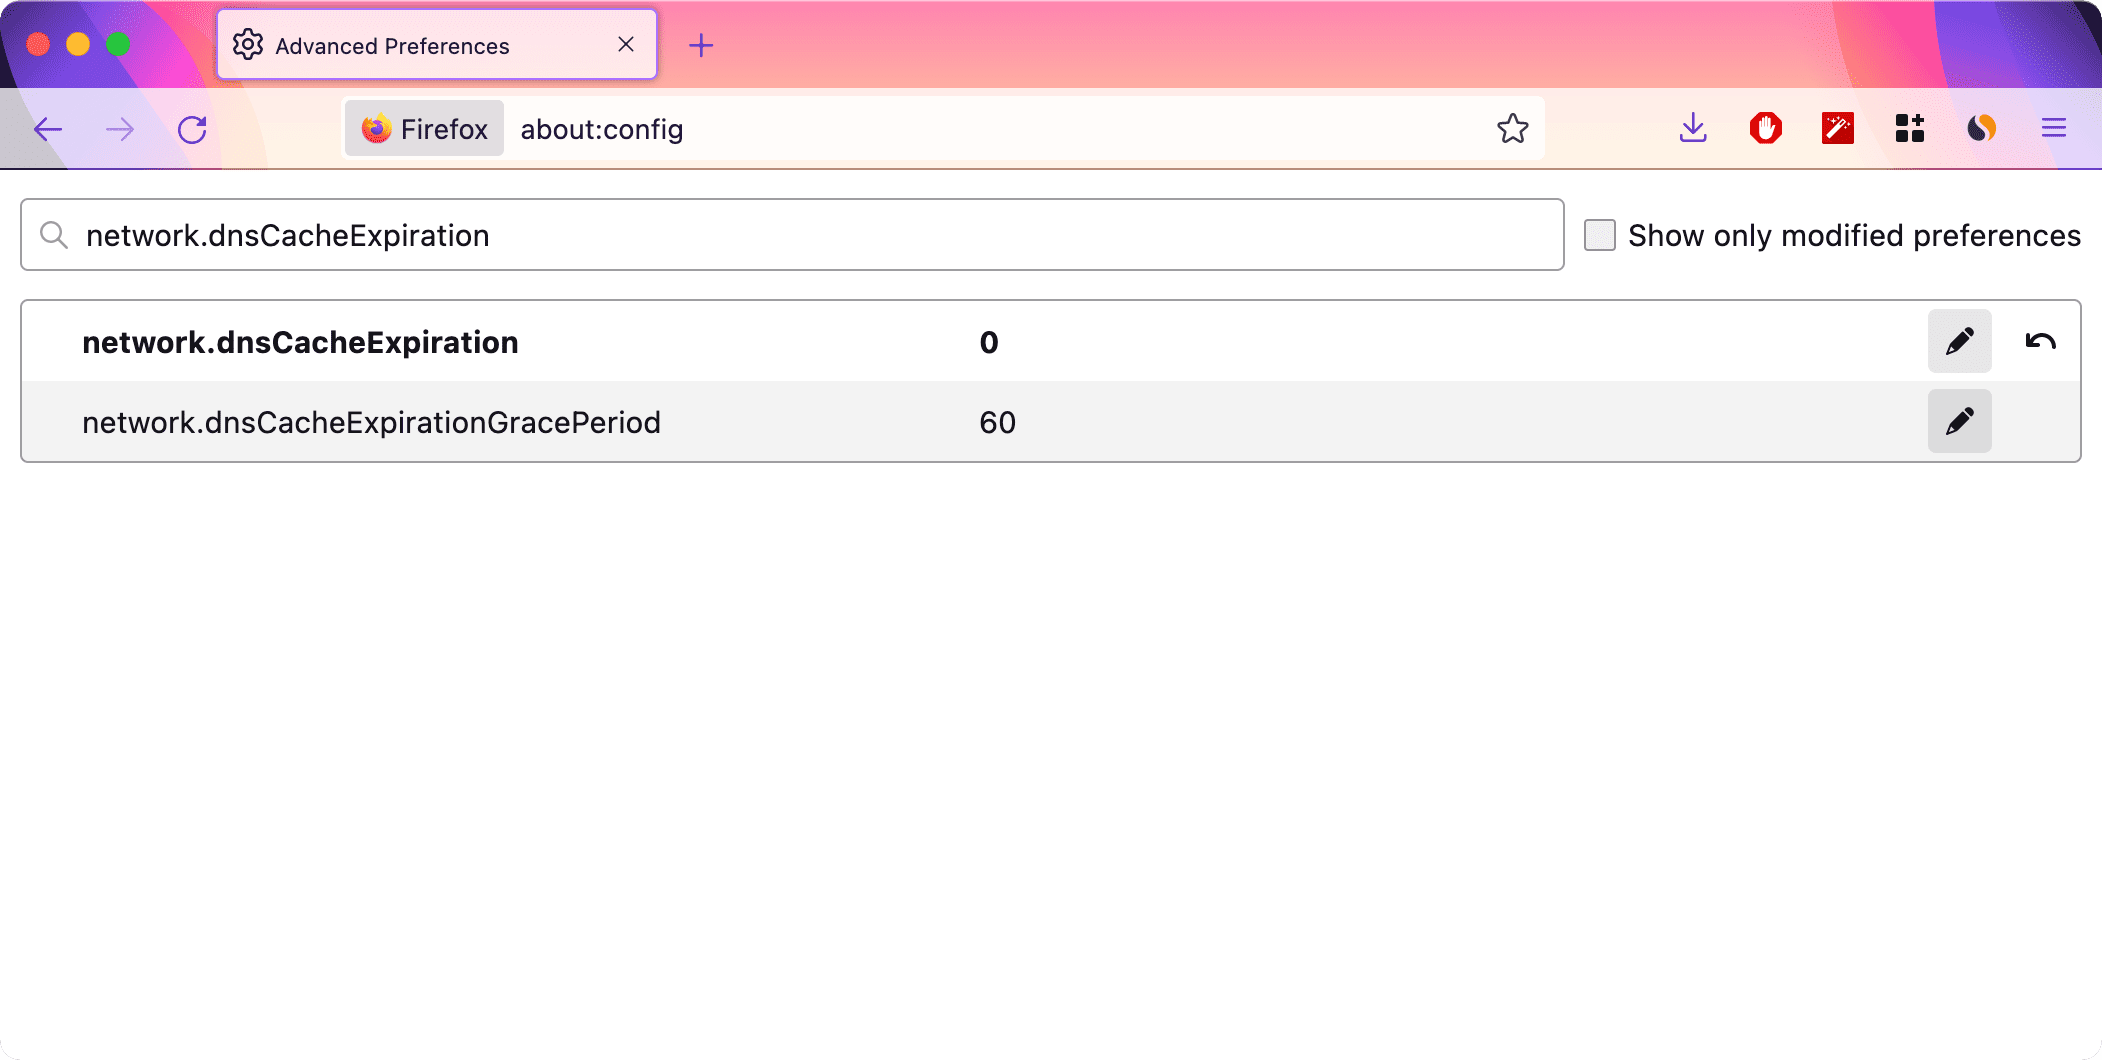
4) Use the search field at the top to search for “network.dnsCacheExpiration”.
5) Your search should return two variables, named “network.dnsCacheExpiration“ and “network.dnsCacheExpirationGracePeriod”. Double-click on each variable’s value part so you can edit it, then change the value from the default 60 to 0, which will prompt Firefox to immediately clear out its DNS cache.
6) After doing this, set both variables back to 60.
Restart Firefox to finish the process.
Also, check out: How to clear system, app, and browser cache on Mac