Learn how to use tables in the Apple Notes app on your iPhone, iPad, and Mac to present information more clearly in a structured format.

The built-in Notes app on iOS and macOS lets you create tables, which comes in handy when paragraphs and lists just don’t cut it. If you haven’t used the table feature yet, the basics here will help you get started.
Using tables in the Apple Notes app on iPhone and iPad
You can add, format, and customize the table to suit your needs.
Add a table
- Open the Notes app and create a new note or open an existing one.
- Tap the table icon in the toolbar above the on-screen keyboard, and it will populate a basic empty table with two rows and two columns. You can then start typing your data in the cells.

The table feature doesn’t stop there, though. You can manage rows and columns, rearrange cells, and apply formatting.
Add or delete rows or columns
- Tap a cell in the table.
- Tap the three dots icon (handle) corresponding to the row or column where you want to add or delete one. This will highlight the row or column in a yellow outline.
- Tap the three dots icon again, and a menu will pop out, from which you can choose Add Row/Column or Delete Row/Column.

Select multiple cells in a table
- Tap inside one of the cells, then tap its three dots icon to highlight that row or column.
- Touch the circle and drag through the rest of the cells to select them. You can do this for all cells in a column, row, or the whole table.

Format the text inside a cell
- Tap inside the cell you want to format, and in the menu, choose Select or Select All.
- Then, tap Format in the thin menu strip.
- Apply bold, italic, underline, or
strikethroughto the selected text.

Format all text in a row or column
- Tap the cell, followed by the three dots icon for that row or column.
- Tap the same three dots icon again until a menu pops out, and select Format.
- Select Bold, Italic, Underline, or Strikethrough to add it to the entire row or column.

Convert the text inside a table to plain text in the note
- Tap inside one of the cells of the table.
- Tap the table button in the toolbar and select Convert to Text in the pop-up menu. Hit the undo icon if you want to restore the table.

Rearrange rows or columns
- Tap the cell in the table for the row or column you want to move. Then, tap the three dots icon until it highlights the entire row or column.
- With the row or column highlighted, touch and hold the three dots icon and drag it to its new spot.

Working with tables in Apple Notes on Mac
Adding, formatting, and managing a table in the macOS Notes app is a bit easier, thanks to the larger display and the use of a keyboard and mouse or trackpad.
Add a table
- Open the Notes app and go to an existing note or create a new one.
- Use the table icon at the top or click Format > Table in the top menu bar. Alternatively, you can just press the Option + Command + T keys.

Add or delete rows or columns
- Click a cell in the table.
- Click the three dots icon corresponding to the row or column where you want to add or delete one.
- Click the down arrow to open the menu and select Add Row Above, Add Row Below, Add Column Before, or Add Column After.

Select multiple cells in a table
- Click inside one of the cells you want in the selection. Then, drag through the rest of the cells using your mouse or trackpad. This will highlight the selected cells. You can do this for all cells in a column, row, or the whole table.
- Alternatively, you can click the three dots icon and then drag the small dot to select the cells.

Format the text inside a cell
- Click inside the cell you want to format and drag through the text or double-click to select it.
- Use the regular keyboard shortcuts like Command + B or Command + I to make the text bold or italic. You can also click the Aa icon in the Notes app toolbar and pick a formatting style, or click the Format button in the top menu bar and choose Font or Text, and make your selection.

Format all text in a row or column
- Click a cell, then click the three dots icon to select a row or column.
- Use the keyboard shortcut like Command + B, hit the Aa icon in the toolbar, or use Format > Font in the top menu bar to format text in the entire row or column.

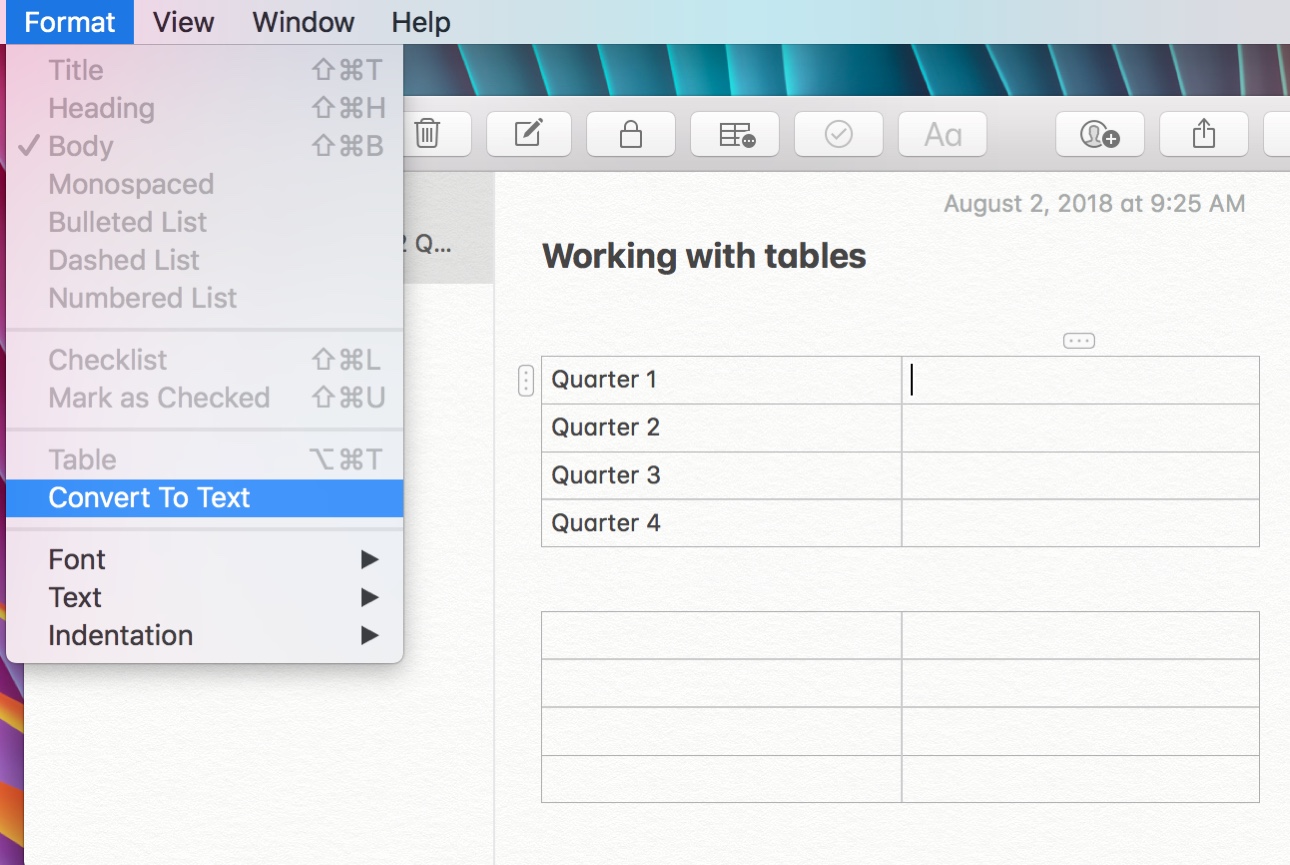
Convert text inside a table to plain text
- Click inside one of the cells of the table.
- Select Format from the menu and click Convert to Text.
Rearrange rows or columns
- Click the first cell in the table for the row or column you want to move.
- Click the tiny three dots icon for that row or column, and it becomes highlighted in yellow.
- Keep the pointer on this three dots icon, and use your mouse or trackpad to drag it to its new location.

There you have it—the basics for creating and working with tables in Apple Notes. Have you tried the table feature yet and found it helpful?
Use tables in other apps: